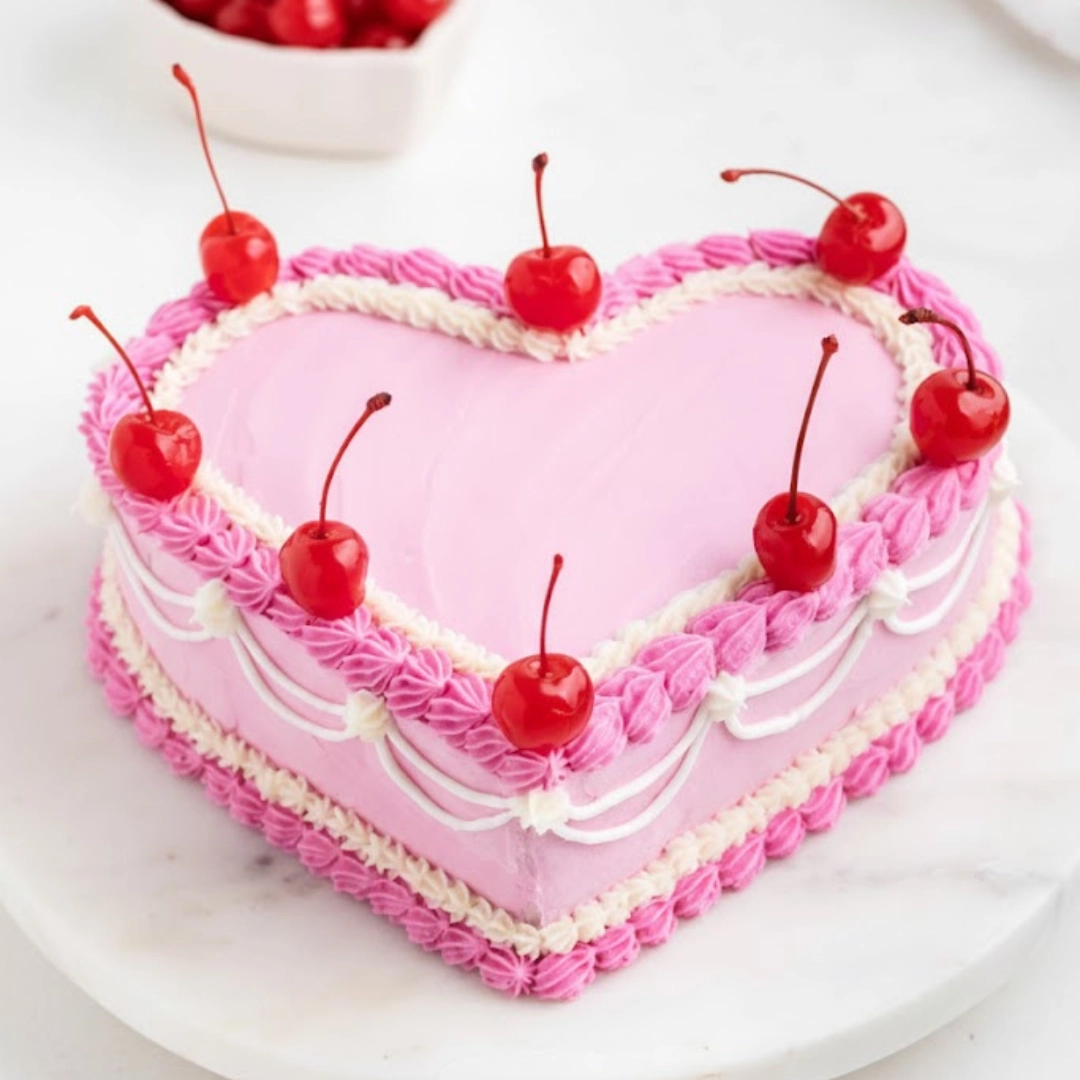
This confection is more than just a dessert; it’s a tangible piece of culinary nostalgia. The Vintage Heart Cake is characterized by its simple, tender crumb, its often-pale, slightly translucent buttercream frosting, and its elegant, piped decorations that feel plucked straight from a 1980s or 90s bakery case. Unlike the towering, highly structured modern layer cakes, this style champions a lower profile and a more homespun, yet meticulous, presentation. It’s the ideal centerpiece for an intimate celebration—be it a birthday, anniversary, or a simple gathering where the focus is truly on sweetness and shared joy. We aim here to recreate that soft, buttery flavor and the satisfying, slightly firm snap of the classic border frosting.
This recipe delivers a moist vanilla layer cake that holds up beautifully to the structured piping that defines the vintage aesthetic. The key to its success lies in careful ingredient temperatures and a buttercream that is whipped to the perfect, pipe-able consistency.
Table of Contents
The Essential Components and Measurements
A successful Vintage Heart Cake relies on precise ratios for both the cake and the Swiss meringue buttercream. Measurements are given in US standard volume, with gram equivalents for the most critical components to ensure accuracy.
For the Vanilla Heart Cake
- Dry Ingredients
- 2 cups (240 grams) all-purpose flour, spooned and leveled
- 1 teaspoon baking powder
- One half teaspoon baking soda
- One half teaspoon fine sea salt
- Wet Ingredients
- 1 cup (226 grams) unsalted butter, softened to room temperature
- One half cup vegetable oil
- 1 and one half cups (300 grams) granulated sugar
- 4 large eggs, at room temperature
- 1 tablespoon pure vanilla extract
- 1 cup buttermilk, shaken and at room temperature
For the Swiss Meringue Buttercream
- Meringue Base
- 5 large egg whites (approximately 150 grams)
- 1 and one fourth cups (250 grams) granulated sugar
- One fourth teaspoon fine sea salt
- Finishing
- 2 cups (452 grams) unsalted butter, cut into cubes and chilled
- 1 teaspoon vanilla extract
- Optional: 1 to 2 tablespoons whole milk or cream, to adjust consistency

Crafting the Cake Layers: A Detailed Walkthrough
This section breaks down the creation of the heart-shaped layers, focusing on technique and the sensory signals that indicate success at each stage.
Step 1: Prepping the Pans and Starting the Creaming
Begin by setting your oven rack to the middle position and preheating it to three hundred fifty Fahrenheit. It is essential to grease two 8-inch heart-shaped cake pans thoroughly, line the bottoms with parchment paper cut to fit the heart shape, and then lightly flour the sides.
In a large mixing bowl, beat the softened butter, oil, and sugar together until the mixture is visibly lightened in color and texture. This creaming process, which can take up to three or four minutes with an electric mixer, is crucial for incorporating air, which is the primary leavening for a tender cake crumb. The mixture should look pale yellow and fluffy, not dense or grainy.
Step 2: The Egg and Flour Incorporation
Add the eggs one at a time, ensuring each is fully blended into the mixture before adding the next. Follow this with the vanilla extract. In a separate bowl, whisk together the flour, baking powder, baking soda, and salt.
Now, alternate adding the dry ingredients and the buttermilk, starting and ending with the dry ingredients. Mix on low speed, just until the ingredients are almost fully combined. The key is to stop mixing the moment you see no dry streaks of flour. Overmixing at this stage activates too much gluten, resulting in a tough, dense cake. The batter should be thick but pourable.
Step 3: Baking and Cooling Protocol
Divide the batter evenly between the two prepared heart pans. Bake for 30 to 35 minutes. The cakes are done when a wooden skewer inserted into the center comes out clean, and the edges of the cakes have just begun to pull slightly away from the pan sides. The surface of the cake will feel springy to the touch.
Let the cakes cool in their pans on a wire rack for exactly ten minutes before gently inverting them onto the rack to cool completely. Never attempt to frost warm cakes, as the heat will melt the buttercream immediately. The layers must be fully cooled before proceeding.

Mastering the Swiss Meringue Buttercream
Unlike American buttercream, Swiss Meringue is famously smooth, less sweet, and exceptionally stable for the intricate piping that defines a vintage cake.
The Gentle Heat Bath
Combine the egg whites, sugar, and salt in the bowl of a stand mixer. Set the bowl over a saucepan containing simmering water—a gentle heat bath, or bain-marie. Whisk constantly until the sugar is completely dissolved and the mixture is hot to the touch. To verify dissolution, rub a tiny amount between your fingers; it should feel smooth, not grainy. The temperature should register one hundred sixty Fahrenheit, which is important for food safety.
Whipping the Meringue
Carefully transfer the bowl to the stand mixer fitted with the whisk attachment. Begin whipping on medium speed, gradually increasing to high. Continue whipping until the meringue is glossy white, thick, and holds stiff, defined peaks. This process can take ten to fifteen minutes. The base of the mixing bowl must feel completely cool before moving on—this is a critical step for preventing a soupy buttercream.
Incorporating the Chilled Butter
Once the meringue is cool and stiff, switch to the paddle attachment. Begin adding the cold, cubed butter, a few pieces at a time, mixing on low speed. The mixture may look curdled or soupy initially—this is normal. Do not panic. Continue mixing for several minutes. The mixture will eventually come together, transform from soupy to curdled, and finally whip into a smooth, pipeable, creamy buttercream.
If the buttercream is too stiff, add a touch of milk. If it is too soft, chill the entire bowl for ten minutes and whip again. Once smooth, divide the buttercream and tint it with gel food coloring for the desired vintage palette—pinks, blues, and soft yellows are traditional.
Assembling and Decorating the Heart
This style is all about the piping. Cleanly executed borders, scrolls, and shell work are the distinguishing marks of a true Vintage Heart Cake.
The Crumb Coat and Chill
Level the cooled cake layers if necessary using a serrated knife. Place the first heart layer on your serving plate or cake stand. Apply a layer of buttercream and top with the second layer. Apply a thin, even layer of frosting over the entire cake—the crumb coat. This seals in loose crumbs. Refrigerate the cake for thirty minutes until the crumb coat is firm to the touch.
The Final Coat and Pipe Work
Apply the final, smooth layer of buttercream. Use an offset spatula dipped in hot water and wiped dry to create a perfectly smooth surface. This creates the canvas for your decorations.
Now, for the fun part:
- Select Your Tips: The most iconic vintage designs use large, open star tips (like Wilton 1M or 2D) for borders, small round tips (like Wilton 3 or 4) for script, and fine writing tips for scrolls or beadwork.
- The Base Border: Start with a simple shell or rope border around the bottom edge of the cake. This grounds the design.
- The Top Border: Repeat the border on the top edge of the cake. This frames the heart shape.
- Decorative Scrolls and Writing: Use contrasting colors to pipe scrolls, rosettes, or written messages across the top. The beauty is in the generous, slightly over-the-top application of buttercream.
Variations and Realistic Substitutions
Part of the charm of classic baking is the ability to adapt. These changes maintain the spirit of the dessert while offering flexibility.
- A Different Flavor Profile: Substitute the vanilla extract in the cake for one teaspoon of almond extract and one teaspoon of vanilla. This gives the cake a subtle, richer bakery-style flavor that pairs beautifully with the buttercream.
- Easier Frosting Option: If the Swiss Meringue seems intimidating, an excellent cooked flour frosting (Ermine frosting) provides a similarly light, pipeable, and less-sweet texture. Avoid standard American buttercream, which is often too soft and sweet for intricate vintage piping.
- Gluten-Free Flour: For a gluten-sensitive option, replace the all-purpose flour with a quality one-to-one gluten-free baking blend that contains xanthan gum. The method remains identical, but watch the baking time, as gluten-free layers can sometimes dry out faster.

Professional Tips for a Flawless Finish
Even small changes in technique can elevate the result from good to truly exceptional.
- Temperature Control is Everything: Ensure your butter, eggs, and buttermilk are all at true room temperature (around seventy Fahrenheit) for the cake batter. This allows them to emulsify correctly, resulting in a smooth, velvety batter that rises evenly.
- Sifting is Not Optional: Sift the dry ingredients twice. This is an extra step but is crucial for ensuring there are no hidden lumps of baking soda or flour that could lead to pockets of dense texture in the final cake.
- Use Gel Colors: Use concentrated gel or paste food colorings, not liquid ones. Liquid colors will throw off the consistency of the buttercream and dilute the color payoff, leading to pale, weak shades.
- Chill Your Tools: Before piping, place your filled piping bags into the refrigerator for five minutes. A slightly cooler buttercream holds its shape better, giving you sharper, cleaner lines for your shells and rosettes.
- Listen to Your Mixer: When making the Swiss Meringue, do not stop whipping until the bowl is cool. If you start adding the butter while the bowl is still warm, the butter will melt instantly, and the emulsion will break, forcing you to start over.
Frequently Asked Questions
Can I bake this recipe in a different pan size?
Yes, you can. If using two 9-inch round pans, the baking time will likely be closer to 25–30 minutes, as the batter will be spread thinner. Always check for doneness with a skewer. For a single 9×13 sheet cake, expect a bake time of 40–45 minutes.
How far in advance can I make the cake?
The cake layers can be baked, cooled, wrapped tightly in plastic wrap, and frozen for up to one month. The assembled and frosted cake can be stored in an airtight container at room temperature for two days, or refrigerated for up to four days. Allow a refrigerated cake to come to room temperature for at least an hour before serving for the best texture.
Why did my Swiss Meringue Buttercream turn soupy?
A soupy buttercream is almost always a temperature issue. Either the meringue base was too warm when you added the butter, or the kitchen itself is too hot. If this happens, place the entire mixing bowl (with the contents) into the refrigerator for 15 minutes, and then return it to the mixer to whip on medium-high speed until it re-emulsifies. The chill will allow the butter to firm up enough to form a stable emulsion.
Serving Suggestions for Maximum Impact
The beauty of a heart cake is that it doesn’t need much accompaniment, but these simple additions enhance the experience.
- A Simple Berry Compote: Serve thin slices alongside a small dish of lightly sweetened fresh strawberry or raspberry compote. The tart fruit provides a lovely counterpoint to the sweetness of the buttercream.
- Tea or Coffee Pairing: The slight sweetness and firm texture of this cake make it the perfect partner for a strong, dark roast coffee or a classic English Breakfast tea.
- Edible Glitter: For a truly vintage flourish, dust the final piped borders with a tiny amount of high-quality, non-toxic edible glitter or pearl dust. This catches the light and emphasizes the decorative nature of the dessert.
Nutrition Information
| Nutrient | Amount per Serving |
| Calories | 450 kcal |
| Protein | 5 g |
| Carbs | 52 g |
| Fat | 25 g |
| Fiber | 1 g |
| Sugar | 38 g |
| Sodium | 145 mg |
Disclaimer
Nutrition information is an estimate and may vary based on preparation and ingredients used.
PrintThe Enduring Charm of a Vintage Heart Cake

This confection is more than just a dessert; it’s a tangible piece of culinary nostalgia. The Vintage Heart Cake is characterized by its simple, tender crumb, its often-pale, slightly translucent buttercream frosting, and its elegant, piped decorations that feel plucked straight from a 1980s or 90s bakery case.
- Prep Time: 45 mins
- Cook Time: 35 mins
- Total Time: 2 hours
- Yield: 12 servings 1x
- Category: Dessert
- Method: Baking
- Cuisine: American
Ingredients
2 cups (240 grams) all-purpose flour, spooned and leveled
1 teaspoon baking powder
One half teaspoon baking soda
One half teaspoon fine sea salt
1 cup (226 grams) unsalted butter, softened to room temperature
One half cup vegetable oil
1 and one half cups (300 grams) granulated sugar
4 large eggs, at room temperature
1 tablespoon pure vanilla extract
1 cup buttermilk, shaken and at room temperature
5 large egg whites (approximately 150 grams)
1 and one fourth cups (250 grams) granulated sugar
One fourth teaspoon fine sea salt
2 cups (452 grams) unsalted butter, cut into cubes and chilled
1 teaspoon vanilla extract
Optional: 1 to 2 tablespoons whole milk or cream, to adjust consistency
Instructions
1. Preheat oven to three hundred fifty Fahrenheit. Grease and flour heart-shaped pans. Cream butter, oil, and sugar until light and fluffy.
2. Add eggs one at a time, followed by vanilla. Alternate adding dry ingredients (flour, baking powder, baking soda, salt) and buttermilk, mixing until just combined.
3. Pour batter into pans and bake for 30 to 35 minutes, or until a skewer comes out clean. Cool completely on a wire rack.
4. Prepare Swiss Meringue by heating egg whites, sugar, and salt over simmering water until sugar is dissolved (one hundred sixty Fahrenheit).
5. Whip meringue to stiff peaks until the bowl is completely cool. Switch to paddle and gradually add chilled butter until smooth and creamy.
6. Level cake layers. Apply a thin crumb coat and chill for thirty minutes. Apply the final smooth coat of frosting.
7. Using piping tips (star, round), decorate the cake with borders, rosettes, and scrolls, using contrasting colored buttercream for the vintage look.
Notes
Temperature control is everything: Ensure your butter, eggs, and buttermilk are all at true room temperature.
Sift the dry ingredients twice for a flawless crumb.
Use concentrated gel colors, not liquid ones, to tint the Swiss Meringue Buttercream.
Allow a refrigerated cake to come to room temperature for at least an hour before serving for the best texture.
Nutrition
- Serving Size: 1 slice
- Calories: 450
- Sugar: 38g
- Sodium: 145mg
- Fat: 25g
- Saturated Fat: 14g
- Unsaturated Fat: 7g
- Trans Fat: 0g
- Carbohydrates: 52g
- Fiber: 1g
- Protein: 5g
- Cholesterol: 130mg


