
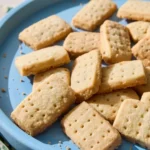
The classic shortbread cookie is arguably the purest expression of baking—a minimalist composition of butter, flour, and sugar. It is a simple trio that, when handled correctly, yields a crumb that is both tender and impossibly rich. But even the most beloved traditions benefit from a thoughtful update, and that is where the aromatic potency of fresh rosemary steps in. These Rosemary Shortbread Cookies transform the familiar buttery richness with a sophisticated, pine-like whisper, offering an unexpectedly elegant and deeply flavorful bite. Ideal for a sophisticated afternoon tea or as a refined conclusion to a seasonal dinner, this recipe delivers a delicate, sandy texture and an herbal complexity that proves simplicity can still be stunning.
Table of Contents
The Essential Components: A Roster of Ingredients
Success in shortbread depends entirely on the quality and temperature of your ingredients. Ensure the butter is truly room temperature—soft enough to leave a small indent when pressed, but not greasy or melted.
For the Shortbread Base
- 2 cups (240 grams) all-purpose flour
- 1 cup (2 sticks / 226 grams) unsalted butter, softened
- 2/3 cup (135 grams) granulated sugar
- 1 teaspoon fine sea salt
- 1 tablespoon finely minced fresh rosemary, packed
Optional Finishing Touch
- 2 tablespoons granulated sugar (for rolling)
- 1 teaspoon turbinado or sanding sugar (for texture)

The High-Level Method: Instructions
This recipe relies on a precise technique rather than complex chemistry. Take your time, especially during the mixing and chilling phases, as these are critical to developing the shortbread’s signature tenderness.
- Prepare the Aromatics: Combine the minced rosemary with the granulated sugar in a small bowl. Rub the rosemary thoroughly into the sugar with your fingers to release the essential oils.
- Cream the Fats: In a stand mixer, cream the softened butter until light and fluffy. Gradually add the rosemary sugar mixture and salt, scraping down the bowl constantly.
- Incorporate the Dry: Slowly add the flour, mixing only until the dough just comes together into a shaggy mass. Do not overmix.
- Form and Chill: Turn the dough out onto a piece of parchment paper. Use the paper to help shape the dough into two long, tight logs, approximately one and one half inches in diameter.
- Set the Logs: Wrap the logs tightly in the parchment paper, then again in plastic wrap. Chill in the refrigerator for a minimum of four hours, or ideally, overnight, until firm.
- Slice and Prepare: Preheat your oven to three hundred fifty Fahrenheit. If using, mix the optional rolling sugars. Brush the chilled dough logs lightly with water or egg white and roll them in the sugar mixture to coat evenly.
- Cut the Rounds: Use a sharp, un-serrated knife to slice the logs into rounds approximately one-quarter inch thick. Place them one inch apart on a parchment-lined baking sheet.
- Bake to Perfection: Bake for twelve to fifteen minutes, rotating the baking sheet halfway through, until the edges are just beginning to turn a pale golden color.
- Cool Completely: Remove the tray and allow the cookies to rest on the sheet for five minutes before transferring them to a wire rack to cool completely.

Mixing the Dough: A Foundation of Flavor
The initial step of blending the rosemary with the sugar is non-negotiable. Known as the blooming or maceration process, this physical act bruises the rosemary leaves and encourages the flavor compounds to migrate into the sugar crystals. This creates a much more intense and even flavor distribution throughout the final shortbread.
When moving to the creaming stage, the goal is aeration. Using a paddle attachment on medium speed, beat the softened butter until its color visibly lightens from deep yellow to pale cream, and its volume increases slightly. This takes approximately three to four minutes. Gradually introduce the rosemary-infused sugar and salt. Continue beating for another two minutes until the mixture appears smooth and well-integrated. This incorporates microscopic air pockets that are vital for the shortbread’s sandy, non-chewy crumb.
The final flour addition is the moment where overworking the dough becomes a serious threat. Once the flour hits the wet ingredients, gluten development begins immediately. Unlike bread, where gluten is desired, shortbread requires minimal gluten to maintain its signature tenderness. Reduce the mixer speed to its lowest setting and add the flour in two batches, mixing only until you see the last streaks of flour disappear. The resulting mixture will look crumbly and shaggy, not like a smooth, elastic dough. If you pinch a portion between your fingers, it should hold together easily. If it seems too dry, a final minute of gentle mixing on the lowest speed is often enough to coax the fat and dry ingredients together without resorting to adding extra liquid.
Crafting the Rounds: Shaping and Setting
The quality of your finished cookie is heavily dependent on the chilling process. Once the shaggy dough is combined, transfer it to a clean counter or a large piece of parchment paper. Do not knead it or work it with warm hands. Instead, use the parchment paper itself to help compress and form the dough into a cohesive log shape. A diameter of one and one half inches is ideal—this ensures a good cookie size that bakes evenly and maintains a reasonable cook time. The log should be uniform in thickness to prevent some cookies from burning while others remain raw.
Wrap the first log tightly in the parchment, using a bench scraper or the edge of a ruler to gently push and tighten the shape. The wrapping process is not just about keeping the dough clean; it is about applying even pressure to force the dough into a perfectly round and dense cylinder. Repeat this with the second piece of dough. Double-wrapping in plastic wrap is critical to prevent the dough from absorbing any stray odors from the refrigerator, which would compromise the pure butter flavor.
The refrigerator rest must be at least four hours. This period serves two essential functions: solidifying the butter completely and, crucially, allowing the flour to fully hydrate. Hydration ensures the final cookie won’t have a raw, powdery mouthfeel. The chilling also relaxes the small amount of gluten formed during the mixing stage, guaranteeing a melt-in-your-mouth tenderness. Attempting to slice the dough before it is fully firm will result in misshapen, easily crumbled rounds. The dough should be rigid and cold to the touch.
Oven Transformation: Achieving the Perfect Texture
Before slicing, ensure your oven has been preheating for at least twenty minutes and that you have verified its accuracy. A shortbread baked in an oven that is too hot will brown too quickly on the edges and remain raw in the center, while an oven that is too cool will cause the butter to melt and spread excessively, creating thin, greasy cookies. The standard temperature of three hundred fifty Fahrenheit is crucial for a slow, even bake.
Slicing requires a sharp, thin, un-serrated chef’s knife. A quarter-inch thickness is the sweet spot; any thinner and the cookie becomes overly brittle; any thicker and the center may not fully bake through before the edges are too brown. Make one smooth, decisive cut per cookie to avoid sawing motions that distort the shape.
The baking phase is a study in patience. Place the slices on a baking sheet lined with parchment paper—silicone mats work as well but can sometimes create a slightly paler bottom crust. Spacing them one inch apart allows for proper air circulation. The visual cue for doneness is subtle: look for the very edges to transition from pale white to a faint, barely discernible light gold. The center should still look pale and perhaps even a little underdone.
The rotation of the pan halfway through the bake is necessary because most home ovens have temperature variations. This ensures a uniform bake across the entire batch. Once the cookies are removed, do not attempt to move them immediately. The butter is still in a liquid state, and the cookies are incredibly fragile. Allowing them to cool on the baking sheet for five minutes allows the butter to solidify slightly and the structure of the cookie to firm up enough for a successful transfer to a cooling rack.
The Master Baker’s Toolkit: Advanced Technique Notes
Refining your shortbread technique elevates the final product from good to exceptional. These detailed points address common pitfalls and suggest improvements for textural superiority.
The Role of Reverse Creaming: For an even finer, sandier crumb, consider the reverse creaming method. Start by mixing the dry ingredients (flour, sugar, salt, and rosemary) first. Then, add the cold, cubed butter and process or mix until the mixture resembles coarse sand. Finally, add the remaining butter, softened, and mix just until the dough comes together. This coats the flour particles in fat before they can interact with any moisture, drastically minimizing gluten development and resulting in an ultra-tender texture.
Dealing with Soft Dough: If your kitchen is warm and the dough is too soft for slicing, place the log into a freezer for five to ten minutes, but no longer. The goal is to firm it up just enough to slice cleanly, not to freeze it solid. A dough that is too hard will crack when sliced.
Why Salt Matters: The inclusion of salt in this recipe is not optional. Shortbread is defined by its high fat content and relatively low sugar. Salt is essential for balancing this richness and, more importantly, for elevating the delicate herbaceous flavor of the rosemary. Without it, the cookie can taste flat and overly fatty. Use a fine-grain sea salt, ensuring it dissolves fully during the creaming process.
Adjusting for Altitude: At higher elevations, dough can dry out faster. Consider reducing the flour by one or two tablespoons, or very minimally increasing the butter content (by about five grams) to ensure the correct moisture level is maintained for a tender crumb.
Uniform Slicing Technique: For professional-looking consistency, chill the dough logs, then use a ruler to mark the log every quarter-inch using a skewer. Use these small guides to ensure every slice is exactly the same width. This prevents some cookies from being overly browned and others undercooked.
Creative Departures: Flavor Variations and Swaps
The simple canvas of shortbread makes it an excellent foundation for experimentation. These variations introduce new profiles while respecting the basic structure of the dough.
Lemon-Kissed Herbaceousness: Before creaming the butter, zest one entire organic lemon directly into the sugar mixture. The aromatic oils of the zest pair beautifully with the rosemary. Proceed with the recipe as written. This adds a bright, cleansing finish to the rich, buttery cookie.
Nutty Crunch: Introduce a textural element by folding in one-half cup of finely chopped, toasted pecans or walnuts after the flour has been incorporated. Ensure the nuts are chopped small enough to be easily sliced through without deforming the log.
Savory Parmesan Twist: Transform the shortbread into an elegant appetizer. Reduce the sugar to one-third cup and omit the rolling sugar step entirely. Fold in one-third cup of finely grated, aged Parmesan cheese along with the flour. Increase the salt slightly to one and one quarter teaspoons. Bake as directed. This savory cookie is excellent with a glass of dry white wine.
Dark Chocolate Drizzle: For a hint of decadence, melt four ounces of high-quality dark chocolate (at least sixty percent cacao) after the cookies have completely cooled. Drizzle the melted chocolate in thin, elegant lines across the tops of the Rosemary Shortbread Cookies. Allow the chocolate to fully set before serving.

The Final Presentation: Pairing and Serving
Shortbread is a versatile cookie that can anchor a variety of dessert settings, from casual coffee breaks to formal dessert platters.
The Classic Tea Pairing: Serve the cookies alongside a simple, high-quality black tea, such as Earl Grey or English Breakfast. The tannins in the tea cut through the richness of the butter, refreshing the palate between bites. The light citrus notes of an Earl Grey especially complement the rosemary.
A Refined Cheese Course: The slightly savory and herbal notes make these cookies an exceptional accompaniment to mild, creamy cheeses. Consider serving them with a small log of fresh goat cheese or a disc of slightly tangy Brie. The rosemary acts as a wonderful bridge between the sweetness of the shortbread and the saltiness of the cheese.
Dessert Platter Enhancement: On a holiday or celebratory platter, arrange the shortbread around a bowl of macerated fresh berries (like raspberries or blackberries) or alongside a dollop of fresh, lightly sweetened whipped cream. The simplicity of the cookie allows it to shine without overpowering other, more complex desserts.
Your Baking Questions Answered
Understanding the mechanics of shortbread can resolve common baking issues.
Why did my cookies spread too much?
Spreading is almost always caused by butter that was too soft or melted before baking, or insufficient chilling time. The butter must be completely solid when it enters the oven. If your oven is running too cool, that can also cause the butter to melt and spread before the flour structure can set.
Can I use dried rosemary instead of fresh?
While fresh rosemary is strongly recommended for its vibrant flavor and aroma, you can use dried rosemary in a pinch. However, you must reduce the amount to one teaspoon, as dried herbs are significantly more potent than fresh ones. Ensure the dried herb is finely crushed or powdered before mixing it with the sugar.
How should I store leftover shortbread?
Shortbread keeps exceptionally well due to its low moisture content. Store the completely cooled cookies in an airtight container at room temperature for up to one week. You can also freeze the baked cookies for up to three months; thaw them at room temperature before serving.
Is it possible to make this dough ahead of time?
Yes, and it is highly encouraged. The dough logs can be tightly wrapped in plastic wrap and kept in the refrigerator for up to five days. For longer storage, the logs can be frozen for up to two months. If freezing, allow the dough to thaw overnight in the refrigerator before slicing and baking.
What is the difference between shortbread and sugar cookies?
The key difference is the ratio of ingredients and the inclusion of leavening. Shortbread is historically made from a 1:2:3 ratio of sugar, butter, and flour, and crucially, contains no leavening agents like baking powder or soda. Sugar cookies usually include leavening, sometimes eggs, and a higher proportion of sugar, resulting in a puffier, chewier texture compared to the shortbread’s characteristic crisp, sandy crumb.
Nutritional Snapshot
| Nutrient | Amount per Serving |
| Calories | 175 kcal |
| Protein | 2 g |
| Carbs | 18 g |
| Fat | 11 g |
| Fiber | 1 g |
| Sugar | 6 g |
| Sodium | 55 mg |
Disclaimer
Nutrition information is an estimate and may vary based on preparation and ingredients used.
PrintThe Definitive Guide to Rosemary Shortbread Cookies
This recipe for Rosemary Shortbread Cookies offers a refined, buttery, and tender crumb with a sophisticated hint of fresh rosemary, perfect for tea or a refined dessert platter.
- Prep Time: 20 mins
- Cook Time: 15 mins
- Total Time: 4 hours 35 mins
- Yield: 24 cookies 1x
- Category: Dessert
- Method: Bake
- Cuisine: American
Ingredients
2 cups (240 grams) all-purpose flour
1 cup (2 sticks / 226 grams) unsalted butter, softened
2/3 cup (135 grams) granulated sugar
1 teaspoon fine sea salt
1 tablespoon finely minced fresh rosemary, packed
2 tablespoons granulated sugar (for rolling, optional)
1 teaspoon turbinado or sanding sugar (for texture, optional)
Instructions
1. Prepare the Aromatics: Combine the minced rosemary with the granulated sugar and rub thoroughly with your fingers.
2. Cream the Fats: In a stand mixer, cream the softened butter. Gradually add the rosemary sugar mixture and salt.
3. Incorporate the Dry: Slowly add the flour, mixing only until the dough just comes together into a shaggy mass.
4. Form and Chill: Shape the dough into two long, tight logs (1.5 inches in diameter). Wrap tightly and chill for a minimum of four hours, or overnight.
5. Slice and Prepare: Preheat your oven to three hundred fifty Fahrenheit. If using, roll the chilled logs in the optional sugar mixture.
6. Cut the Rounds: Use a sharp knife to slice the logs into rounds approximately one-quarter inch thick. Place them on a parchment-lined baking sheet.
7. Bake to Perfection: Bake for twelve to fifteen minutes, rotating the sheet halfway through, until the edges are just beginning to turn a pale golden color.
8. Cool Completely: Remove the tray and allow the cookies to rest on the sheet for five minutes before transferring them to a wire rack to cool completely.
Notes
Ensure the butter is truly room temperature for proper creaming.
The chilling process is essential for preventing spread and creating a tender crumb.
For an even finer crumb, consider using the reverse creaming method described in the article.
Nutrition
- Serving Size: 1 cookie
- Calories: 175
- Sugar: 6g
- Sodium: 55mg
- Fat: 11g
- Saturated Fat: 7g
- Unsaturated Fat: 4g
- Trans Fat: 0g
- Carbohydrates: 18g
- Fiber: 1g
- Protein: 2g
- Cholesterol: 25mg


