There’s a special kind of magic in the kitchen during the holidays, a chance to abandon seriousness for something utterly playful. These melted snowman cookies capture that spirit perfectly, delivering a sweet, buttery crunch underneath a marshmallow frosting that looks like it barely survived a warm winter day. It’s a brilliant way to transform a simple sugar cookie into a delightful centerpiece for any festive gathering, from a casual cookie swap to a formal holiday dinner, promising a smile from every person who sees—and tastes—them.
The construction is simple, relying on a classic cutout cookie base for stability and a gentle, glossy icing to hold the whimsical snowman parts. The result is a charming treat that proves holiday baking doesn’t need to be complicated to be memorable.
Table of Contents
The Foundation: Essential Ingredients
Creating the perfect base for your melted snowman requires a few simple, high-quality baking staples. The recipe calls for standard US measurements.
For the Sugar Cookie Dough
- 3 cups (360 grams) all-purpose flour, plus more for rolling
- 1 teaspoon baking powder
- 1/2 teaspoon salt
- 1 cup (226 grams or two sticks) unsalted butter, softened to room temperature
- 1 cup (200 grams) granulated sugar
- 2 large eggs
- 1 teaspoon vanilla extract
For the Snowman Assembly
- 1 (10-ounce) package large marshmallows (about 20 total)
- 1 cup (120 grams) powdered sugar, sifted
- 3 tablespoons milk, plus more if needed
- 1 teaspoon almond extract (optional, for flavor depth)
- 30-40 mini pretzel sticks
- Orange sprinkles or candy for the nose
- Black edible marker or small tube of black cookie icing for the eyes and mouth
- Assorted small sprinkles or candy pieces for the buttons and scarves (e.g., sanding sugar, mini chocolate chips)

Preparing the Treats: Step-by-Step
This outline provides a high-level view of the baking process. Refer to the Detailed Technique Guide below for critical cues and timing.
- Prep the Dough: Whisk the dry ingredients (flour, baking powder, and salt) together. Separately, cream the butter and sugar until light and fluffy. Beat in the eggs one at a time, followed by the vanilla. Gradually add the dry mixture until just combined.
- Chill and Shape: Divide the dough in half, wrap each in plastic, and chill for at least one hour. Preheat your oven to three hundred fifty Fahrenheit.
- Cut and Bake: Roll out the chilled dough to about one-quarter inch thickness. Use a large, round cookie cutter (three to four inches) to cut out shapes. Place on parchment-lined baking sheets and bake for eight to twelve minutes.
- Cool Completely: Remove cookies from the oven when the edges are just beginning to turn a pale golden color. Let them cool on the baking sheet for five minutes before transferring them to a wire rack to cool fully.
- Mix the Icing: Whisk the powdered sugar, milk, and almond extract (if using) in a small bowl until smooth. The consistency should be thick but pourable.
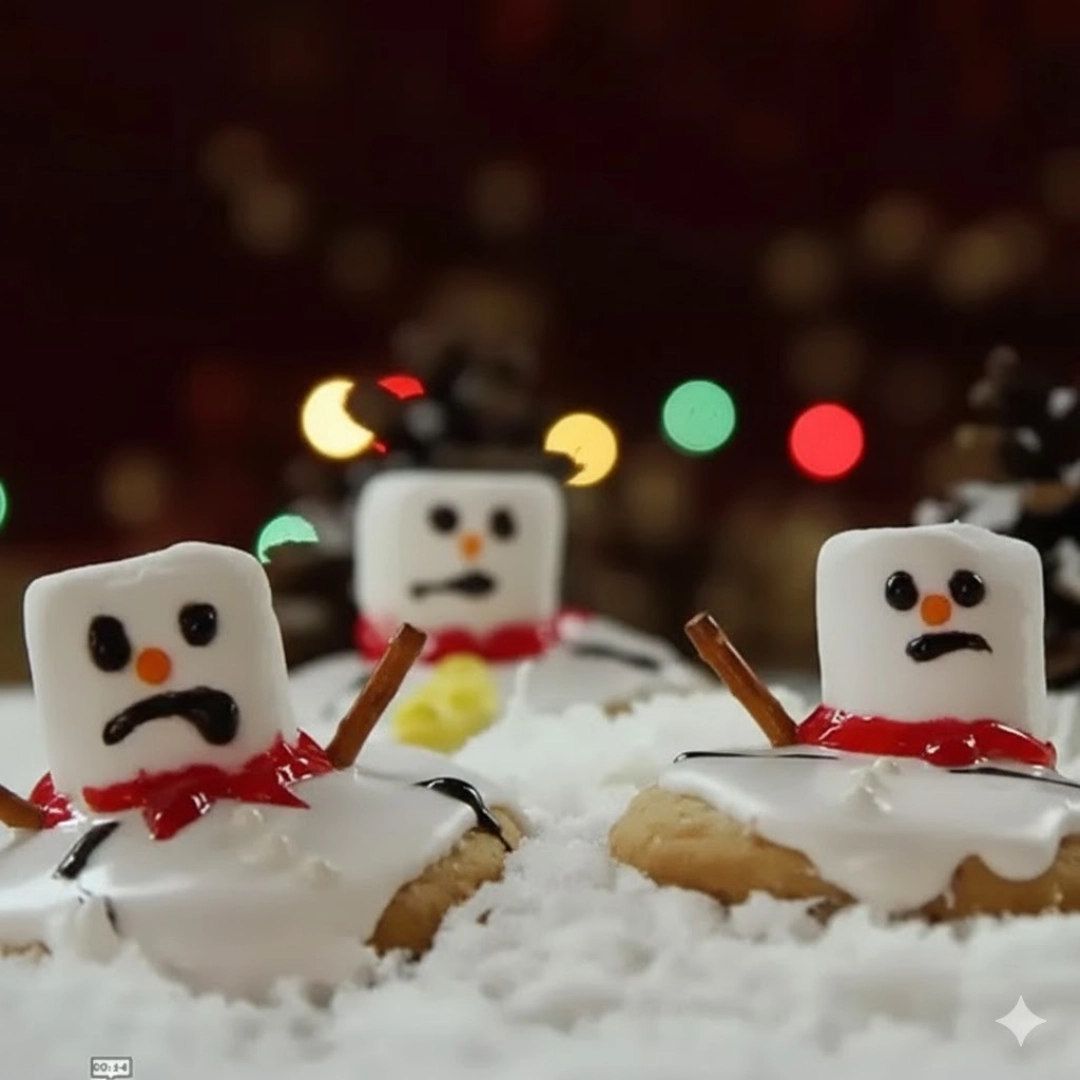
- Assemble the Base: Dip the flat bottom of each large marshmallow into the icing, then immediately place it toward the top edge of a cooled cookie. This acts as the snowman’s head, which has “sunk” into the snow.
- Create the Melt: Spoon one to two teaspoons of the remaining icing around the base of the marshmallow and let it “drip” slightly down the cookie to create the melted snow effect. Allow the icing to set for ten minutes.
- Decorate and Finish: Once the “melt” is set, gently push two mini pretzel sticks into the marshmallow for arms. Add an orange sprinkle nose and use the black marker or icing to draw the eyes and a coal-dot mouth. Finally, place small sprinkles for buttons on the melted “puddle.”

Detailed Technique Guide for Flawless Snowmen
The difference between a nice cookie and a truly spectacular one often comes down to attention to sensory and textural details.
The Art of the Perfect Dough
When creaming the butter and sugar, watch for a visual cue: the color will lighten from deep yellow to a pale cream, and the texture will become noticeably aerated, which is vital for a tender, not tough, final cookie. When adding the flour mixture, stop mixing the instant you see no more streaks of dry flour. Overmixing develops gluten, resulting in a tough cookie that won’t hold the delicate topping well. The chilling step is mandatory; it prevents the cookies from spreading too much in the oven, keeping your circles round and uniform. Roll the dough out on a lightly floured surface, turning the dough once or twice to ensure it isn’t sticking.
Achieving Ideal Doneness
Preheat your oven fully to three hundred fifty Fahrenheit. Baking time is critical. The cookies should be taken out of the oven when they look barely set in the center and the edges are just showing the first hint of color. If you wait for the whole cookie to be golden brown, it will be overbaked and dry. The residual heat on the baking sheet will finish the baking process. If your cookie sheet is dark, the bake time will be shorter; if it is light-colored, it may take longer. You want a cookie that’s sturdy enough to hold the marshmallow without being overly hard.
Mastering the “Melted” Effect
The icing consistency is the most important element for a realistic melted look. Start with the suggested amount of milk and whisk vigorously. If the icing is too thick and forms hard peaks, add milk, half a teaspoon at a time, until it coats the back of a spoon and flows sluggishly. If it’s too thin, add a tiny bit more sifted powdered sugar. When you dip the marshmallow, the thin layer of icing helps it adhere firmly. When spooning the “melt” around the base, gravity is your friend. Don’t try to force a pattern; simply drop a small pool and let it naturally ooze toward the edge of the cookie. This creates the organic, imperfect look of melting snow. Wait at least ten minutes for this base layer to firm up before adding decorations, or the pretzel sticks will slide right out.
Clever Tips from the Cookie Workshop
These small insights will elevate your baking experience and the final product.
- Marshmallow Pre-Trim: If your large marshmallows seem too tall, you can use kitchen shears to snip a tiny slice off the bottom. This flattens the base slightly, providing better contact with the cookie and making the snowman’s head look like it truly settled into the melted puddle.
- The Power of Cold Butter: If your cookie dough is too soft to roll out, place it in the freezer for ten minutes instead of the refrigerator. This quick chill hardens the fat instantly, allowing you to roll without adding excess flour, which can dry out the dough.
- Preventing Cracking: When pushing the pretzel sticks into the marshmallow, a gentle twisting motion works better than a direct stab. This prevents the marshmallow skin from ripping, which can make the arms look messy.
- Flavor Boosting: For a richer, more complex flavor in your cookie dough, substitute half of the vanilla extract with bourbon vanilla or use a mix of vanilla bean paste and pure extract.
- Coloring the Icing: To make the melted puddle a fun, festive color (like pale blue or mint green), add one drop of gel food coloring to the icing mixture. Gel color won’t thin the icing like liquid drops can.
- Edible Markers vs. Icing: For the faces, an edible black marker offers far more precision and control than piping black icing, especially for small dots and thin lines. It’s a worthwhile investment for intricate cookie decorating.
Creative Variations and Substitutions
Keep the spirit of the melted snowman while changing the flavor profile and appearance.
- Gingerbread Snowmen: Substitute the classic sugar cookie dough with a spiced gingerbread base. The warm, dark spice complements the sweet, plain marshmallow perfectly. Reduce the baking powder by half and add two teaspoons of ground ginger, one teaspoon of cinnamon, and one-quarter teaspoon of cloves to the dry ingredients.
- Hot Chocolate Base: Use a chocolate cutout cookie recipe instead of sugar cookies. The dark backdrop makes the white marshmallow and icing pop even more, and the flavor combination mimics a cup of hot cocoa.
- Peppermint Accents: Replace the almond extract in the icing with one-quarter teaspoon of pure peppermint extract. Crush a candy cane finely and sprinkle the resulting dust over the “melted” puddle for a cool, minty crunch.
- Gluten-Free Flour Swap: This recipe performs well using a good-quality one-to-one gluten-free flour blend that contains xanthan gum. No other adjustments are typically needed, though you might need to chill the dough for an extra twenty minutes, as gluten-free dough tends to be slightly stickier.

Presentation and Serving Suggestions
These whimsical cookies are a fantastic standalone dessert but pair wonderfully with simple, festive additions.
- The Coffee Course: Serve one or two melted snowman cookies alongside a mug of freshly brewed coffee or a rich espresso. The light sweetness cuts through the bitterness of the dark roast beautifully.
- A Cookie Platter Centerpiece: Arrange these cookies among more traditional, uniform holiday cookies (like shortbread or thumbprints). Their playful nature makes them an immediate focal point, adding height and character to a flat display.
- Pair with Cocoa: Nothing says “holiday coziness” quite like a rich cup of hot cocoa. Present the cookies next to mugs of cocoa, optionally adding a small dollop of whipped cream on the side for dipping.
- DIY Decorating Station: Bake and cool the cookies ahead of time, then set out all the decoration components (icing, marshmallows, pretzels, sprinkles) for a fun, interactive party activity. Guests can assemble their own snowmen.
Common Queries About Melted Snowman Cookies
You might have a few final questions before starting your bake.
Can I make the cookie dough ahead of time?
Absolutely. The dough can be prepared, wrapped tightly, and refrigerated for up to three days. You can also freeze the dough for up to two months; just be sure to thaw it overnight in the refrigerator before rolling and cutting.
Why are my cookies spreading too much during baking?
Spreading is usually caused by the butter being too soft or the dough not being cold enough. Ensure your butter is only softened, not melted, and that the cut-out cookies are well-chilled (at least fifteen minutes in the fridge or five minutes in the freezer) immediately before they go into the hot oven.
How do I store these cookies, and for how long?
Store the decorated melted snowman cookies in a single layer in an airtight container at room temperature for up to three days. If you must stack them, use a sheet of parchment paper between the layers to prevent the delicate icing and decorations from sticking or smashing.
What’s the best substitute for pretzel sticks?
If you want to avoid pretzels, you can use very thin, dark chocolate-covered Pocky sticks (broken to size) or even thin slivers of toasted almonds for the arms. The almond pieces offer a nice crunch and a slightly more sophisticated look.
Can I use store-bought cookie dough?
Yes, you can use store-bought sugar cookie dough to save time. Look for a brand that is specifically labeled “cutout” dough, as these recipes are designed to hold their shape better than drop cookies. Be sure to follow the package’s thickness and chilling recommendations.
Nutrition Information
| Nutrient | Amount per Serving |
| Calories | 240 kcal |
| Protein | 4 g |
| Carbs | 38 g |
| Fat | 8 g |
| Fiber | 1 g |
| Sugar | 25 g |
| Sodium | 65 mg |
Important Disclosure
Nutrition information is an estimate and may vary based on preparation and ingredients used.
PrintMelted Snowman Cookies: A Whimsical Holiday Treat

An adorable and easy holiday cookie recipe featuring a buttery sugar cookie base topped with a marshmallow ‘snowman’ and a fun, melted-snow icing effect. Perfect for holiday parties.
- Prep Time: 45 mins
- Cook Time: 12 mins
- Total Time: 2 hours
- Yield: 20 cookies 1x
- Category: Dessert
- Method: Baking
- Cuisine: American
Ingredients
3 cups all-purpose flour, plus more for rolling
1 teaspoon baking powder
1/2 teaspoon salt
1 cup (two sticks) unsalted butter, softened
1 cup granulated sugar
2 large eggs
1 teaspoon vanilla extract
1 (10-ounce) package large marshmallows (about 20 total)
1 cup powdered sugar, sifted
3 tablespoons milk, plus more if needed
1 teaspoon almond extract (optional)
30–40 mini pretzel sticks
Orange sprinkles or candy for the nose
Black edible marker or small tube of black cookie icing
Assorted small sprinkles or candy pieces for the buttons and scarves
Instructions
1. Whisk the dry ingredients (flour, baking powder, and salt) together. Separately, cream the butter and sugar until light and fluffy. Beat in the eggs one at a time, followed by the vanilla. Gradually add the dry mixture until just combined.
2. Divide the dough in half, wrap each in plastic, and chill for at least one hour. Preheat your oven to three hundred fifty Fahrenheit.
3. Roll out the chilled dough to about one-quarter inch thickness. Use a large, round cookie cutter (three to four inches) to cut out shapes. Place on parchment-lined baking sheets and bake for eight to twelve minutes.
4. Remove cookies from the oven when the edges are just beginning to turn a pale golden color. Let them cool on the baking sheet for five minutes before transferring them to a wire rack to cool fully.
5. Whisk the powdered sugar, milk, and almond extract (if using) in a small bowl until smooth. The consistency should be thick but pourable.
6. Dip the flat bottom of each large marshmallow into the icing, then immediately place it toward the top edge of a cooled cookie.
7. Spoon one to two teaspoons of the remaining icing around the base of the marshmallow and let it “drip” slightly down the cookie to create the melted snow effect. Allow the icing to set for ten minutes.
8. Gently push two mini pretzel sticks into the marshmallow for arms. Add an orange sprinkle nose and use the black marker or icing to draw the eyes and a coal-dot mouth. Finally, place small sprinkles for buttons on the melted “puddle.”
Notes
Ensure the cookies are fully cooled before decorating to prevent the icing from melting.
Use fresh pretzel sticks to avoid breakage.
Store decorated cookies in an airtight container at room temperature for up to three days.
Nutrition
- Serving Size: 1 cookie
- Calories: 240
- Sugar: 25g
- Sodium: 65mg
- Fat: 8g
- Saturated Fat: 4g
- Unsaturated Fat: 3g
- Trans Fat: 0g
- Carbohydrates: 38g
- Fiber: 1g
- Protein: 4g
- Cholesterol: 25mg


