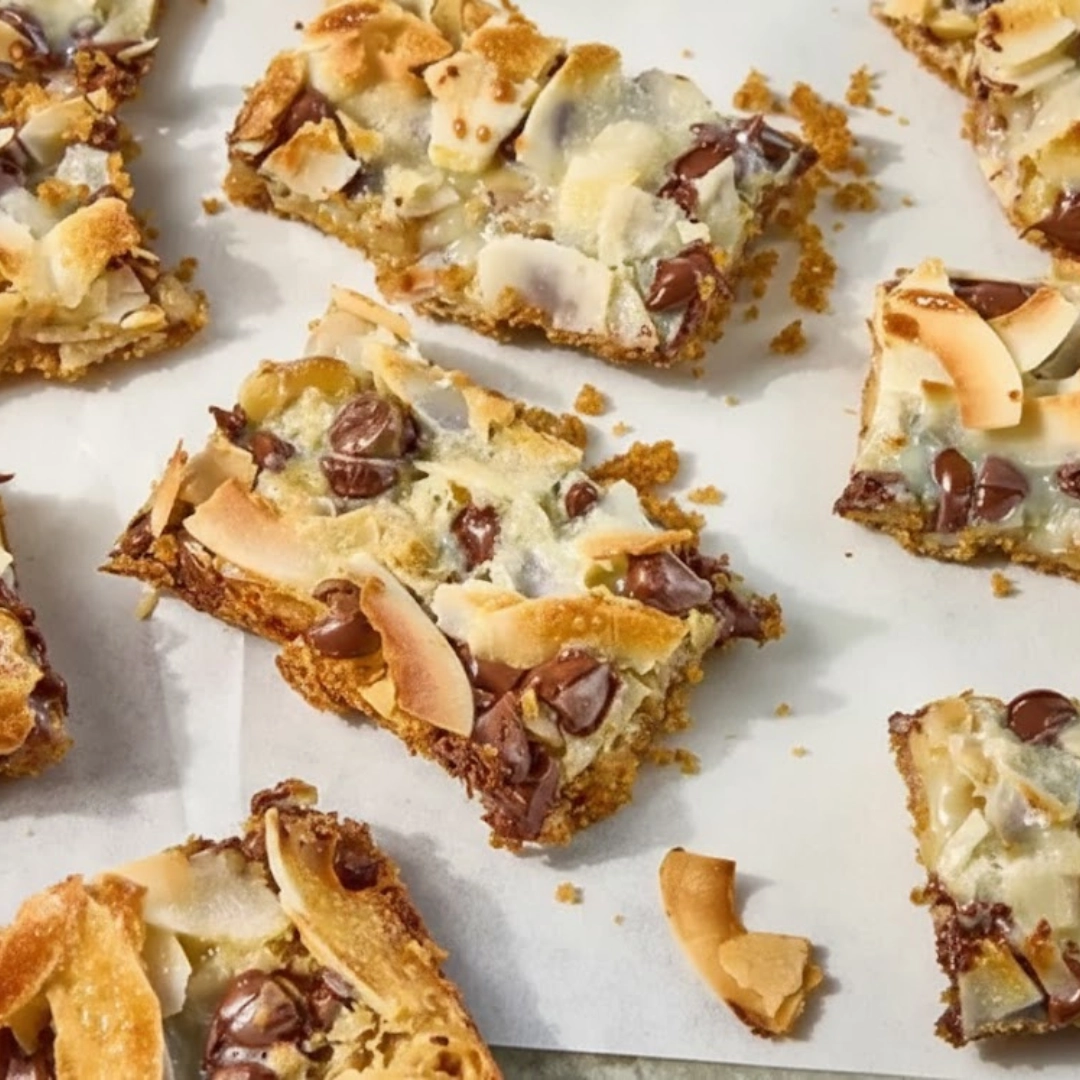
There are certain recipes that feel less like a dessert and more like a core memory, and this quintessential bar is certainly one of them. The classic structure—a crisp, buttery base giving way to a rich, molten layer of coconut, nuts, and chocolate—is pure indulgence, executed with minimal effort. It is the architectural wonder of the cookie world, offering distinct textural and flavor contrasts in every bite. Whether you are baking for a neighborhood potluck, a holiday platter, or simply a late-night craving, the incredible ease and spectacular payoff of Magic Cookie Bars make them a timeless choice. This recipe delivers a reliably chewy, deeply caramelized treat that stands up to all the wonderful nostalgia this dessert evokes.
Table of Contents
The Essential Building Blocks: What You’ll Need
For the Crust
- One and one half cups (300 grams) graham cracker crumbs
- One half cup (113 grams) unsalted butter, melted
For the Filling
- One fourteen-ounce can (400 milliliters) sweetened condensed milk
- One cup (170 grams) semi-sweet chocolate chips
- One cup (170 grams) butterscotch chips
- One and one third cups (100 grams) shredded sweetened coconut
- One cup (120 grams) chopped walnuts or pecans

Quick-Start Guide to Layered Perfection
- Preheat and Prep: Set your oven rack to the middle position and preheat to three hundred fifty Fahrenheit. Line a thirteen-by-nine inch metal baking pan with parchment paper, leaving an overhang on the long sides for easy lifting.
- Make the Base: Combine the graham cracker crumbs and melted butter until fully saturated. Press this mixture firmly and evenly into the bottom of the prepared pan.
- Pour the Foundation: Drizzle the entire can of sweetened condensed milk slowly and evenly over the graham cracker crust.
- Layer the Texture: Sprinkle the chocolate chips and butterscotch chips evenly across the surface, followed by the shredded coconut and the chopped nuts. Do not stir or press the layers down.
- Bake Until Golden: Place the pan in the preheated oven and bake for twenty-five to thirty minutes, or until the edges are golden brown and the coconut topping has caramelized slightly.
- Cool Completely: Remove the bars from the oven and place the pan on a wire rack. Allow the bars to cool completely to room temperature, which will take at least two hours, before lifting and slicing.
- Slice and Serve: Use the parchment overhang to lift the entire slab of bars out of the pan and place it on a cutting board. Slice into twenty-four uniform squares using a long, sharp knife.

Mastering the Layers: A Deep Dive into the Process
The beauty of this recipe lies in its simplicity, but understanding how each layer interacts during baking is the key to achieving a truly superb result—one that is both stable for slicing and gloriously gooey for eating.
Preparing the Platform
The graham cracker crust is more than just a base; it’s the structural integrity of the entire dessert. When combining the crumbs and melted butter, ensure every last crumb is coated. The mixture should feel like wet sand, holding its shape when squeezed. The pressing phase is critical: you must compact the base firmly into the pan, extending all the way to the corners. This prevents the sweetened condensed milk from seeping through during baking and sticking the bars to the pan—even when using parchment. A flat-bottomed measuring cup is the perfect tool for achieving an even, professional press.
The Sweet, Unifying Element
The sweetened condensed milk acts as the glue, the moisturizer, and the primary agent for the creamy caramelization that defines this treat. The crucial step here is the pour. Do not dump the milk in the middle; pour it in a slow, steady stream, moving across the surface to achieve a thin, even coat over the entire graham cracker base. Resist the urge to spread it with a spatula. As the bars bake, the heat will thin the milk, allowing it to wick up and around the various toppings, binding them together in a luscious matrix. An uneven pour will result in dry spots in one area and overly sticky, solidified patches in another.
The Art of the Scatter
The layering of the chips, coconut, and nuts is where visual appeal and textural contrast are established. For even distribution, treat each topping separately. Start with the chips—both chocolate and butterscotch. Toss them gently over the milk-coated crust so they land haphazardly, not piled in one spot. Follow with the coconut and then the nuts. The temptation is to press the toppings into the milk, but this should be avoided. The act of pressing forces the milk down into the crust and prevents it from rising up to coat the dry ingredients properly. A light, airy scatter allows the milk to create those signature caramel pockets around the ingredients as it heats.
Reading the Bake for Perfect Texture
Baking time is dictated less by the clock and more by visual cues. Set your timer for twenty-five minutes, but keep a close eye after that point. The ideal Magic Cookie Bars will show a deeply golden-brown crust peeking out at the edges of the pan. The sweetened condensed milk layer should appear set, no longer liquid or jiggly in the center, and its color should have shifted from pale cream to a beautiful light caramel. The coconut is your best indicator of doneness—it should look lightly toasted, with some pieces turning a rich, mahogany brown. An underbaked bar will be too soft and messy, while an overbaked one will be hard and dry.
Patience for the Slice
This is arguably the most important, yet most skipped, step. The caramel layer is extremely hot and molten straight from the oven. Attempting to slice the bars while warm is a recipe for a sticky, gooey disaster; the pieces will tear, and the filling will ooze. You must allow them to cool completely—at least two hours at room temperature, or even better, chilling them in the refrigerator for thirty minutes once cooled. The cold sets the caramel layer, making clean, professional-looking cuts simple and straightforward. Use a large, non-serrated knife, wiping the blade clean with a damp cloth between cuts to prevent drag and sticking.
The Secrets to Flawless Cookie Bars
- Skip the Substitute for Butter: While oil or margarine might seem like an acceptable swap for the crust, the high water content and lack of milk solids in substitutes will create a flimsy, less flavorful foundation. Only melted butter provides the richness and structure needed for a crisp, stable base.
- Toasted Nuts are Superior: For a deeper, more complex flavor, toast your chopped walnuts or pecans lightly in a dry skillet over medium heat for four to five minutes before sprinkling them on. This small step significantly enhances the aroma and prevents the nuts from tasting raw against the rich caramel.
- The Pan Material Matters: Use a light-colored metal baking pan. Dark pans absorb more heat, leading to an over-baked, potentially burned crust before the top layers are fully set. Glass pans take longer to heat and can also lead to an uneven bake.
- No Peeking During the First Ten: The layering of ingredients requires stable, consistent heat to bind and caramelize properly. Avoid opening the oven door unnecessarily, especially during the first ten minutes, which can cause the oven temperature to drop and extend the baking time.
- Achieve Crisp Edges with Care: If you prefer ultra-crisp edges, use a slightly smaller pan, like an eleven-by-seven inch, but be sure to reduce the baking time by five to seven minutes and watch for faster browning. The taller layer will concentrate the flavors but may require a lower, slower bake.
- The Parchment Overhang Trick: Do not just line the pan bottom; create a sling by laying two strips of parchment across the pan perpendicular to each other, allowing for a two-inch overhang on all four sides. This makes lifting the bars effortless and keeps the edges neat.

Ingredient Swaps and Creative Twists
The Magic Cookie Bars concept is endlessly adaptable, making it an excellent canvas for seasonal or personal preference changes.
A Different Chip Array
Instead of the classic semi-sweet and butterscotch duo, try white chocolate and dark chocolate chips for a sophisticated marble effect, or peanut butter chips for a nutty, savory undertone. You could also swap in one cup of M&M’s or chopped pretzels for a salty crunch.
Varying the Base
While graham crackers are traditional, a delicious and easy substitution is to use vanilla wafer or shortbread cookies, pulverized into fine crumbs. For a spiced twist, try ginger snaps or speculoos cookies as the base. No matter the crumb, the ratio of one and one half cups of crumbs to one half cup of melted butter should be maintained.
The Nut-Free Option
If you or your guests have nut allergies, simply omit the walnuts or pecans entirely. To compensate for the lost volume and crunch, increase the amount of shredded coconut by half a cup, or introduce one cup of old-fashioned rolled oats to the topping mix.
Citrus or Salt Infusion
A fun and subtle addition is to sprinkle the top of the bars with one half teaspoon of flaky sea salt immediately after they come out of the oven. Alternatively, for a bright contrast to the richness, fold the zest of one small orange or lemon into the graham cracker crumb mixture before pressing it into the pan.
Pairing and Presentation: Serving Ideas
These dessert bars are wonderfully rich on their own, but a thoughtful accompaniment can elevate the experience from simple sweet treat to structured dessert.
- The Classic Scoop: Serve a warm square with a generous scoop of high-quality vanilla bean ice cream. The cold, melting dairy provides a beautiful counterpoint to the gooey, warm caramel and chocolate.
- Coffee House Complement: Because of the strong notes of butterscotch and caramel, these bars pair exceptionally well with a strong cup of dark-roast coffee or a foamy, unsweetened latte. The bitterness of the coffee cuts through the sweetness of the bar.
- Fruit and Freshness: For an after-dinner serving, arrange the bar on a small plate alongside a few fresh raspberries or sliced strawberries. The tartness and high acidity of the berries offer a needed refreshing note.
- Warmed with Cream: For an extremely indulgent holiday dessert, gently warm a piece for about thirty seconds in the microwave and serve it with a dollop of fresh whipped cream and a light dusting of cinnamon or cocoa powder.
Your Baking Questions Answered
Why did my bars stick to the bottom of the pan?
This is usually caused by the sweetened condensed milk seeping through an insufficiently compressed graham cracker crust. Ensure the base is pressed down very firmly and that the sides of the pan are fully lined with parchment paper or foil, not just the bottom, before you begin layering.
Can I use low-fat or evaporated milk?
No. Sweetened condensed milk is a specific product where approximately forty percent of the water content has been removed and sugar has been added, resulting in a thick, sticky liquid that caramelizes perfectly. Evaporated milk or any other milk substitute is too thin and will not bind the layers or create the signature caramel texture.
How long can these bars be stored?
When stored properly in an airtight container at room temperature, these bars maintain their excellent texture and flavor for three to four days. If you wish to extend their freshness, you can keep them in the refrigerator for up to one week. Be aware that chilling may make them slightly firmer.
Can I freeze the finished bars?
Yes, they freeze beautifully. Once the Magic Cookie Bars are completely cooled and sliced, place them in a single layer on a parchment-lined sheet pan and freeze for one hour. Then, transfer the frozen bars to a freezer-safe, airtight container, separating the layers with parchment paper. They will keep well for up to two months; thaw at room temperature before serving.
Do I have to use two kinds of chips?
The combination of two chip types is traditional and provides a depth of flavor that a single type often lacks. The slight saltiness of the butterscotch chips balances the richness of the semi-sweet chocolate. However, you can use any two cups of your preferred chocolate chips or combination of baking candies.
Nutritional Snapshot
| Nutrient | Amount per Serving |
| Calories | 315 kcal |
| Protein | 4 g |
| Carbs | 38 g |
| Fat | 17 g |
| Fiber | 1 g |
| Sugar | 30 g |
| Sodium | 110 mg |
Nutrition Information is an estimate and may vary based on preparation and ingredients used.
PrintThe Ultimate Magic Cookie Bars Recipe
This classic Magic Cookie Bars recipe delivers a reliably chewy, deeply caramelized treat with layers of graham cracker crust, sweetened condensed milk, chocolate, butterscotch, coconut, and nuts.
- Prep Time: 15 mins
- Cook Time: 30 mins
- Total Time: 2 hours 45 mins
- Yield: 24 bars 1x
- Category: Dessert
- Method: Baked
- Cuisine: American
Ingredients
1 1/2 cups graham cracker crumbs
1/2 cup unsalted butter, melted
1 (14-ounce) can sweetened condensed milk
1 cup semi-sweet chocolate chips
1 cup butterscotch chips
1 1/3 cups shredded sweetened coconut
1 cup chopped walnuts or pecans
Instructions
1. Set oven rack to the middle position and preheat to 350 Fahrenheit. Line a 13×9 inch metal baking pan with parchment paper, leaving an overhang on the long sides for easy lifting.
2. Combine the graham cracker crumbs and melted butter until fully saturated. Press this mixture firmly and evenly into the bottom of the prepared pan.
3. Drizzle the entire can of sweetened condensed milk slowly and evenly over the graham cracker crust.
4. Sprinkle the chocolate chips, butterscotch chips, shredded coconut, and chopped nuts evenly across the surface. Do not stir or press the layers down.
5. Bake for 25 to 30 minutes, or until the edges are golden brown and the coconut topping has caramelized slightly.
6. Remove the bars from the oven and place the pan on a wire rack. Allow the bars to cool completely to room temperature (at least 2 hours) before lifting and slicing.
Notes
Allow the bars to cool completely before slicing for clean, professional-looking cuts.
Toast the nuts lightly before adding them for a deeper flavor.
Store leftovers in an airtight container at room temperature for up to 4 days.
Nutrition
- Serving Size: 1 bar
- Calories: 315
- Sugar: 30g
- Sodium: 110mg
- Fat: 17g
- Saturated Fat: 10g
- Unsaturated Fat: 5g
- Trans Fat: 0g
- Carbohydrates: 38g
- Fiber: 1g
- Protein: 4g
- Cholesterol: 25mg


