
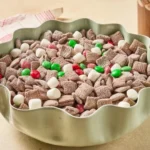
There are few flavors that transport us quite like a classic mug of hot chocolate. That deep, comforting resonance of cocoa, the velvety melt of sugar, and the buoyant lift of marshmallow—it’s pure, distilled winter joy. This Hot Chocolate Snack Mix captures all the elements of that beloved beverage and transforms them into a richly textured, highly addictive, and utterly irresistible handful of crunch. It serves as a perfect companion for cozy movie nights, a delightful addition to any holiday platter, or simply a sweet, satisfying moment when a chocolate craving hits. It is a celebratory dish, combining the satisfying crispness of cereal with a lavish coating of spiced cocoa-chocolate and a final tumble of confectionary elements.
This recipe is designed to be highly accessible yet sophisticated in flavor profile. We move past the simple, one-note chocolate coating and introduce techniques that ensure every piece is perfectly coated, intensely flavored, and possesses a delightful textural contrast. The key lies in creating a triple-layered finish: a chocolate base, a spiced cocoa powder dusting, and finally, the tender, chewy additions that make this mix feel like a miniature cup of hot chocolate in every bite.
Table of Contents
The Essential Ingredients for Success
Selecting high-quality base ingredients is crucial for achieving an excellent final texture and flavor. We prioritize simple, readily available pantry staples that come together quickly.
For the Crispy Base:
- Four cups rice or corn square cereal (or a mixture of both for varied texture)
- One-quarter teaspoon fine sea salt (critical for balancing sweetness)
For the Rich Coating:
- One cup (approximately six ounces) milk chocolate chips, high quality
- One tablespoon unsalted butter or coconut oil
- One teaspoon pure vanilla extract
For the Cocoa Dusting:
- One-half cup confectioners’ powdered sugar
- Two packets (or one-third cup) high-quality hot cocoa mix, preferably one that contains milk powder for added richness
- One-half teaspoon ground cinnamon (optional, but highly recommended)
The Essential Additions:
- One cup mini marshmallows
- One cup candy-coated chocolate pieces (such as M&M’s or similar seasonal varieties)

Mixing the Magic: Step-by-Step Instructions
This preparation process is straightforward and fast, requiring minimal cooking time and no special equipment beyond a large baking sheet and a microwave-safe bowl.
- Prepare the Cereal: Place the cereal and salt into a very large bowl. In a separate small, microwave-safe bowl, combine the chocolate chips and the butter or oil.
- Melt the Chocolate: Microwave the chocolate mixture in intervals of thirty seconds, stirring thoroughly after each one, until the chocolate is fully melted and perfectly smooth. Stir in the vanilla extract.
- Coat the Base: Pour the melted chocolate mixture over the cereal. Using a heatproof spatula, gently fold and stir the cereal until every piece is uniformly coated in the chocolate mixture.
- Dust the Mix: In a medium bowl, whisk together the powdered sugar, hot cocoa mix, and cinnamon (if using) to eliminate any clumps. Sprinkle half of this cocoa mixture over the coated cereal and gently toss. Repeat with the remaining mixture until the cereal is evenly dusted and no longer sticky.
- Set the Base: Spread the fully coated and dusted cereal in a single, thin layer onto a large baking sheet lined with parchment paper. Allow the mixture to set completely at room temperature for at least twenty minutes.
- Final Assembly: Once the chocolate coating is dry to the touch, transfer the mix back to the large bowl. Stir in the mini marshmallows and candy-coated chocolate pieces. Serve immediately or store in an airtight container.

Mastering the Technique: Detailed Coating and Drying
While the instruction list is concise, true success in a recipe like this hinges on executing the coating and drying phases with precision. Achieving that professional, crisp, non-sticky finish requires attention to detail.
The Art of the Melt
When melting the chocolate for the coating, temperature control is paramount. Chocolate scorches easily, which results in a grainy, seized texture that will not adhere smoothly to the cereal. Using a microwave is the fastest method, but you must employ short, thirty-second bursts. After the first burst, the chips will likely look unchanged. Stirring is mandatory, as residual heat will continue the melting process even outside the microwave.
The butter or coconut oil is not merely a fat; it acts as an emulsifier and thinning agent. It gives the melted chocolate a sheen and a fluidity that allows it to coat the sharp edges and crevices of the cereal pieces effectively without becoming heavy or clumping. When stirring in the vanilla extract, ensure the chocolate is off the heat source, as the alcohol in the extract can cause the mixture to thicken slightly, which is why we add it last. The finished coating should pour like a thick, luxurious ribbon.
Achieving the Perfect Cocoa Dust
The dry dusting mixture—powdered sugar combined with hot cocoa mix and spices—is what creates the characteristic “hot chocolate” look and mouthfeel. The powdered sugar is the anti-clumping agent, absorbing any excess surface moisture from the chocolate coating.
The Application Method:
Do not dump the entire cocoa mixture onto the wet cereal at once. This will immediately create thick, paste-like clumps. The goal is to gradually introduce the dry ingredients.
- Pour the chocolate-coated cereal into a dry bowl.
- Sprinkle the first half of the dusting mixture over the cereal.
- Toss gently using two spatulas or large wooden spoons, moving the cereal from the bottom to the top. This gentle, scooping motion prevents the cereal from crushing.
- The mixture will look unevenly coated and slightly damp after the first application.
- Repeat with the second half of the dusting mixture. Continue tossing until every piece is evenly separated, fully coated, and the texture on the surface shifts from damp and sticky to dry and powdery. A good coating prevents the chocolate from staining your fingers when you handle the finished mix.
Setting and Finishing
The most common mistake when making snack mix is adding the final elements (like the marshmallows and candies) before the chocolate coating is completely dry. If you rush this step, the heat and moisture will cause the powdered sugar to dissolve, leading to a sticky mess where marshmallows clump irreversibly to the chocolate.
After dusting, spread the mix thinly on parchment paper. The paper prevents sticking and makes cleanup easy. Allow it to air-dry at room temperature. Do not refrigerate. Placing the mix in a refrigerator introduces excessive moisture from condensation when it comes back to room temperature, which can make it sticky later. Wait for the coating to be firm and cool before proceeding to the final assembly step. The addition of the marshmallows and candies should only happen after the base mix is fully set.
Troubleshooting Common Snack Mix Issues
Even experienced cooks can run into minor difficulties. Here are some solutions for common problems encountered when preparing this particular recipe.
The Mix is Too Sticky
This usually happens if the mix was not fully dusted, or if it was exposed to too much humidity while drying. The solution is simple: create more of the dusting mixture. Whisk together an extra one-quarter cup of powdered sugar and one packet of hot cocoa mix. Return the sticky mix to the large bowl and toss it with the additional dry blend until the stickiness dissipates. Humidity is a factor, so consider using a dehumidifier in your kitchen or preparing the mix on a low-humidity day.
The Cereal is Crushing
The cereal chosen for this mix is delicate. If you are using a wooden spoon or stirring aggressively, the squares can break down, turning the finished product into more of a fragmented crumble. To fix this, use a gentler approach. Instead of traditional stirring, employ a wide, scooping motion. Use two spatulas to lift the cereal from the bottom of the bowl and fold it over the top. This ensures even distribution of the coating and dusting without applying crushing force.
The Chocolate Seized or Became Grainy
Seizing occurs when a small amount of water or moisture interacts with the melted chocolate, causing the cocoa solids to bind up. If this happens, do not discard the chocolate. Try stirring in one teaspoon of additional neutral oil or melted butter. If the seizing is severe, whisk in one tablespoon of boiling water or milk. This may seem counterintuitive, but adding a larger amount of liquid can sometimes force the cocoa solids to re-disperse into a smooth emulsion, salvaging the mixture.
Marshmallows Became Hard
If you add the marshmallows before the chocolate base is cooled, the residual warmth will cause the sugars in the marshmallows to melt slightly, and they will harden into unpleasantly stiff chunks once the mix cools completely. Ensure the chocolate base is truly cool—not just set, but cool to the touch—before adding the tender mini marshmallows.
Elevated Add-Ins and Flavor Combos
The beauty of this Hot Chocolate Snack Mix lies in its adaptability. Once you have the core chocolate-cocoa technique mastered, you can introduce variations to suit any palate or occasion.
Spiced Chocolate Depth
To give the mix a more sophisticated, layered flavor profile, incorporate additional warm spices into the powdered sugar mixture. Try a blend of one-quarter teaspoon ground nutmeg and a pinch of ground cloves along with the cinnamon. For a deeper, almost mole-like flavor, add one-eighth teaspoon of cayenne pepper. The subtle heat does not make the mix spicy, but it amplifies the chocolate notes dramatically.
Peppermint Twist
For a holiday-specific variation, replace the vanilla extract with one teaspoon of pure peppermint extract. When the base is finished, stir in one-half cup of crushed candy canes or peppermint candies along with the marshmallows and M&M’s. This is a powerful flavor combination that feels festive and bright.
Nutty Crunch
Introduce a layer of savory contrast and protein by incorporating nuts. Add one cup of toasted pecans, walnuts, or slivered almonds to the cereal base before pouring over the melted chocolate. This ensures the nuts also receive a chocolate coating, which helps them meld into the finished mix. Alternatively, toss them in the dusting mixture at the end for a raw, earthy crunch.
Caramel Swirl
For a salted caramel version, replace the vanilla extract with one teaspoon of caramel extract. Instead of using plain milk chocolate, use a mix of half milk chocolate and half caramel chips. Once the mix is completely dry, drizzle a very light amount of high-quality, pre-made caramel sauce over the entire batch, then let it set again before serving. Be careful not to use too much, as this risks stickiness.
Dark Chocolate Base
For those who prefer a less overtly sweet treat, substitute the milk chocolate chips with dark chocolate chips (sixty to seventy percent cocoa mass). This change gives the snack mix a more pronounced, slightly bitter chocolate intensity that pairs exceptionally well with the sweetness of the marshmallows and powdered sugar.

Thoughtful Presentations and Serving Pairings
This mix is versatile and can be used in numerous ways beyond simply serving it in a bowl. Its texture and flavor make it a wonderful component in other desserts or as a special gift.
The Edible Gift
Because this mix holds up well in storage, it is an ideal candidate for homemade food gifts. Package the finished mix in cellophane bags tied with ribbon or in small, attractive tins. Attaching a handwritten tag with the ingredients (minus the actual recipe) transforms it into a thoughtful, personal gift for neighbors, teachers, or colleagues during the holiday season.
Ice Cream Topping
The crunch and cocoa flavor of the mix make it a phenomenal topping for ice cream. Scoop plain vanilla, coffee, or even cherry ice cream into bowls, then scatter a generous handful of the mix over the top. The contrast between the cold, creamy ice cream and the room-temperature, crunchy, powdery snack mix is highly satisfying.
Trail Mix Upgrade
If you plan to take this mix on a hike or long trip, omit the marshmallows, as they can sometimes get compressed or stick together in warm conditions. Instead, double the amount of nuts and add one-half cup of small pretzels for a more substantial, savory contrast. This transforms it into a high-energy, sweet-and-salty trail mix perfect for travel.
Garnished Dessert Platter
Use the Hot Chocolate Snack Mix as a decorative element on a larger dessert platter. Surround a small mound of the mix with fresh fruit, such as sliced apples and mandarin oranges, along with cubes of sharp cheddar cheese. The unexpected pairing of the savory cheese and fruit with the intensely sweet mix creates a complex grazing platter.
Answers to Your Baking and Storage Queries
Understanding how to properly handle, store, and modify the recipe ensures that you can enjoy this treat long after you prepare it.
How long does this snack mix stay fresh?
When stored properly in an airtight container at cool room temperature, the mix will remain fresh and crunchy for up to one week. After that point, the cereal may begin to absorb moisture from the other ingredients, slightly softening its texture. For optimal crispness, consume it within the first four or five days.
Can I bake the mix instead of air-drying it?
Yes, you can gently bake the mix to accelerate the setting process and add a toasted flavor, similar to a traditional Chex mix. Spread the coated and dusted mix on a baking sheet and bake at two hundred fifty Fahrenheit for about fifteen minutes, stirring halfway through. Ensure you let it cool completely before adding the marshmallows or candies.
What is the best way to substitute the chocolate chips?
If you do not have chocolate chips, you can substitute a high-quality chocolate bar that has been finely chopped. The key is to measure by weight (six ounces or 170 grams) rather than volume to ensure the coating ratio is correct. Do not use chocolate syrup or chocolate spread, as these do not contain enough cocoa butter to properly set and will result in a perpetually sticky product.
Can I use different kinds of cereal?
Absolutely. While rice or corn squares provide the ideal shape for coating, you can substitute them with puffed wheat cereal, pretzel sticks, or even small, crunchy cookies like vanilla wafers. Just be sure to maintain the total volume of four cups and adjust the coating process to account for the size and fragility of the substituted ingredient.
Nutritional Snapshot
This information provides an estimate of the macronutrient breakdown per serving, based on a recipe yield of ten servings.
| Nutrient | Amount per Serving |
| Calories | 260 kcal |
| Protein | 3 g |
| Carbs | 48 g |
| Fat | 7 g |
| Fiber | 2 g |
| Sugar | 34 g |
| Sodium | 60 mg |
Nutritional Information Disclaimer
Nutrition information is an estimate and may vary based on preparation and ingredients used.
PrintThe Ultimate Hot Chocolate Snack Mix
This recipe captures the deep, comforting flavors of cocoa, sugar, and marshmallow in a highly addictive and richly textured Hot Chocolate Snack Mix. It’s an expert-level treat perfect for the holiday season.
- Prep Time: 15 mins
- Cook Time: 5 mins
- Total Time: 40 mins
- Yield: 10 servings 1x
- Category: Snack
- Method: No-Bake
- Cuisine: American
Ingredients
4 cups rice or corn square cereal
1/4 teaspoon fine sea salt
1 cup (6 ounces) milk chocolate chips
1 tablespoon unsalted butter or coconut oil
1 teaspoon pure vanilla extract
1/2 cup confectioners’ powdered sugar
2 packets hot cocoa mix (or 1/3 cup)
1/2 teaspoon ground cinnamon (optional)
1 cup mini marshmallows
1 cup candy-coated chocolate pieces
Instructions
1. Place the cereal and salt into a very large bowl. Combine chocolate chips and butter/oil in a small, microwave-safe bowl. Microwave in thirty-second intervals, stirring thoroughly after each one, until the chocolate is fully melted and perfectly smooth. Stir in the vanilla extract.
2. Pour the melted chocolate mixture over the cereal. Using a heatproof spatula, gently fold and stir the cereal until every piece is uniformly coated.
3. In a medium bowl, whisk together the powdered sugar, hot cocoa mix, and cinnamon. Sprinkle half of this cocoa mixture over the coated cereal and gently toss. Repeat with the remaining mixture until the cereal is evenly dusted and no longer sticky.
4. Spread the fully coated and dusted cereal in a single, thin layer onto a large baking sheet lined with parchment paper. Allow the mixture to set completely at room temperature for at least twenty minutes until dry to the touch.
5. Once the coating is dry, transfer the mix back to the large bowl. Stir in the mini marshmallows and candy-coated chocolate pieces. Serve immediately or store in an airtight container.
Notes
Do not refrigerate the mix while setting, as this can introduce moisture and cause stickiness.
If the mix is sticky, toss it with an additional quarter cup of powdered sugar and one packet of hot cocoa mix.
For a peppermint twist, use one teaspoon of peppermint extract instead of vanilla.
Nutrition
- Serving Size: 1/2 cup
- Calories: 260
- Sugar: 34g
- Sodium: 60mg
- Fat: 7g
- Saturated Fat: 4g
- Unsaturated Fat: 3g
- Trans Fat: 0g
- Carbohydrates: 48g
- Fiber: 2g
- Protein: 3g
- Cholesterol: 5mg


