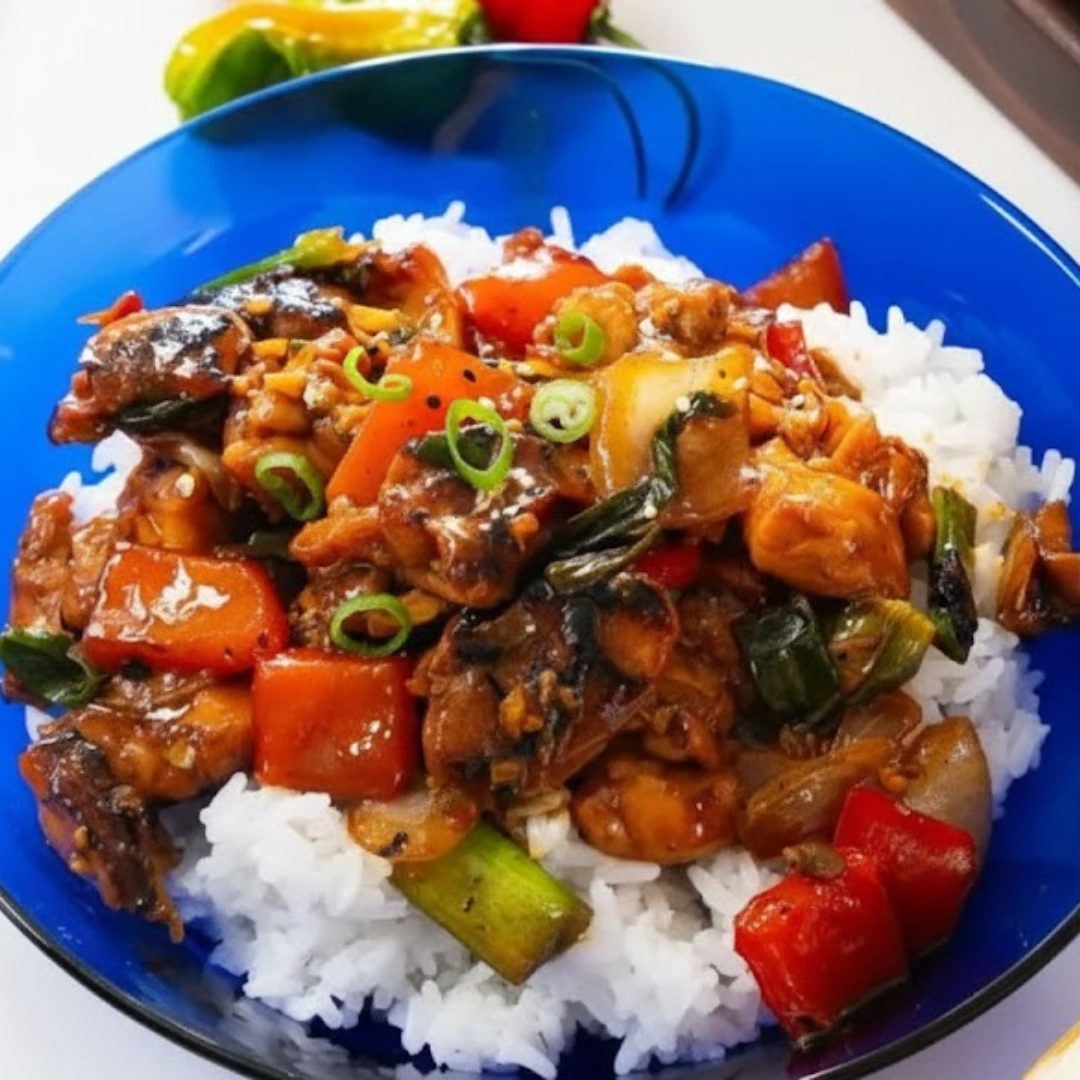
The weeknight dinner challenge often comes down to a choice: speed or flavor. Far too often, we compromise on one for the sake of the other, settling for something simple but ultimately uninspiring. This is where the Honey Garlic Chicken Stir Fry enters the culinary conversation, proving that truly satisfying, restaurant-quality food is achievable even on your busiest days. It’s a dish built on the beautiful balance of sweet, savory, and aromatic notes, coated in a sticky, glossy glaze that clings perfectly to every bite of tender chicken and crisp-tender vegetable. The beauty lies not just in its twenty-minute execution, but in the masterful contrast of textures and the depth of flavor drawn from simple, staple pantry items. Whether you are a novice cook or a seasoned home chef, mastering this fundamental stir-fry technique will elevate your entire repertoire.
Table of Contents
The Essential Components: Ingredients Breakdown
A great stir fry starts with organization, known in the kitchen as mise en place. Having your ingredients measured, chopped, and ready ensures a smooth, quick cooking process and prevents burning due to hesitation.
For the Chicken and Marinade
- One and a half pounds boneless, skinless chicken breasts or thighs, cut into one-inch pieces
- One tablespoon low-sodium soy sauce
- One teaspoon sesame oil
- One-half teaspoon white pepper
- One teaspoon cornstarch
For the Vegetables
- One tablespoon neutral, high smoke point oil (such as grapeseed, canola, or avocado)
- Two cups broccoli florets, bite-sized
- One large red bell pepper, thinly sliced
- One cup sliced carrots (on a bias for more surface area)
- One-half large yellow onion, sliced pole-to-pole
For the Sticky Honey Garlic Glaze
- One-half cup chicken stock (low sodium)
- One-third cup honey
- Three tablespoons low-sodium soy sauce
- Two tablespoons rice vinegar
- One tablespoon fresh ginger, minced
- Four cloves garlic, minced
- One teaspoon sriracha or red pepper flakes (optional, for heat)
- One tablespoon cornstarch mixed with two tablespoons cold water (the ‘slurry’)

A Primer on Technique: The Cooking Process, Simplified
Executing a flawless stir-fry is less about complex steps and more about managing heat and timing. This is a high-heat, high-speed endeavor.
- Prepare the Chicken: Marinate the cut chicken pieces to tenderize and enhance flavor.
- Construct the Glaze Base: Whisk together all the sauce ingredients, except the cornstarch slurry, and set aside.
- Sear the Protein: Cook the marinated chicken in the wok or large skillet over high heat until browned and nearly cooked through. Remove it from the pan.
- Blanch and Build the Base: Add a fresh splash of oil and then introduce the firmer vegetables, followed by the softer ones, maintaining a lively sizzle.
- Reintroduce and Glaze: Return the chicken to the pan, pour the reserved sauce base over the ingredients, and bring the liquid to a simmer.
- Thicken and Finish: Stir in the cornstarch slurry, stirring constantly until the sauce visibly thickens and turns into a glossy, beautiful glaze that coats all the ingredients.
- Serve: Transfer immediately to plates over rice or noodles and garnish.

Achieving Wok Hei at Home: In-Depth Method and Mastery
The success of any great stir-fry hinges on applying intense, focused heat to the ingredients for a short period. This rapid cooking technique caramelizes the exterior of the vegetables and protein, lending a desirable smoky depth often called wok hei. You can simulate this effect effectively with a standard home skillet or wok, provided you adhere to the following steps precisely.
Preparing the Chicken for Optimal Sear:
Before cooking, ensure the marinated chicken is patted mostly dry after its soak, even with the small amount of cornstarch in the coating. Excess moisture will steam the chicken rather than sear it, leading to a dull, rubbery exterior. Use a very hot pan, and cook the chicken in batches if necessary. Crowding the pan is a critical mistake to avoid, as it drops the temperature precipitously. You are looking for a beautiful, golden-brown crust and a distinct nutty aroma as the exterior sugars caramelize. Cook until the chicken is roughly eighty percent done—it will finish cooking when the sauce is introduced later, preventing dry, overcooked poultry. Remove the chicken to a clean plate and reserve any residual rendered fat or browned bits in the pan; these form the flavor foundation for the rest of the dish.
The Vegetable Order and Sensory Cues:
The secret to perfectly crisp-tender vegetables—al dente—is staggering their introduction based on their density. Start with the “hardest” vegetables that require the most heat, in this case, the carrots and broccoli. Add a fresh teaspoon of high smoke point oil to your hot pan. Stir the carrots and broccoli for two to three minutes, listening for a loud, continuous hiss. The aroma should be intensely fresh and slightly toasted. Next, introduce the medium-firm vegetables, the sliced onion and bell pepper. These cook quickly and only need about one to two minutes of vigorous tossing. The goal is to heat them through, softening them slightly while maintaining their vibrant color and essential crunch. If you hear the vegetables starting to sound soft or quiet, your pan is too cool. Conversely, if you see them turning black, your heat is too high.
Bringing the Glaze to Life:
Once the vegetables have reached the desired texture—bright, crunchy, and still holding their shape—it is time to complete the dish. Return the seared chicken and any accumulated juices to the pan. Give the reserved honey garlic sauce base a quick whisk (since the honey tends to settle) and pour the entire mixture over the contents of the pan. The volume of liquid should immediately deglaze the pan, picking up all the tasty browned bits from the chicken and vegetables. Bring this mixture to a rolling simmer. This heat activation is essential for melding the flavors of the garlic, ginger, soy, and honey. Allow it to simmer for sixty to ninety seconds, just long enough to ensure the chicken is fully cooked through.
The Final Act: The Cornstarch Slurry:
The thickening slurry is the final critical step that transforms a savory broth into a sticky, glossy coating. Off the heat, or on the lowest setting, stir the slurry (one tablespoon cornstarch mixed with two tablespoons cold water) one last time to ensure it is fully homogenized. Pour the slurry directly into the simmering sauce while stirring vigorously and continuously. Do not dump the slurry and stop stirring; this will result in lumps. As you stir, the sauce will undergo a dramatic change, thickening within seconds and gaining a beautiful translucent sheen. Once it reaches the texture of thin gravy or a heavy syrup, remove the pan from the heat immediately. Overcooking after adding the slurry will cause the starch to break down and the sauce to thin out again. The final look should be a deep amber color, fully coating the chicken and vegetables in an irresistible, shiny glaze. This completes your perfect Honey Garlic Chicken Stir Fry.
Perfecting the Sticky Glaze: Essential Sauce-Making Tips
A common issue in stir-frying is ending up with a sauce that is either too runny or too thick and gummy. The success of this glaze requires attention to detail.
- Use Cold Water for the Slurry: Always mix cornstarch with cold liquid, typically water, before adding it to a hot sauce. Adding cornstarch directly to a hot liquid will cause it to clump instantly, creating a texture that is impossible to smooth out.
- Taste and Adjust Before Thickening: Before you introduce the cornstarch slurry, taste the sauce base. Is it too sweet? Add a dash more rice vinegar or soy sauce. Too salty? A tiny splash of water or stock can correct it. Do all flavor adjustments when the sauce is liquid, as it is much harder to alter once thickened.
- Clean Your Wok or Pan Thoroughly: If you have any residue, burnt bits, or excessive oil remaining after cooking the chicken, quickly wipe it out with a paper towel before starting the vegetables. Any burnt residue will impart a bitter, acrid flavor to your finished glaze.
- Use Quality Honey: The quality of the honey directly impacts the final flavor. Use a good quality clover or even a floral honey rather than a generic, processed variety. The distinctive floral notes will enhance the aromatic quality of the ginger and garlic.
- Monitor the Simmer: When you add the sauce base, ensure the liquid is simmering but not boiling violently. A gentle, steady simmer is sufficient to finish cooking the chicken and integrate the flavors without reducing the liquid too quickly or scorching the sugars.
- Avoid Over-Thickening: Once the slurry is added, you only need to cook it for about fifteen to thirty seconds until it coats the back of a spoon. If the sauce becomes too thick—like paste—you can thin it out by stirring in a tablespoon or two of hot chicken stock until the desired consistency is achieved.
Customizing Your Stir Fry: Vegetable and Protein Swaps
This specific preparation of Honey Garlic Chicken Stir Fry is highly adaptable. It provides a robust flavor profile that pairs well with a multitude of textures and ingredients, allowing for creativity and utilizing what you have on hand.
- Alternative Proteins: Swap the chicken for firm tofu, cubed and pan-fried until crispy, or substitute shrimp (reduce cooking time by half). You can also use thinly sliced pork tenderloin or beef flank steak, which should be marinated identically to the chicken.
- Heartier Vegetables: Introduce snap peas, water chestnuts for a textural crunch, or bamboo shoots for a deeper, earthier note. Sliced baby corn adds a different kind of sweetness. You can also add thinly sliced cabbage during the last minute for a wilted texture.
- Changing the Base Fat: While a neutral oil is recommended for high-heat cooking, a small amount of rendered bacon fat or even ghee can introduce a richer, more complex background note, though these will slightly overpower the delicate honey-garlic notes.
- Adding Heat: For a spicy variation, double the amount of sriracha or red pepper flakes, or incorporate thinly sliced jalapeños or serrano peppers into the vegetable mix for a sharp, fresh heat.
Pairing and Presentation: Enhancing the Meal
A stir-fry is a complete meal on its own, but the right accompaniments can elevate it from a simple dinner to a fulfilling, restaurant-style presentation.
- Classic Steamed Rice: The most traditional pairing is perfectly cooked short-grain white rice or jasmine rice. The mild, fluffy texture and subtle aroma of the rice are the ideal backdrop for soaking up the sticky honey-garlic glaze. Brown rice or quinoa works equally well for a whole-grain alternative.
- Simple Noodles: Toss the finished stir-fry with lo mein or udon noodles. Before you add the glaze, toss the cooked noodles directly into the wok with the vegetables and chicken to coat them slightly with the aromatic oil, then proceed with the sauce steps.
- Cooling Contrast: Serve the stir-fry alongside a simple, cooling side salad. A classic choice is sliced cucumbers dressed with a splash of rice vinegar and a pinch of salt. This provides a refreshing counterpoint to the sweetness and richness of the main dish.
- Crunchy Garnish: Always finish the dish with a textural garnish. Toasted sesame seeds, finely chopped scallions (green parts only), or even a drizzle of chili crisp oil add both visual appeal and a final layer of texture and flavor complexity.

Troubleshooting Common Stir Fry Questions
Understanding the nuances of the technique ensures a successful dish every time. Here are answers to common concerns.
Why is my sauce not thickening?
The sauce typically fails to thicken for two main reasons: insufficient simmering time, or an inactive cornstarch slurry. Ensure the sauce reaches a full simmer before adding the slurry, as cornstarch only activates and thickens at high temperatures. Also, verify that you mixed the cornstarch with cold water thoroughly just before adding it; if it sits too long, the cornstarch settles to the bottom of the cup and you only add water. If the sauce is still liquid, mix a second, smaller slurry and add it in, stirring quickly.
Can I use frozen vegetables?
You can certainly use frozen vegetables, but their preparation requires a slight adjustment. Do not thaw them first. Add the frozen vegetables directly to the hot pan, increase the heat slightly, and stir them for an extra minute or two until all the excess moisture has evaporated. If you skip this step, the released water will drastically drop the pan temperature, resulting in soggy vegetables and a watery sauce base, compromising the whole textural profile.
Is it safe to substitute butter for oil?
No, it is not safe or advisable for high-heat stir-frying. Butter has a very low smoke point because of its milk solids, meaning it will smoke, burn, and turn black and bitter long before the pan reaches the temperature needed to properly sear the chicken and crisp the vegetables. Always stick to a neutral, high smoke point oil like canola, grapeseed, or peanut oil for this technique.
How do I store leftovers?
Leftover stir-fry can be stored in an airtight container in the refrigerator for three to four days. It reheats best in a small amount of oil in a skillet over medium heat, rather than in the microwave. This method helps to re-crisp the vegetables slightly and revitalize the glossy texture of the honey glaze.
Can I prepare the sauce ahead of time?
Yes, the sauce base (all ingredients except the cornstarch slurry) can be mixed and stored in the refrigerator for up to one week. You must, however, prepare the cornstarch slurry right before you are ready to use it, as it will settle and become ineffective if mixed too far in advance.
Nutritional Snapshot
| Nutrient | Amount per Serving |
| Calories | 425 kcal |
| Protein | 38 g |
| Carbs | 45 g |
| Fat | 13 g |
| Fiber | 4 g |
| Sugar | 25 g |
| Sodium | 550 mg |
Disclaimer
Nutrition information is an estimate and may vary based on preparation and ingredients used.
PrintCrafting the Ultimate Honey Garlic Chicken Stir Fry for a Weeknight Feast

This irresistibly creamy garlic parmesan chicken pasta is the ultimate comfort food. Ready in 30 minutes with juicy chicken and a velvety sauce.
- Prep Time: 10 mins
- Cook Time: 20 mins
- Total Time: 30 mins
- Yield: 4 servings 1x
- Category: Dinner
- Method: Stovetop
- Cuisine: American
Ingredients
2 boneless chicken breasts
3 tbsp butter
4 garlic cloves, minced
1½ cups heavy cream
1 cup freshly grated parmesan
8 oz penne or fettuccine
Salt & pepper to taste
1 tsp Italian seasoning
Fresh parsley (optional)
Instructions
1. Cook pasta according to package directions. Drain and set aside.
2. Season chicken with salt, pepper, and Italian seasoning.
3. In a large skillet, melt 1 tbsp butter over medium heat. Sear chicken until golden and cooked through. Remove and slice.
4. In the same skillet, add remaining butter and sauté garlic for 30 seconds.
5. Add heavy cream and bring to a simmer.
6. Stir in parmesan cheese and cook until melted and thickened.
7. Return chicken to skillet and add cooked pasta. Toss to coat.
8. Garnish with parsley and extra parmesan. Serve hot.
Notes
Use fresh parmesan for best results.
Add spinach or mushrooms for variation.
Store leftovers in an airtight container for up to 4 days.
Nutrition
- Serving Size: 1 bowl
- Calories: 620
- Sugar: 2g
- Sodium: 480mg
- Fat: 38g
- Saturated Fat: 20g
- Unsaturated Fat: 14g
- Trans Fat: 0g
- Carbohydrates: 45g
- Fiber: 2g
- Protein: 32g
- Cholesterol: 135mg