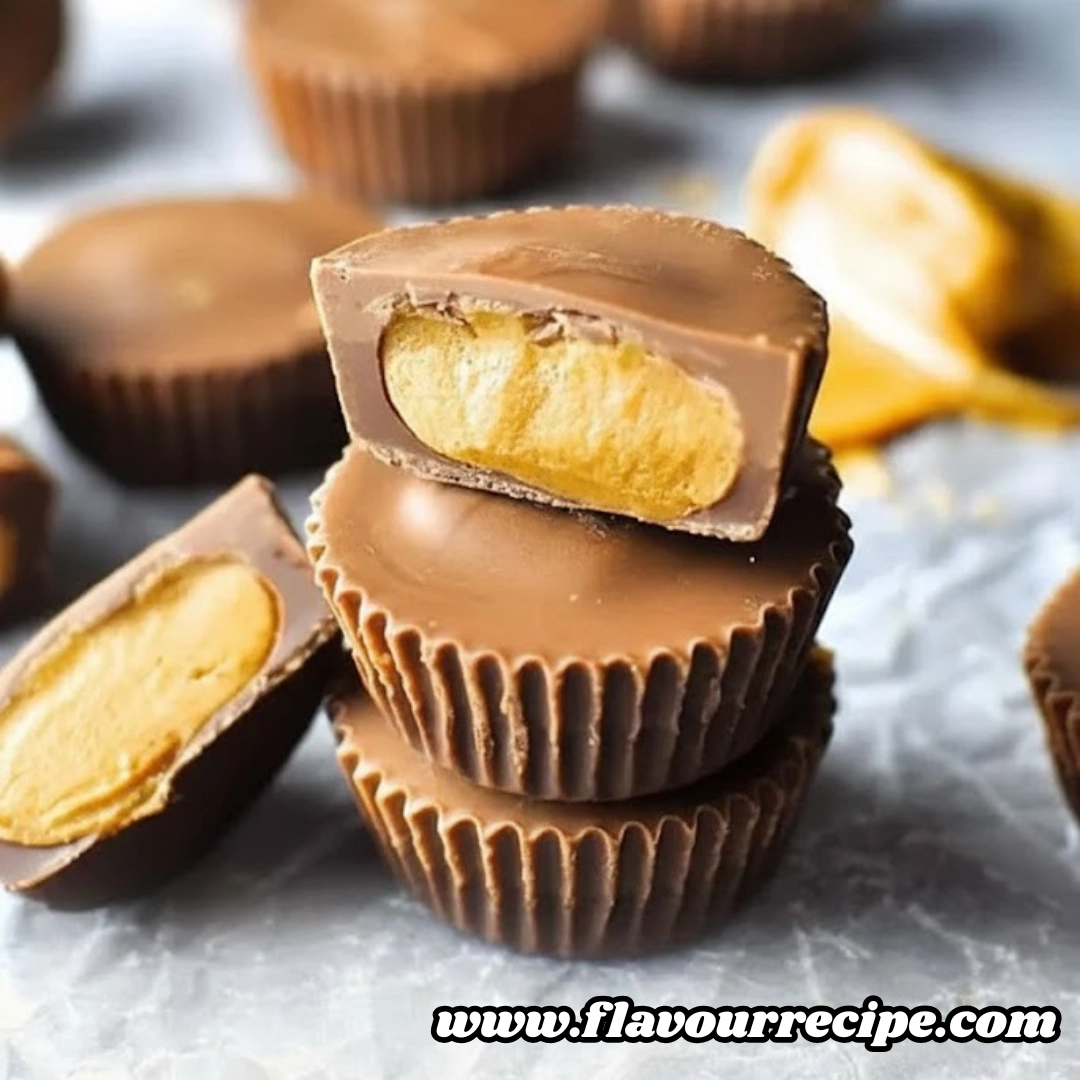
There is a specific kind of magic that happens when salty, creamy peanut butter meets the smooth, snap-worthy shell of high-quality chocolate. For many of us, the orange wrapper of a Reese’s is a symbol of pure nostalgia. However, once you learn how to make these iconic treats in your own kitchen, the store-bought version simply cannot compare. This recipe focuses on achieving that signature slightly gritty, sweet, and melt-in-your-mouth peanut butter center while ensuring every single cup is perfectly encased in a chocolate shell. Whether you are living somewhere where these are hard to find or you just want a superior version of your favorite candy, this guide will walk you through every nuance of the process.
Table of Contents
Ingredients
- 1 cup smooth peanut butter
- 60 grams unsalted butter (approximately 4 tablespoons)
- 1/4 cup brown sugar
- 1 cup icing sugar, also known as powdered sugar
- 500 grams chocolate, specifically formulated for melting rather than standard eating chocolate

Instructions
- Begin by preparing your workspace. Line three twelve-hole mini muffin tins with paper patties to ensure the candies do not stick to the pan.
- In a small saucepan placed over medium heat, combine the smooth peanut butter, the unsalted butter, and the brown sugar.
- Stir the mixture constantly as it heats. Continue this process until the ingredients have fully melted together and the mixture begins to bubble gently.
- Remove the saucepan from the heat source immediately.
- Add the icing sugar to the warm peanut butter mixture gradually, about one-quarter cup at a time. Stir vigorously after each addition to ensure the sugar fully dissolves and the texture remains uniform.
- Set the finished peanut butter filling aside to cool. If you are in a hurry, you can place the mixture in the refrigerator to accelerate the cooling process.
- Take half of your melting chocolate (250 grams) and place it in a microwave-safe bowl. Heat the chocolate in thirty-second bursts, stirring thoroughly between each interval until it is completely smooth.
- Carefully pour approximately one and a half to two teaspoons of the melted chocolate into the bottom of each prepared muffin cup.
- Once the peanut butter filling is cool enough to handle, scoop up a slightly heaped teaspoon of the mixture. Roll it into a small ball and then flatten it slightly into a disc. Ensure the diameter of the disc is smaller than the muffin cup so the chocolate can flow around the sides.
- Place one peanut butter disc into the center of each chocolate-filled muffin cup. Repeat this for all cups.
- Place the tins in the refrigerator for twenty minutes to allow the chocolate base and the filling to set firmly.
- Melt the remaining 250 grams of chocolate using the same thirty-second microwave burst method.
- Pour one and a half to two teaspoons of the fresh melted chocolate over the top of each peanut butter disc, ensuring the filling is completely covered.
- Gently tap or bang the muffin tin against your countertop. This helps the chocolate level out and removes any trapped air bubbles for a professional finish.
- Return the tins to the refrigerator for another twenty minutes or until the chocolate is fully set.
- Carefully peel away the paper patties and serve your homemade treats.

Mastering the Art of the Perfect Chocolate Shell
The secret to a successful peanut butter cup lies in the structural integrity of the chocolate. When you are melting your chocolate, the goal is a glossy, fluid consistency that can easily coat the sides of the paper liners. Using chocolate specifically designed for melting is vital because it contains a higher fat content, usually cocoa butter, which allows it to flow better than a standard chocolate bar intended for snacking.
When you pour that initial layer into the muffin tin, you are creating the foundation. If the chocolate is too thick, it won’t rise up the sides of the liner when you drop the peanut butter disc in. By gently pressing the flattened peanut butter ball into the wet chocolate, you encourage the chocolate to displace upwards, creating that side-wall that seals the filling inside. The twenty-minute chilling period is non-negotiable. If you skip this and pour warm chocolate over a soft filling, the weight and heat will cause the peanut butter to displace, leading to a “leaky” cup where the filling touches the paper rather than being encased in chocolate.
Why Quality Sugar and Heat Management Matter
You might wonder why we heat the peanut butter, butter, and brown sugar first. This step is essential for texture. The brown sugar needs that heat to partially dissolve and meld with the fats, providing a deep, molasses-like undertone that mimics the complex flavor of the original candy.
When it comes to the icing sugar, quality is paramount. Lower-grade powdered sugars often contain higher amounts of cornstarch or are ground less finely, which can result in a chalky or gritty mouthfeel. By adding the sugar to the warm peanut butter mixture one-quarter cup at a time and stirring vigorously, you are essentially creating a smooth fudge. This “dough-like” consistency is what allows you to roll the filling into balls. If the mixture feels too soft to roll, it simply needs more time to cool. As the butter in the mixture firms up, the filling becomes much easier to manipulate.
Modifications and Ingredient Substitutions
While the classic recipe calls for smooth peanut butter, those who enjoy a bit of texture can easily swap in crunchy peanut butter. This adds a delightful snap to the center of the cup. If you have a peanut allergy in the house but still want the experience, almond butter or sunflower seed butter can be substituted in equal measurements. However, keep in mind that these alternative butters have different oil contents, so you may need to adjust the amount of icing sugar slightly to reach that “rollable” consistency.
On the chocolate front, the world is your oyster. While milk chocolate provides the most authentic “Reese’s” experience, dark chocolate (around sixty to seventy percent cocoa) offers a sophisticated, less sweet alternative that pairs beautifully with the salty filling. For a decorative touch, you could even use white chocolate for the top layer or drizzle it over the finished milk chocolate cups for a marbled effect.
Optimal Storage and Serving Suggestions
To keep your homemade peanut butter cups at their best, store them in an airtight container. If your kitchen is cool, they can stay on the counter for several days. However, for the best “snap” of the chocolate, many prefer to keep them in the refrigerator. They will last for up to two weeks when chilled—though it is unlikely they will last that long before being eaten.
For a true gourmet experience, try serving these alongside a glass of cold milk or a strong espresso. The bitterness of the coffee cuts through the richness of the peanut butter and sugar perfectly. If you are feeling adventurous, you can crumble these homemade cups over vanilla bean ice cream or use them as a decadent topping for chocolate cupcakes.
Common Questions Regarding Homemade Candy Making
Why is my peanut butter filling too soft to roll into balls?
This usually happens for one of two reasons: either the mixture hasn’t cooled down enough, or the ratio of fats to sugar is slightly off. The butter needs to return to a semi-solid state to provide structure. Try placing the filling in the refrigerator for fifteen minutes. If it is still too sticky after cooling, stir in an additional tablespoon of icing sugar to stiffen the “dough.”
Can I use regular chocolate bars instead of melting chocolate?
While you can use standard eating chocolate, it often lacks the stability and flow of melting wafers or compound chocolate. If you use a standard bar, you might find the chocolate turns “bloomed” (white streaks appear) or it may not set as firmly at room temperature. For the best results, look for chocolate labeled as “couverture” or “melting wafers.”
How do I prevent the chocolate from seizing while melting?
Chocolate is very sensitive to heat and moisture. Ensure your bowl and stirring spoon are completely dry, as even a single drop of water can cause the chocolate to clump and turn grainy. Using the thirty-second burst method in the microwave is the safest way to avoid scorching the chocolate, which happens easily if it is heated for too long without stirring.
A Rewarding Kitchen Project
Creating your own candy at home is an incredibly satisfying endeavor that yields results far superior to anything found in a vending machine. By following this two-step setting process and paying close attention to the texture of your peanut butter center, you will produce a treat that is both visually stunning and delicious. These cups make wonderful gifts, though you might find it difficult to part with them once you have tasted the difference that real butter and high-quality chocolate make.
Nutritional Information
| Nutrient | Amount Per Serving |
| Calories | 165 |
| Total Fat | 11 grams |
| Saturated Fat | 5 grams |
| Cholesterol | 4 milligrams |
| Sodium | 45 milligrams |
| Total Carbohydrates | 16 grams |
| Dietary Fiber | 1 gram |
| Sugars | 14 grams |
| Protein | 3 grams |
Disclaimer
The nutritional values provided are estimates based on standard ingredient data. Actual nutritional content may vary depending on the specific brands of peanut butter and chocolate utilized in your kitchen.
PrintThe Ultimate Guide to Crafting the Best Homemade Reese’s Peanut Butter Cups

Skip the store-bought orange wrapper! These homemade peanut butter cups feature a perfectly snap-worthy chocolate shell and a creamy, salty-sweet peanut butter center that tastes better than the original.
- Prep Time: 40 mins
- Cook Time: 10 mins
- Total Time: 50 mins
- Yield: 30 servings 1x
- Category: Dessert
- Method: No-Bake
- Cuisine: American
- Diet: Vegetarian
Ingredients
1 cup smooth peanut butter
60 grams unsalted butter
1/4 cup brown sugar
1 cup icing sugar (powdered sugar)
500 grams melting chocolate
Instructions
1. Line 3 x 12 hole mini muffin tins with paper patties.
2. Combine peanut butter, butter and sugar in a small saucepan over medium heat until melted and bubbling gently.
3. Remove from heat and stir in powdered sugar 1/4 cup at a time until smooth. Let cool.
4. Melt half the chocolate in the microwave in 30 second bursts.
5. Pour 1.5 to 2 tsp of chocolate into each muffin cup.
6. Roll 1 tsp of peanut butter filling into a ball, flatten into a disc, and place in the center of each cup.
7. Refrigerate for 20 minutes.
8. Melt remaining chocolate and pour over the filling to cover completely. Tap tin to level.
9. Refrigerate for 20 minutes until set. Remove liners and serve.
Notes
Use high-quality icing sugar to ensure the filling isn’t grainy.
Always use melting chocolate or couverture for the best snap and shine.
Store in the refrigerator in an airtight container for up to 2 weeks.
Nutrition
- Serving Size: 1 cup
- Calories: 165
- Sugar: 14g
- Sodium: 45mg
- Fat: 11g
- Saturated Fat: 5g
- Unsaturated Fat: 6g
- Trans Fat: 0g
- Carbohydrates: 16g
- Fiber: 1g
- Protein: 3g
- Cholesterol: 4mg


