
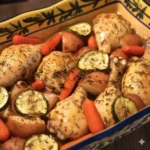
This hearty, oven-braised dish represents the quintessence of home-style cooking, where the natural juices of the poultry and a medley of garden vegetables create a rich, savory broth. Often prepared for Sunday gatherings or a restorative family supper, Grandma’s Famous Chicken relies on the slow release of flavors in a sealed environment to ensure every component is tender and infused with aromatic garlic. The beauty of this preparation lies in its rustic simplicity; by nesting bone-in chicken legs among starchy potatoes and vibrant squash, you create a complete meal that yields a magnificent liquid gold broth.
Table of Contents
Components for the Pan
- 8 whole chicken legs: Bone-in and skin-on for maximum flavor and moisture.
- 5 large white potatoes: Peeled and cut into two-inch chunks to withstand the long braise.
- 8 ounces baby carrots: Left whole for a touch of natural sweetness.
- 5 garlic cloves: Whole, peeled, and slightly crushed to release their essential oils.
- 2 yellow squash: Quartered lengthwise and sliced into half-inch thick pieces.
- 1 large yellow onion: Peeled and cut into thin, translucent rings.
- 1 tablespoon dried parsley flakes: For a subtle, herbal earthiness.
- 1/2 tablespoon garlic powder: To provide a deep, savory foundation.
- Sea salt and cracked black pepper: To taste, applied generously over the surface.
- 4 tablespoons unsalted butter: Divided into eight equal portions for basting.
- 2 cups filtered water: Or enough to reach a half-inch depth in the roasting pan.

Preparation Overview
- Set the oven rack to the center position and heat to three hundred fifty Fahrenheit.
- Arrange the chicken legs in a large nine-by-thirteen inch deep baking dish.
- Tuck the potatoes, carrots, garlic, and squash into the spaces around the meat.
- Distribute the onion slices across the top of the entire assembly.
- Season the dish thoroughly with parsley, garlic powder, salt, and pepper.
- Place a half-tablespoon pat of butter directly on the thickest part of each chicken leg.
- Pour the water into the corner of the pan until it reaches a depth of roughly half an inch.
- Seal the dish tightly with heavy-duty aluminum foil and bake for sixty minutes.
- Remove the foil and continue roasting for another twenty minutes to finish.
- Rest the dish for five minutes before serving to allow the juices to settle.
Detailed Culinary Steps
Achieving the Foundation
Begin by selecting a roasting dish that allows the chicken to lay flat without excessive crowding. This ensures the heat circulates evenly. When you nestle the potatoes and carrots around the protein, try to keep the vegetables partially submerged in the water while leaving the chicken skin exposed to the rising steam. The aroma of raw garlic and onions will be sharp initially, but it mellows significantly during the first hour of cooking.
The Braising Process
During the initial sixty-minute window at three hundred fifty Fahrenheit, the foil acts as a pressurized environment. You will notice the scent of the garlic powder and parsley intensifying. The water will begin to bubble, combining with the rendered chicken fat and melting butter to create a thin but flavorful jus. At the forty-five-minute mark, the kitchen should smell deeply savory, a sign that the connective tissues in the chicken legs are beginning to break down.
Developing Texture and Color
Once the foil is removed, the environment shifts from a steam-heavy braise to a dry roast. You are looking for the chicken skin to lose its translucency and for the vegetables to soften until they offer no resistance to a paring knife. The onions on top should begin to wilt and caramelize slightly. If the water has evaporated too quickly, a small splash more can be added to preserve the broth, which is a hallmark of this recipe.
Assessing Doneness
The final check involves piercing the thickest part of the drumstick. The juices must run completely clear, without any hint of pink. The potatoes should be fork-tender but not falling apart into a mash. The yellow squash will be very soft, almost melting into the surrounding liquid, which thickens the broth naturally.

Professional Roasting Insights
- The Butter Technique: Placing the butter directly on the meat rather than in the water ensures the fats baste the chicken skin as they melt, providing a richer mouthfeel.
- Liquid Level Management: Always pour the water into the corner of the pan. Pouring it directly over the seasoned chicken will wash away all the herbs and garlic powder you just applied.
- Potato Selection: While white potatoes are traditional, Yukon Golds are a fantastic substitute because their high starch content creates an even creamier broth.
- The Foil Seal: Ensure the foil is crimped tightly around the edges of the pan. If steam escapes during the first hour, the potatoes may remain hard even after the full cooking time.
- Resting Period: Do not skip the resting phase. This allows the protein fibers to relax, making the chicken significantly more tender.
- Garlic Mellowing: If you prefer a milder garlic flavor, leave the cloves whole. For a more pungent sauce, mince them finely before adding.
Creative Variations
- The Root Vegetable Swap: Replace the yellow squash with parsnips or rutabaga for a deeper, more autumnal flavor profile that stands up well to the long cooking time.
- Herbaceous Enhancement: Substitute the dried parsley for fresh sprigs of rosemary and thyme tucked between the chicken legs for a more sophisticated, woody aroma.
- The Zesty Finish: Squeeze the juice of half a lemon over the dish immediately after removing the foil to brighten the heavy, buttery flavors of the broth.

Suggestions for Serving
This dish is best served in shallow bowls to accommodate the generous amount of broth produced during the roasting process. A thick slice of toasted sourdough or a warm baguette is essential for soaking up the garlic-infused liquid. For a brighter contrast, a simple side of crisp bitter greens with a sharp vinaigrette helps cut through the richness of the butter and chicken fat.
Frequently Asked Questions
Can I use chicken breasts instead of legs?
Chicken breasts are much leaner and tend to dry out during the long eighty-minute cooking process. If you must use them, reduce the initial covered cooking time to forty minutes and ensure they are bone-in to retain as much moisture as possible.
What should I do if my broth looks too thin?
If you prefer a thicker gravy-like consistency, you can remove the chicken and vegetables once cooked and whisk a small amount of cornstarch slurry into the pan liquids while the dish is still hot. However, the traditional appeal of Grandma’s Famous Chicken is its light, soup-like broth.
Can I prepare this in a slow cooker?
Yes, this recipe adapts well to a slow cooker. Place the vegetables at the bottom and the seasoned chicken on top, using only one cup of water. Cook on low for six to seven hours, though you will miss out on the slightly roasted texture of the onions.
Is it possible to make this ahead of time?
This meal actually tastes better the next day as the flavors in the broth continue to meld. Reheat it gently in a covered dish in the oven at three hundred Fahrenheit to prevent the chicken from becoming rubbery.
Nutrition Information
| Nutrient | Amount per Serving |
| Calories | 520 kcal |
| Protein | 35 g |
| Carbs | 48 g |
| Fat | 21 g |
| Fiber | 7 g |
| Sugar | 4 g |
| Sodium | 198 mg |
Nutrition information is an estimate and may vary based on preparation and ingredients used.
PrintGrandma’s Famous Chicken
This hearty, oven-braised dish represents the quintessence of home-style cooking, where the natural juices of the poultry and garden vegetables create a rich, savory broth.
- Prep Time: 15 mins
- Cook Time: 1 hr 20 mins
- Total Time: 1 hr 35 mins
- Yield: 8 servings 1x
- Category: Main Dish
- Method: Oven
- Cuisine: American
Ingredients
8 chicken legs
5 large white potatoes, peeled and chopped
8 ounces baby carrots
5 cloves garlic, crushed
2 yellow squash, sliced
1 large yellow onion, sliced into rings
1 tablespoon dried parsley
1/2 tablespoon garlic powder
Salt to taste
Black pepper to taste
4 tablespoons butter
2 cups water
Instructions
1. Preheat your oven to three hundred fifty Fahrenheit.
2. Arrange chicken legs in a 9×13 inch baking dish.
3. Distribute potatoes, carrots, garlic, and squash around the chicken pieces.
4. Layer onion slices on top and season with parsley, garlic powder, salt, and pepper.
5. Place butter pats on chicken legs and add water to the pan corner.
6. Cover tightly with foil and bake for 60 minutes.
7. Remove foil and bake for an additional 20 minutes until the chicken is cooked through.
8. Rest for five minutes before serving.
Notes
Use white or Yukon Gold potatoes for the best broth consistency.
Ensure the foil seal is tight to steam the vegetables properly.
Serve with crusty bread to soak up the garlic butter broth.
Nutrition
- Serving Size: 1 leg with vegetables
- Calories: 520
- Sugar: 4g
- Sodium: 198mg
- Fat: 21g
- Saturated Fat: 8g
- Unsaturated Fat: 10g
- Trans Fat: 0g
- Carbohydrates: 48g
- Fiber: 7g
- Protein: 35g
- Cholesterol: 118mg


