
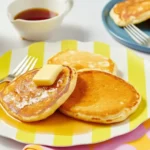
There is a simple, satisfying magic in a stack of perfectly cooked Good Old-Fashioned Pancakes. These aren’t the flat, rubbery, or overly sweet versions found in diners; this is the archetypal breakfast cake—airy, tender, and with that distinct, slightly tangy lift that only buttermilk can provide. They are the ultimate Saturday morning tradition, a casual weeknight treat, or the centerpiece of a holiday brunch. When doused in a warm maple syrup and topped with melting butter, they truly embody cozy comfort. This recipe focuses on achieving that ideal light texture and golden-brown exterior, ensuring a delightful start to any day, regardless of the occasion.
Table of Contents
The Essential Components for Your Morning Stack
This formula relies on common pantry staples, but the technique is key. Measurements are provided in US customary units, with metric grams listed for precision where helpful.
Dry Foundation
- 1 and one-half cups all-purpose flour (180 g)
- 3 tablespoons granulated sugar
- 1 teaspoon baking powder
- one-half teaspoon baking soda
- one-half teaspoon fine sea salt
Wet Ingredients and Fat
- 1 and one-quarter cups buttermilk (300 ml)
- 1 large egg
- 3 tablespoons unsalted butter, melted, plus extra for the griddle

Crafting the Batter and Cooking Process: A Quick Guide
Follow these steps precisely to achieve a light, airy crumb without overdeveloping the gluten.
- Whisk the Dry: In a large mixing bowl, thoroughly whisk together the flour, sugar, baking powder, baking soda, and salt.
- Combine the Wet: In a separate medium bowl, whisk the buttermilk and egg until just combined. Gently pour in the three tablespoons of melted butter.
- Mix the Batter: Create a well in the center of the dry ingredients and pour in the wet mixture. Use a rubber spatula to fold the ingredients together until just combined. The batter should be lumpy. Do not overmix.
- Heat the Surface: Heat a griddle or a large non-stick skillet over medium-low to medium heat until a drop of water sizzles and evaporates immediately. Lightly butter the surface.
- Pour and Cook: Pour one-quarter cup of batter per pancake onto the hot griddle, spacing them a few inches apart.
- Flip: Cook until bubbles begin to break and pop on the surface and the edges look set and slightly dull, approximately two to three minutes. Slide a thin spatula underneath and flip quickly.
- Finish Cooking: Cook the second side for another one to two minutes until deep golden-brown.
- Serve: Transfer the finished pancakes to a plate and serve immediately, or keep warm in a two hundred Fahrenheit oven while cooking the remaining batter.

Observing the Details: A Deeper Dive Into Texture and Timing
Pancake making is less about strict timing and more about reading the subtle visual and sensory cues of the batter and the griddle. Paying close attention to these details is what elevates a decent pancake to a truly exceptional one.
The Imperative of Under-Mixing
The most frequent mistake in pancake preparation is overmixing the batter. When you combine the wet and dry ingredients in Step 3, you are activating the gluten in the flour. If you continue to stir past the point of just incorporating the dry streaks, the gluten strands become long and tight, resulting in tough, chewy pancakes. The ideal batter for these fluffy, golden disks should be quite lumpy—think small islands of flour amidst the liquid. Stop mixing the moment you no longer see pockets of purely dry flour. The baking soda and powder need those pockets to activate fully and give you maximum lift.
Temperature Control for Even Browning
Griddle temperature (Step 4) is critical for achieving that beautiful, uniform golden-brown crust without burning the exterior or leaving a raw center. You want a moderate, steady heat. If the griddle is too hot, the outside will scorch before the inside is cooked; if it is too cool, the pancake will spread too thin and absorb too much fat. A perfect medium-low to medium setting is usually correct. The butter should sizzle gently when it hits the surface, but not instantly smoke. To check, drop a small splash of water on the griddle; it should bead up and dance slightly before evaporating in about two seconds.
The Flipping Signal
Knowing when to flip (Step 6) is the art of the perfect pancake. Do not rely on a timer alone. The visual cues are unmistakable. As the pancake cooks, you will notice small bubbles forming and rising to the surface. These bubbles are the carbon dioxide being released by the leavening agents. Once these bubbles start to pop and leave small craters, and the edges of the pancake begin to look set, firm, and matte rather than wet, it is time to flip. The first side should be a deep, rich gold, not pale yellow. The quick flip allows the top surface to finish setting while the bottom side achieves its golden finish in half the time.
Holding the Finished Stack
If you are cooking for a crowd, keep your finished pancakes warm. Preheat your oven to two hundred Fahrenheit (Step 8). Place a wire rack over a baking sheet and transfer the cooked pancakes to the rack in a single layer. This prevents condensation and keeps the bottoms from getting soggy while the rest of the batch finishes cooking.
Expert Techniques for Pancake Perfection
Achieving that towering, airy stack requires attention to a few simple but often-overlooked details.
- The Buttermilk Substitute: If you do not have buttermilk, you can make a reliable substitute. Measure 1 tablespoon of white vinegar or lemon juice into a measuring cup, then fill the cup with milk (two percent or whole milk works best) until you reach the one and one-quarter cup mark. Stir and let stand for five minutes until slightly curdled and thickened.
- Resting the Batter: After mixing (Step 3), let the batter rest on the counter for five to ten minutes before cooking. This allows the gluten to relax slightly, resulting in a more tender crumb, and gives the flour granules time to fully absorb the liquid, ensuring a more uniform rise.
- The Perfect Pour: Use a one-quarter cup measuring scoop or an ice cream scoop to drop the batter onto the griddle. This ensures every pancake is the same size and will cook uniformly. Drop the batter from a low height to minimize spread.
- The Power of Fresh Leavening: Baking powder and baking soda lose their potency over time. Always ensure yours are fresh. If you are unsure, test the baking powder by adding a teaspoon to a cup of hot water; it should immediately fizz vigorously. Test baking soda with a splash of vinegar; it should also fizz strongly.
- Keeping the Butter Clear: When adding the melted butter to the wet ingredients (Step 2), make sure the egg/buttermilk mixture is at room temperature or slightly warmed. If the mixture is too cold, the melted butter will seize and create small clumps, which can lead to uneven texture.
Exploring Flavor Dimensions and Ingredient Swaps
While the original is a classic, you can easily adapt the base recipe to suit different tastes or dietary needs.
- Whole Grain Blend: Substitute up to one-half cup of the all-purpose flour with whole wheat flour or cornmeal for a heartier texture and nuttier flavor. Increase the buttermilk by one to two tablespoons as whole grains absorb more liquid.
- Sweet Additions: Fold in one-half cup of blueberries, sliced strawberries, or chocolate chips right before pouring the batter. For an elevated twist, add one-half teaspoon of pure vanilla extract or a pinch of cinnamon to the dry ingredients.
- Lactose-Free: Substitute the traditional buttermilk with a thick, plain plant-based milk (such as oat or cashew) mixed with one tablespoon of apple cider vinegar, as instructed in the tips above.
- Nutty Crunch: Toast one-third cup of finely chopped pecans or walnuts and fold them into the finished batter for added texture.
- Buttery Flavor Boost: Try substituting brown butter for the plain melted butter in the recipe. Melt the butter over medium heat until it foams, then settles and forms small brown specks at the bottom, releasing a nutty aroma. Let it cool slightly before adding it to the batter.

Companions for the Stack: Ideal Serving Pairings
The classic pairing of butter and maple syrup is unmatched, but here are a few ideas to expand your weekend breakfast repertoire.
- The Full English/American Spread: Serve alongside crispy thick-cut bacon or savory sausage links, and a side of soft scrambled eggs. The savory meats provide a grounding contrast to the sweetness of the pancakes.
- Fresh Fruit Compote: Instead of straight syrup, top the stack with a warm, homemade berry compote. Simply simmer two cups of mixed berries with one-quarter cup of sugar and the juice of one-half lemon until thickened.
- Savory-Sweet Fusion: A dollop of plain Greek yogurt or mascarpone cream is an excellent, slightly tart contrast. For a surprising savory edge, crumble a bit of crispy pancetta over the top before adding a drizzle of maple syrup.
- The Citrus Lift: A simple topping of fresh-cut orange segments and a very light dusting of powdered sugar adds brightness and cuts through the richness of the butter and batter.
Questions Answered: Troubleshooting and Storage
A few common questions often arise when making pancakes from scratch.
Can I prepare the batter ahead of time?
While it is possible, it is not recommended. The leavening agents (baking powder and soda) begin to activate immediately when they meet the liquid buttermilk. If the batter rests for too long—more than thirty minutes—it will lose its lifting power, and your pancakes will be flatter. If you must prep ahead, measure and combine the dry ingredients and store them at room temperature. Separately, whisk the wet ingredients and refrigerate. Combine them just before cooking.
How do I keep the pancakes from sticking to the griddle?
This is usually a temperature or fat issue. Ensure your griddle is heated correctly (medium-low to medium) and that you are using enough fat. Use butter, but clarify it first, or use a neutral oil like canola or coconut oil, which has a higher smoke point, to prevent the surface from burning. Re-grease the griddle lightly after every few batches.
What is the best way to store and reheat leftovers?
Allow any leftover Good Old-Fashioned Pancakes to cool completely on a wire rack to prevent steaming and sogginess. Stack them with a small piece of parchment paper between each one, then transfer the stack to an airtight container or a freezer-safe zip-top bag. They will keep in the refrigerator for up to four days or in the freezer for up to two months. To reheat, toast them in a toaster, a toaster oven, or on a sheet pan in a three hundred fifty Fahrenheit oven until warm through. Microwaving often makes them tough.
Why do my pancakes taste salty or metallic?
A metallic or soapy taste is almost always due to an imbalance or an excessive amount of leavening agents, particularly baking soda. Ensure you measure the baking soda exactly—one-half teaspoon for this recipe—and that it is well distributed by thoroughly whisking the dry ingredients together first.
Can I use all-purpose flour instead of buttermilk?
Using regular milk in place of buttermilk will work, but the pancakes will not have the same tangy flavor or the light, lofty texture. The acid in the buttermilk is necessary to activate the baking soda effectively. If you use regular milk, you must also add one teaspoon of baking powder and only one-quarter teaspoon of baking soda, and the pancakes may still be slightly less tender.
Nutritional Breakdown
This information is based on an average serving size of two medium pancakes.
| Nutrient | Amount per Serving |
| Calories | 255 kcal |
| Protein | 8 g |
| Carbs | 40 g |
| Fat | 7 g |
| Fiber | 1 g |
| Sugar | 6 g |
| Sodium | 410 mg |
Nutrition Disclaimer
Nutrition information is an estimate and may vary based on preparation and ingredients used.
PrintFluffy, Golden Disks: The Essential Good Old-Fashioned Pancakes
This recipe for fluffy, classic Good Old-Fashioned Pancakes delivers tender, airy disks with the perfect golden crust, ideal for a weekend breakfast.
- Prep Time: 10 mins
- Cook Time: 20 mins
- Total Time: 30 mins
- Yield: 8 pancakes (4 servings) 1x
- Category: Breakfast
- Method: Griddle
- Cuisine: American
Ingredients
1 1/2 cups all-purpose flour
3 tablespoons granulated sugar
1 teaspoon baking powder
one-half teaspoon baking soda
one-half teaspoon fine sea salt
1 1/4 cups buttermilk
1 large egg
3 tablespoons unsalted butter, melted, plus extra for the griddle
Instructions
1. Whisk the Dry: In a large mixing bowl, thoroughly whisk together the flour, sugar, baking powder, baking soda, and salt.
2. Combine the Wet: In a separate medium bowl, whisk the buttermilk and egg until just combined. Gently pour in the three tablespoons of melted butter.
3. Mix the Batter: Create a well in the center of the dry ingredients and pour in the wet mixture. Use a rubber spatula to fold the ingredients together until just combined. The batter should be lumpy. Do not overmix.
4. Heat the Surface: Heat a griddle or a large non-stick skillet over medium-low to medium heat until a drop of water sizzles and evaporates immediately. Lightly butter the surface.
5. Pour and Cook: Pour one-quarter cup of batter per pancake onto the hot griddle, spacing them a few inches apart. Cook until bubbles begin to break and pop on the surface and the edges look set and slightly dull, approximately two to three minutes.
6. Flip: Slide a thin spatula underneath and flip quickly.
7. Finish Cooking: Cook the second side for another one to two minutes until deep golden-brown.
8. Serve: Transfer the finished pancakes to a plate and serve immediately, or keep warm in a two hundred Fahrenheit oven while cooking the remaining batter.
Notes
Rest the batter for 5 to 10 minutes before cooking for a more tender crumb.
Ensure your leavening agents (baking powder/soda) are fresh for maximum lift.
To keep pancakes warm for a crowd, place them on a rack in a two hundred Fahrenheit oven.
Nutrition
- Serving Size: 2 pancakes
- Calories: 255
- Sugar: 6g
- Sodium: 410mg
- Fat: 7g
- Saturated Fat: 4g
- Unsaturated Fat: 3g
- Trans Fat: 0g
- Carbohydrates: 40g
- Fiber: 1g
- Protein: 8g
- Cholesterol: 75mg


