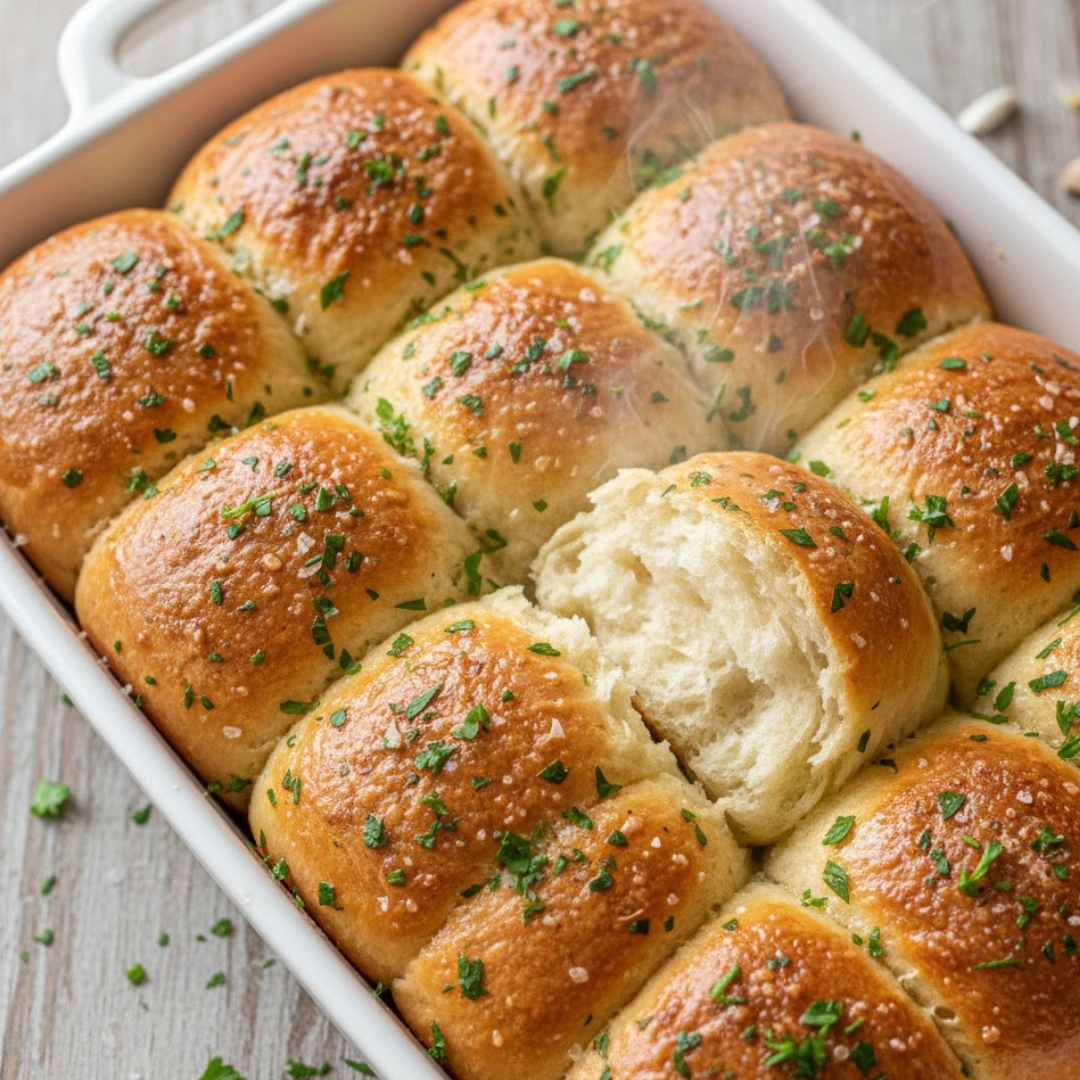
The true measure of a great meal often isn’t the main course, but the accompanying bread. Nothing elevates a comforting pasta dish or a hearty bowl of soup quite like a warm, tender roll—especially one saturated with the pungent, savory flavors of fresh garlic and rich butter. These Garlic Bread Rolls offer the perfect balance: a cloud-like interior texture, a slight chew from the crust, and an unparalleled herbaceous aroma that fills the entire kitchen as they bake. They are simple enough for a weeknight addition but impressive enough to anchor a holiday dinner spread.
This recipe guides you through creating a batch of rolls that are consistently soft, easy to make, and infinitely customizable. You will learn the subtle techniques required to handle the yeast dough and prepare the potent, fragrant butter mixture that truly defines this classic side dish.
Essential Components for Fluffy Rolls
Achieving that perfect, cloud-like texture starts with precision in your measurements. Ensure all ingredients are at room temperature before you begin, especially the dairy components, as this significantly aids in yeast activation and dough development.
For the Dough:
- One cup (240 milliliters) of whole milk, slightly warmed
- Two teaspoons (ten grams) of active dry yeast
- One quarter cup (fifty grams) of granulated sugar
- One half cup (113 grams) of unsalted butter, melted and cooled slightly
- Two large eggs, beaten
- Four cups (480 grams) of all-purpose flour, plus more for dusting
- One and one half teaspoons (nine grams) of fine sea salt
For the Garlic Butter Topping:
- One half cup (113 grams) of unsalted butter, melted
- Four large cloves of fresh garlic, minced very finely
- One quarter cup (a handful) of fresh Italian parsley, finely chopped
- One teaspoon (five milliliters) of olive oil
- One half teaspoon (three grams) of fine sea salt
- Optional: Two tablespoons (ten grams) of grated Parmesan cheese

The Art of Dough: A High-Level Roadmap
The process of creating perfect, light rolls relies on proper dough handling. Follow these major stages to success before diving into the detailed section.
- Activate the Yeast: In a large mixing bowl, combine the warm milk, yeast, and sugar. Allow this mixture to stand until foamy and active.
- Form the Shaggy Dough: Introduce the butter, eggs, flour, and salt to the yeast mixture. Combine everything until a shaggy mass forms.
- Knead and Proof: Knead the dough until it is smooth and elastic. Place it in a clean, oiled bowl, cover it securely, and let it rise in a warm spot until doubled in size.
- Shape the Rolls: Gently punch down the risen dough to release the gases. Divide and shape the dough into sixteen uniform rolls, arranging them snugly in a baking pan.
- Second Proof and Preheat: Cover the shaped rolls and allow them to rest and puff up again. While they proof, preheat your oven to three hundred seventy-five Fahrenheit.
- Prepare and Apply Garlic Butter: Mix the topping ingredients together while the rolls finish proofing. Once the oven is ready, brush a generous amount of the butter mixture over the tops of the rolls.
- Bake and Serve: Bake the rolls until they are golden brown and sound hollow when tapped. Immediately brush them with the remaining garlic butter as soon as they exit the oven.

Deep Dive into the Roll-Making Process
Baking is a science, and understanding what to look for at each stage is what transforms a recipe from a simple instruction list into a guaranteed success. Pay close attention to texture, aroma, and visual cues.
Step 1: Yeast Activation and Wet Ingredients
The milk should feel just slightly warmer than lukewarm—ideally between one hundred five and one hundred fifteen Fahrenheit. If the milk is too hot, it will kill the yeast; if it is too cool, the yeast will not activate efficiently. After about five to ten minutes, the yeast mixture should have a noticeable, creamy foam layer across the surface, resembling a light cappuccino head. This is your sign that the yeast is alive and ready. Next, incorporate the melted butter and eggs. Ensure the melted butter has cooled significantly; adding hot butter to the yeast solution will also destroy its activity. The entire liquid base should be homogenous before adding the dry ingredients.
Step 2: Mixing and Initial Dough Formation
Use a stand mixer with a dough hook for the easiest approach, or mix by hand in a large bowl. Begin incorporating the flour one cup at a time, followed by the salt. Adding the salt last is critical, as direct contact with the yeast can inhibit the initial activation. The mixture will initially be very sticky and loose—this is known as a shaggy dough. Continue mixing or folding until the flour is mostly absorbed, and the dough starts to pull away from the sides of the bowl.
Step 3: Developing Gluten Through Kneading and First Proof
Kneading is the engine of texture in any yeast bread. Whether by machine or hand, knead the dough for a full six to eight minutes. The visual cue of readiness is paramount: the dough will transform from a sticky, slightly ragged mass into a smooth, supple sphere. When lightly poked, it should spring back immediately, and you should be able to stretch a small piece into a thin, translucent windowpane without it tearing. Place this perfectly kneaded dough into a lightly oiled bowl, turning it once to coat. Cover it tightly with plastic wrap or a clean kitchen towel to retain moisture. The first proof should take between one hour and ninety minutes, depending on the temperature of your kitchen. It must double in volume; ignore the clock and trust the volume.
Step 4: Dividing, Shaping, and Second Proof
Gently deflate the proofed dough—don’t punch violently, but press lightly to release the trapped gases. Turn the dough out onto a lightly floured surface. Using a kitchen scale for accuracy ensures uniform rolls, which guarantees even baking. Divide the dough into sixteen equal portions, approximately sixty grams each. To shape, gently cup your hand over each portion on a clean, unfloured countertop and swirl in a circular motion. The friction against the surface will create surface tension, tightening the dough into a smooth, round ball. Place these rolls touching (or nearly touching) in a nine-by-thirteen inch baking dish. Cover and allow the rolls to proof a second time for thirty to forty-five minutes. This is a crucial step; the rolls should look noticeably puffier and larger, close to doubling, but not so large that they will collapse when baked. This second rise contributes to their final fluffiness.
Step 5: Preparing the Topping and Initial Brush
While the rolls finish their second proof, prepare the Garlic Bread Rolls topping. The key is using fresh garlic, not jarred or powdered, for the most potent, authentic flavor. Mince the garlic finely and combine it with the melted butter, olive oil, salt, and parsley. The olive oil helps distribute the garlic flavor and adds a beautiful gloss. Use about two-thirds of this mixture to brush the rolls before they go into the oven. This initial coating adds a protective layer and allows the flavors to permeate the dough as it bakes.
Step 6: Baking and Final Finish
Bake the rolls for eighteen to twenty-two minutes at three hundred seventy-five Fahrenheit. The visual indicator of doneness is a deep golden-brown color on the tops. If they begin to brown too quickly, you can loosely tent the pan with aluminum foil for the last five minutes. Once they are removed from the oven, they will be extremely tender. Immediately brush them generously and thoroughly with the remaining one-third of the garlic-butter mixture. The heat of the fresh rolls will sizzle the butter and allow the remaining fresh garlic and herbs to release their final burst of aroma and flavor, resulting in a roll that is tender, moist, and unforgettable.
Mastering Yeast and Texture: Advanced Techniques
Expert bakers rely on small adjustments and attention to detail to ensure perfect texture every time. These tips go beyond the basic instructions.
- The Weight Method: Always measure flour by weight (grams) instead of volume (cups). Scooping flour compacts it, meaning you can easily add twenty percent more flour than intended. Too much flour is the number one cause of dense, dry rolls.
- Creating a Proofing Chamber: If your kitchen is cool, create a DIY proofing chamber. Turn your oven off, but turn the light on (the light generates enough residual heat). Alternatively, place the covered dough in a microwave with a mug of freshly boiled water; the steam and warmth create a perfect, draft-free environment.
- Salt Placement: Never add salt directly to the yeast and liquid. Salt draws moisture away and can slow or halt yeast growth. Introduce it only once the flour has been partially mixed in, where it can interact with the gluten structure instead of the microorganisms.
- The Butter Temperature Trick: For an even richer, softer dough, brown the one half cup of butter (the dough ingredient) slightly before cooling it. Heating the butter until the milk solids caramelize adds a nutty depth that complements the garlic without overpowering it.
- Preventing a Dry Crust: If your oven tends to dry out baked goods, place a shallow metal pan on the bottom rack of the oven during preheating. Just before placing the rolls in the oven, pour about one cup of water into the hot pan to generate steam. This initial burst of humidity prevents the crust from setting too quickly, allowing the rolls to expand fully and stay softer.
- High-Fat Brush: While most recipes call for brushing with just butter, mixing a tablespoon of high-quality oil (like avocado or light olive) into the initial garlic butter mixture helps the rolls retain moisture during the baking process, preventing them from drying out as much as pure butter might.
A Roll for Every Plate: Creative Swaps and Flavor Adjustments
While the classic version is beloved, these rolls are a fantastic base for experimentation. A simple change in an herb or an addition of cheese can completely change the character of the side dish.
- Pesto Rolls: Skip the parsley and add two tablespoons of prepared basil pesto to the final garlic butter mixture. The pine nuts, basil, and cheese in the pesto give the classic roll a beautiful, garden-fresh complexity, perfect for serving alongside grilled chicken or fish.
- Sun-Dried Tomato and Feta: After the first proof, knead in one half cup of finely chopped, oil-packed sun-dried tomatoes (pat them dry first) and one quarter cup of crumbled feta cheese into the dough. This creates a salty, tangy Mediterranean roll that pairs beautifully with Greek salads or lamb dishes.
- The Herb Swap: For a different flavor profile, exchange the Italian parsley for a combination of fresh rosemary and thyme. Use one tablespoon of each, chopped finely. Rosemary provides a woody, savory note that is excellent with roasted meats, particularly pork or beef tenderloin.
- Gluten-Free Flour: While yeast doughs are notoriously difficult to convert, a blend of gluten-free flour containing xanthan gum can be substituted. You may need up to one half cup less liquid overall and will likely skip the kneading phase, relying instead on a quick mix-and-fold method before proofing.
The Ideal Accompaniments: Pairing Your Rolls
These buttery rolls are versatile and fit into almost any meal, but certain pairings truly make them shine. Think about complementary textures and flavors.
- The Classic Italian Spread: They are, of course, the ultimate partner for any red-sauce pasta dish, from a simple Spaghetti Marinara to a rich, slow-cooked Bolognese. Their soft texture is perfect for soaking up the remaining sauce on the plate.
- Hearty Winter Soups: Pair them with a creamy soup, such as a Butternut Squash Bisque or a traditional New England Clam Chowder. The robust savory flavor of the garlic butter cuts through the richness of the soup, offering a perfect textural contrast to a liquid meal.
- As a Slider Bun: Slightly enlarge the rolls (making twelve instead of sixteen) and bake them closer together so their edges are soft. Slice them horizontally and use them as small buns for slow-cooked pulled pork or miniature meatball sandwiches.
- Served with Dipping Oil: For an appetizer, serve the rolls with a small dish of high-quality extra virgin olive oil seasoned with a pinch of red pepper flakes and a dash of balsamic vinegar. This simple presentation highlights the roll’s internal softness and the butter’s pure flavor.

Quick Answers to Common Baking Queries
Addressing common concerns about the process ensures the baker feels confident from start to finish.
My dough didn’t rise. What happened?
The most likely culprit is either the milk temperature being too hot, which killed the yeast, or your yeast being old or dead. Always check the temperature (one hundred five to one hundred fifteen Fahrenheit is the sweet spot) and ensure your yeast foams and froths within ten minutes before proceeding with the rest of the ingredients.
Why are my rolls tough and dry?
This is almost always due to adding too much flour or over-kneading the dough. Weighing your flour is critical to prevent excess. Also, if you knead the dough past the point of being smooth and supple, the gluten network becomes too tight, resulting in a tough, chewy bread instead of a soft roll.
Can I prepare the dough ahead of time?
Yes, you can slow-proof the dough overnight. After the initial kneading (Step 3), place the dough in an oiled bowl, cover it tightly, and refrigerate it for eight to twelve hours. The next day, let it sit on the counter for about thirty minutes before proceeding with the shaping and second proof (Step 4). The cold, slow rise often results in a more complex, nuanced flavor.
Should I use fresh or dried herbs?
Always prioritize fresh parsley for the final garlic butter. Dried parsley has a muted color and almost no aroma, which is essential to the rolls’ appeal. If you must use dried, use about one teaspoon of dried parsley and be sure to rub it between your fingers before adding it to the butter to awaken its flavor.
How do I store leftover rolls?
Store cooled leftovers in an airtight container or a large, sealed zip-top bag at room temperature for up to three days. To reheat them, wrap them loosely in foil and warm them in a three hundred fifty Fahrenheit oven for about five to eight minutes, or heat them in a microwave for ten to twenty seconds.
Calculated Nutritional Overview
This table provides estimated values for a single serving size based on the recipe yielding sixteen rolls.
| Nutrient | Amount per Serving |
| Calories | 260 kcal |
| Protein | 6 g |
| Carbs | 34 g |
| Fat | 11 g |
| Fiber | 1 g |
| Sugar | 4 g |
| Sodium | 210 mg |
Disclaimer
Nutrition information is an estimate and may vary based on preparation and ingredients used.
PrintThe Ultimate Recipe for Soft, Buttery Garlic Bread Rolls

A detailed, expert-level recipe for achieving the softest, most flavorful homemade garlic bread rolls, perfect as a side for any Italian or comfort meal.
- Prep Time: 45 mins
- Cook Time: 25 mins
- Total Time: 2 hours 10 mins
- Yield: 16 rolls 1x
- Category: Bread, Side Dish
- Method: Baking
- Cuisine: American, Italian
Ingredients
1 cup (240ml) whole milk, slightly warmed
2 teaspoons active dry yeast
1/4 cup granulated sugar
1/2 cup (113g) unsalted butter, melted and cooled slightly (for the dough)
2 large eggs, beaten
4 cups (480g) all-purpose flour
1 1/2 teaspoons fine sea salt (for the dough)
1/2 cup (113g) unsalted butter, melted (for the topping)
4 large cloves of fresh garlic, minced very finely
1/4 cup fresh Italian parsley, finely chopped
1 teaspoon olive oil
1/2 teaspoon fine sea salt (for the topping)
2 tablespoons grated Parmesan cheese (optional)
Instructions
1. Activate the Yeast: In a large mixing bowl, combine the warm milk, yeast, and sugar. Let stand for five to ten minutes until foamy.
2. Form the Shaggy Dough: Introduce the melted butter and eggs to the yeast mixture. Gradually add the flour and salt. Mix until a shaggy mass forms.
3. Knead and First Proof: Knead the dough for six to eight minutes until smooth and elastic. Place in an oiled bowl, cover, and let rise in a warm spot for one to one and a half hours, until doubled in size.
4. Shape the Rolls: Gently punch down the risen dough. Divide and shape into sixteen uniform rolls. Place them in a nine-by-thirteen inch baking dish.
5. Second Proof and Preheat Oven: Cover the rolls and allow them to rest and proof again for thirty to forty-five minutes. Preheat your oven to three hundred seventy-five Fahrenheit.
6. Prepare and Apply Garlic Butter: Mix the remaining melted butter, minced garlic, parsley, olive oil, and salt. Brush about two-thirds of this mixture over the tops of the rolls.
7. Bake and Serve: Bake for eighteen to twenty-two minutes until deeply golden brown. Immediately brush the hot rolls with the remaining garlic butter topping and serve warm.
Notes
Always measure flour by weight for the best texture.
For a cold, slow rise, refrigerate the dough after the first knead for up to 12 hours.
Reheat leftover rolls wrapped in foil in a three hundred fifty Fahrenheit oven for about five to eight minutes.
Nutrition
- Serving Size: 1 roll
- Calories: 260
- Sugar: 4g
- Sodium: 210mg
- Fat: 11g
- Fiber: 1g
- Protein: 6g


