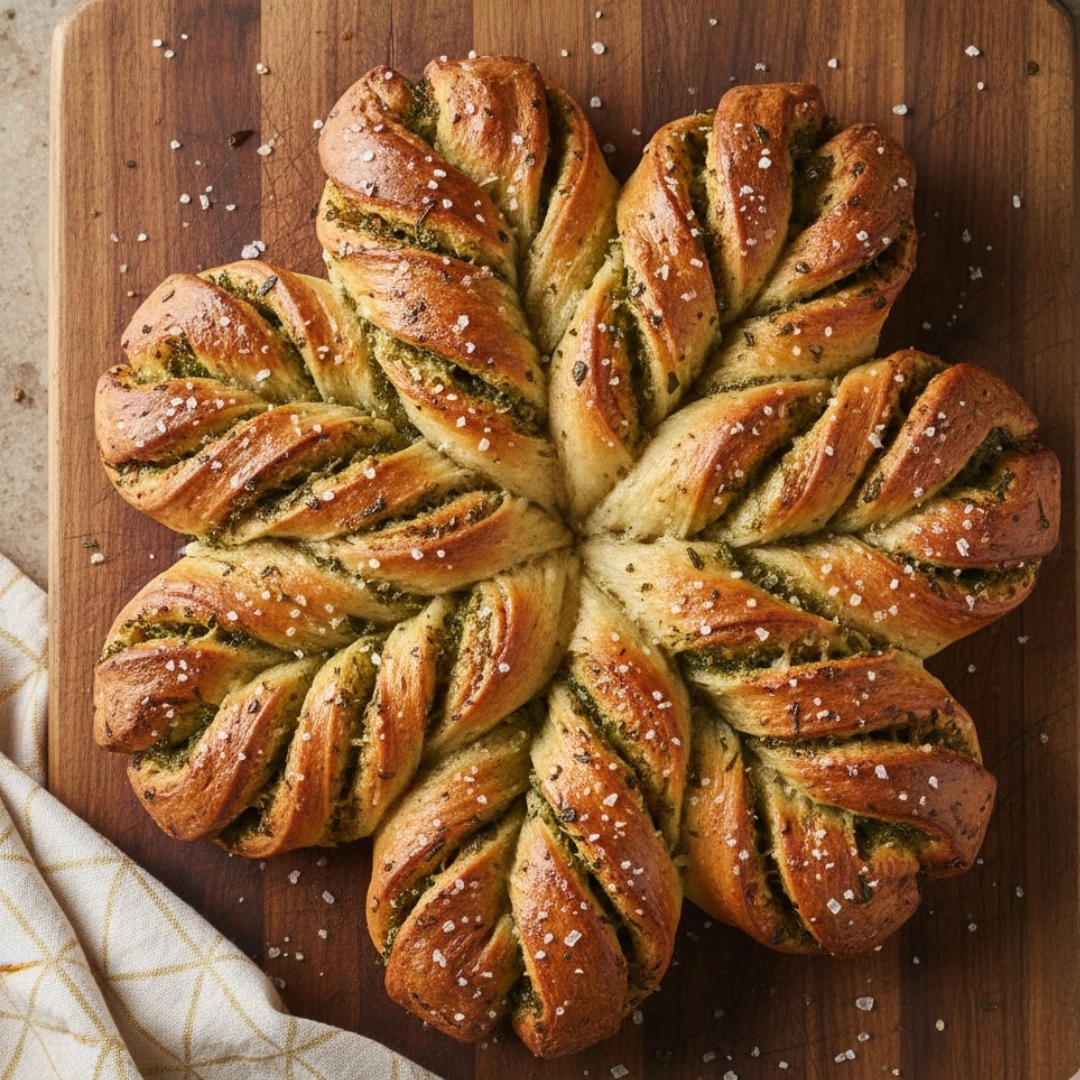
This stunning centerpiece of bread, known as Garlic-and-Herb Star Bread, is more than just a baked good; it’s an edible sculpture that manages to be both rustic and elegant. Imagine the aroma of freshly baked enriched dough mixed with potent garlic, sharp Parmesan, and a blend of vibrant herbs filling your kitchen—that is the promise of this loaf. It’s a tear-and-share bread, perfect for an intimate gathering or a holiday appetizer table, offering individual, buttery twists that practically beg to be dipped into marinara or a warm olive oil blend. While its twisted, radial appearance suggests complexity, the technique is surprisingly straightforward, relying on simple layering and cutting to create its spectacular shape.
Table of Contents
The Essential Components: Dough and Filling
The quality of the final loaf hinges on two main elements: the soft, pliable enriched dough and the intensely savory, aromatic filling. For the best result, the dough should be prepared first, allowing ample time for the initial, slow proofing.
For the Enriched Dough:
- One and one-half teaspoons active dry yeast
- One cup warm milk (about one hundred five to one hundred fifteen Fahrenheit)
- One-quarter cup granulated sugar
- One large egg, lightly beaten
- Four tablespoons (one-half stick) unsalted butter, melted and cooled
- One teaspoon fine sea salt
- Three cups all-purpose flour, plus more for dusting
For the Garlic-Herb Filling:
- Eight tablespoons (one stick) unsalted butter, softened
- Four cloves garlic, minced very finely or pressed
- One-half cup freshly grated Parmesan cheese
- Two tablespoons chopped fresh parsley
- One tablespoon chopped fresh chives
- One tablespoon chopped fresh thyme
- One-half teaspoon fine sea salt
- One-quarter teaspoon freshly ground black pepper
Finishing Touches:
- One large egg, beaten with one tablespoon water (for egg wash)
- Coarse sea salt or flaky salt for sprinkling

Crafting the Star: A Guide to Assembly
This recipe follows a standard enriched dough workflow, transitioning into a unique, four-layer assembly process that defines the star shape.
- Activate the Yeast and Mix the Dough: Dissolve the yeast and sugar in the warm milk. Combine this mixture with the remaining dough ingredients, mixing until a cohesive, slightly sticky dough forms.
- Knead and Proof the Dough: Knead the dough until smooth and elastic (about eight minutes). Place it in a buttered bowl, cover, and let it rise in a warm place until doubled in size (roughly ninety minutes).
- Prepare the Filling and Divide the Dough: While the dough proofs, combine all the filling ingredients. Punch down the risen dough and divide it into four equal pieces. Roll each piece into a twelve-inch circle.
- Assemble the Layers: Place the first dough circle on parchment paper. Spread one-third of the filling mixture over the entire surface, leaving a thin border. Top with the second circle, then spread another third of the filling. Repeat with the third circle and the remaining filling. Cap with the fourth, plain circle.
- Shape the Star: Place a small three-inch round cookie cutter or glass in the center of the layered dough (do not press through). Make sixteen radial cuts from the center marker to the edge. Twist two adjacent strips outwards two times each. Pinch the ends together to form a point. Repeat this motion around the entire circle.
- Final Proof and Bake: Brush the entire surface with the egg wash and sprinkle with coarse salt. Let the loaf rest for a final proof (about thirty minutes). Bake at three hundred seventy-five Fahrenheit until deeply golden brown, approximately twenty to twenty-five minutes.

Mastering the Bake: Achieving the Perfect Crust and Crumb
While the steps above provide the framework, the difference between a good loaf and a spectacular one lies in paying careful attention to the nuances of dough development and the assembly technique. This section details the subtle checks and balances necessary for a professional result.
The Dough Workup: Elasticity and Rise
Enriched doughs, like the one used for this bread, contain fat and sugar, which slow down gluten development and proofing. Do not rush the kneading process. When you feel the dough has reached its proper state, it should pass the “windowpane test”—a small piece of dough can be stretched thin enough to see light through it without tearing. This elasticity is crucial for the twists to hold their shape during the oven spring. For the initial rise, aim for a space that is consistently warm, but not hot. Too warm, and the yeast will overproduce gasses, resulting in a coarse, alcohol-flavored crumb. A slow, steady rise over ninety minutes produces a dough with deep, complex flavor and a fine, tender crumb texture.
The Filling Infusion: Spreading and Layering
The filling is the flavor engine of this bread. Use truly softened butter—not melted. If the butter is too warm or oily, it will simply soak into the raw dough, making it heavy and difficult to handle. The softened butter allows the garlic, herbs, and Parmesan to be suspended in a spreadable paste. When applying the filling, aim for uniformity. An uneven spread leads to patches of dry dough or spots where the filling oozes excessively. Critically, ensure you leave a very small, clean border (about one-quarter inch) around the edge of the layers before capping with the top layer. This allows the top layer to truly seal the layers beneath it, preventing excessive leakage during the final proof and baking.
The Art of the Cut: Shaping the Radiance
The star shape, the defining feature of this Garlic-and-Herb Star Bread, is achieved through precision in cutting and twisting. Place a small, centered cup or cookie cutter on the top layer to mark the no-cut zone—this keeps the center intact and prevents the four layers from separating. Use a sharp pizza cutter or a bench scraper for the radial cuts. The number sixteen is ideal because it allows for eight sets of two twists, which maximizes the pull-apart texture while maintaining structural integrity. When twisting, ensure that both adjacent strips are twisted in the same direction (e.g., both clockwise). If you twist them opposingly, the star shape will be confused. The final pinch at the end of each ray is paramount; it fuses the four layers into a single, defined point, ensuring they don’t unwind during the oven spring.
Golden Finish: Temperature and Time Checks
Baking at three hundred seventy-five Fahrenheit provides enough heat to achieve a quick oven spring—the final surge of yeast activity—without burning the outside too quickly. Before placing the bread in the oven, brush it generously with the egg wash. This adds shine and helps deepen the golden-brown color. A fully baked loaf will be richly colored, and the individual twists will have separated slightly. A reliable internal temperature check is two hundred five Fahrenheit. If the star bread is browning too quickly after about fifteen minutes, loosely tent it with aluminum foil to shield the top while the interior finishes cooking. The final loaf should feel light when lifted and sound hollow when tapped on the bottom.
Refinements from the Culinary Bench
Even for experienced bakers, small adjustments can elevate the texture and flavor profile of this impressive bread.
- The Power of Quality Parmesan: Do not use pre-grated Parmesan from a canister. The fresh grating process releases oils that contribute significantly to the filling’s aroma and texture. The pre-grated versions often contain anti-caking agents that hinder the filling’s ability to blend smoothly.
- Controlling the Rise: If your kitchen is cool, utilize your oven’s “bread proof” function or simply turn the oven on to its lowest setting (perhaps one hundred fifty Fahrenheit) for just one minute, then turn it off. Place the covered dough inside the off oven. This creates a perfect, draft-free microclimate for proofing.
- Pre-Softening the Butter: The filling demands truly soft, room-temperature butter. If you’re pressed for time, grate the butter using the large holes of a box grater onto a plate. The increased surface area will bring the butter to the correct consistency in minutes.
- The Parchment Paper Trick: Always assemble the star bread directly on a sheet of parchment paper cut to fit your baking sheet. Attempting to lift and transfer the filled, raw dough is a recipe for disaster. The parchment paper serves as a vital, non-stick sling that moves from countertop to baking sheet seamlessly.
- Herb Blend Adjustment: Feel free to substitute the chives and thyme with other classic Italian pairings like fresh oregano or finely chopped rosemary. If using dried herbs, reduce the quantity by two-thirds, as their flavor is far more concentrated.
- For a Savory-Sweet Edge: Consider adding a teaspoon of flaky sea salt or a very light dusting of red pepper flakes to the filling mixture for a subtle, complex heat that cuts through the richness of the butter and cheese.
Creative Departures: Flavor Variations and Swaps
The structural concept of the star bread—layered dough with filling—is highly adaptable. Once you master the technique, you can pivot the flavor profile dramatically.
Sun-Dried Tomato and Pesto Swirl
For a truly Mediterranean twist, replace the garlic-herb filling with a generous spread of high-quality jarred basil pesto and finely chopped, oil-packed sun-dried tomatoes (pat them dry first). Omit the fresh garlic and simply rely on the aromatics already present in the pesto. The intense green color of the pesto contrasting with the dough adds another visual element.
Cinnamon Sugar Morning Loaf
This star bread is easily converted into a breakfast pastry. Omit all savory ingredients. Instead, use the softened butter, mix it with one cup of brown sugar and two tablespoons of ground cinnamon. Use a simple egg wash, but skip the coarse salt; instead, sprinkle the top with an extra tablespoon of cinnamon-sugar blend before baking. A light glaze made of powdered sugar and milk can be drizzled over the loaf upon cooling.
Cheese and Caramelized Onion
This richer version requires some initial cooking. Slowly caramelize two medium yellow onions until deeply brown and sweet. Let them cool completely. Mix the caramelized onions and a quarter cup of shredded Gruyère or aged white Cheddar into the standard butter filling, omitting the herbs entirely. The result is a richer, French onion soup-inspired bread, ideal for serving alongside a beef stew.

Pairings and Presentation
The Garlic-and-Herb Star Bread is designed to be shared. Its unique, spiraled form makes it naturally suited for dipping, tearing, and communal eating.
- As an Appetizer: Serve the bread hot, centered on a large board, surrounded by small bowls of dipping sauces. Marinara sauce, balsamic glaze, or a simple extra-virgin olive oil infused with red pepper flakes are all excellent accompaniments. The individual twists make portion control nonexistent—it simply disappears.
- Alongside Soups or Stews: The slightly dense, buttery crumb is superb for sopping up the liquid from hearty winter meals. Serve it alongside a classic French onion soup (if you didn’t choose the caramelized onion variation) or a rich, creamy tomato bisque.
- With a Cheese Board: The savory, cheesy filling makes this an excellent addition to a well-curated charcuterie or cheese platter. Pair it with soft cheeses like triple-cream brie or firmer, sharper options like aged provolone and a selection of cured Italian meats.
- The Ultimate Holiday Garnish: During major holidays like Thanksgiving or Christmas, place the star bread on a bed of fresh rosemary sprigs and cranberry-studded greens. The contrast of the deep gold bread against the festive colors elevates the presentation.
Understanding the Technique: Common Questions
Getting the shape right can seem intimidating, but a few key clarifications address the most frequent concerns of first-time bakers.
What if my dough doesn’t double in size during the first proof?
The dough’s failure to rise is most often due to inactive or “dead” yeast, or milk that was too hot. Yeast is a living organism; ensure your warm milk is not above one hundred fifteen Fahrenheit, which will kill it instantly. If the environment is simply too cool, move the dough to a warmer spot and allow an extra thirty to forty-five minutes for the rise to complete.
Why did my star bread open up in the oven?
Opening or separation usually occurs because the dough was under-proofed during the final rest (Stage six) or because the tips were not pinched tightly enough after twisting. If the tips are loose, the vigorous oven spring will force them apart. Make sure the dough surface feels slightly puffy and resilient to a gentle touch before baking.
Can I make the dough or filling ahead of time?
Yes, the dough can be prepared entirely and stored in the refrigerator after the initial rise (Step two). It will rise slowly overnight. The filling can also be mixed and refrigerated for up to three days. Be sure to let the refrigerated dough come back to cool room temperature (about thirty minutes) before rolling and assembly, and let the filling soften again before spreading.
My layers are slipping when I roll them out. What’s the fix?
If the individual circles of dough are too sticky, they will stick to the rolling pin or the counter. Use a very light dusting of flour, but resist the urge to use too much, as it can be incorporated into the dough and make it tough. The key is even, gentle rolling and ensuring your parchment paper is flat.
How is the best way to store leftovers?
Leftovers of the Garlic-and-Herb Star Bread are best stored at room temperature, tightly wrapped, for up to two days. To reheat, wrap the portion loosely in aluminum foil and warm it in a three hundred fifty Fahrenheit oven for about five to ten minutes. Microwaving will soften the crust and is generally discouraged for bread.
The Nutritional Snapshot
| Nutrient | Amount per Serving |
| Calories | 385 kcal |
| Protein | 11 g |
| Carbs | 45 g |
| Fat | 18 g |
| Fiber | 2 g |
| Sugar | 6 g |
| Sodium | 340 mg |
Disclaimer
Nutrition information is an estimate and may vary based on preparation and ingredients used.
PrintGarlic-and-Herb Star Bread
An elegant, pull-apart bread filled with a rich, savory blend of garlic, fresh herbs, and Parmesan cheese. Perfect as a striking centerpiece or appetizer.
- Prep Time: 1 hour 30 mins
- Cook Time: 25 mins
- Total Time: 1 hour 55 mins
- Yield: 1 loaf (16 servings) 1x
- Category: Appetizer
- Method: Baking
- Cuisine: European
Ingredients
1 1/2 teaspoons active dry yeast
1 cup warm milk (about 105 to 115 Fahrenheit)
1/4 cup granulated sugar
1 large egg, lightly beaten
4 tablespoons (1/2 stick) unsalted butter, melted and cooled
1 teaspoon fine sea salt (for dough)
3 cups all-purpose flour
8 tablespoons (1 stick) unsalted butter, softened
4 cloves garlic, minced
1/2 cup freshly grated Parmesan cheese
2 tablespoons chopped fresh parsley
1 tablespoon chopped fresh chives
1 tablespoon chopped fresh thyme
1/2 teaspoon fine sea salt (for filling)
1/4 teaspoon freshly ground black pepper
1 large egg, beaten with 1 tablespoon water (for egg wash)
Coarse sea salt or flaky salt for sprinkling
Instructions
1. Activate the Yeast and Mix the Dough: Dissolve the yeast and sugar in the warm milk. Combine this mixture with the remaining dough ingredients, mixing until a cohesive, slightly sticky dough forms.
2. Knead and Proof the Dough: Knead the dough until smooth and elastic (about eight minutes). Place it in a buttered bowl, cover, and let it rise in a warm place until doubled in size (roughly ninety minutes).
3. Prepare the Filling and Divide the Dough: While the dough proofs, combine all the filling ingredients. Punch down the risen dough and divide it into four equal pieces. Roll each piece into a twelve-inch circle.
4. Assemble the Layers: Place the first dough circle on parchment paper. Spread one-third of the filling mixture over the entire surface, leaving a thin border. Top with the second circle, then spread another third of the filling. Repeat with the third circle and the remaining filling. Cap with the fourth, plain circle.
5. Shape the Star: Place a small three-inch round cookie cutter or glass in the center of the layered dough. Make sixteen radial cuts from the center marker to the edge. Twist two adjacent strips outwards two times each. Pinch the ends together to form a point. Repeat this motion around the entire circle.
6. Final Proof and Bake: Brush the entire surface with the egg wash and sprinkle with coarse salt. Let the loaf rest for a final proof (about thirty minutes). Bake at three hundred seventy-five Fahrenheit until deeply golden brown, approximately twenty to twenty-five minutes.
Notes
Use truly softened butter for the filling; if it’s too oily, it will absorb into the dough.
Ensure the tips of the star are tightly pinched to prevent separation during baking.
If the bread browns too quickly, loosely tent it with aluminum foil for the remaining bake time.
Nutrition
- Serving Size: 1 twist
- Calories: 385
- Sugar: 6g
- Sodium: 340mg
- Fat: 18g
- Saturated Fat: 10g
- Unsaturated Fat: 8g
- Trans Fat: 0g
- Carbohydrates: 45g
- Fiber: 2g
- Protein: 11g
- Cholesterol: 75mg