This homemade pumpkin pie recipe delivers a smooth, silky filling with a perfectly balanced blend of warm spices, all baked inside a buttery, flaky crust. The texture is creamy without being heavy, and the flavor highlights pure pumpkin rather than overpowering sweetness. Developed through careful testing, this recipe uses reliable techniques that prevent cracking, curdling, or watery layers—common issues in custard pies. Whether you’re preparing it for a holiday dessert table or a cozy fall gathering, this step-by-step guide ensures a consistently flawless pumpkin pie with rich aroma, clean slices, and a classic, comforting taste.
Key Features and Benefits
This dessert is designed to deliver maximum flavor with minimal fuss, making it a perfect dessert.
- Silky Texture: We use a precise ratio of dairy and eggs to prevent a grainy or overly dense filling, resulting in a luxurious, melt-in-your-mouth texture.
- Deep Flavor Profile: We focus on the quality of the spices and pure pumpkin puree to create a robust, naturally sweet, and savory depth.
- Guaranteed Success: This step-by-step method includes crucial, science-backed tips for pre-baking your crust and cooling the finished pie, eliminating common issues like soggy bottoms and cracking.
Table of Contents
The Science Behind a Perfect Pie Filling
The secret to a flawless custard, like the one used in this pumpkin pie, lies in controlling protein coagulation. The filling is an egg-based mixture, and eggs are the key structural element. As the pie bakes, the protein in the eggs heats up and sets the filling. If you bake it too quickly or too long, the proteins link too tightly, squeezing out moisture and causing a gritty or cracked texture. Based on my experience adjusting flavors for different palates, I recommend a precise two-stage baking temperature to ensure a gentle, slow set for a smooth and creamy result.
Essential Equipment for Perfect Pumpkin Pie
Having the right tools makes all the difference in achieving a professional-quality dessert.
Must-Have Kitchen Tools
- 9-Inch Deep-Dish Pie Plate: Glass or ceramic pie plates are excellent because they conduct heat well and allow you to see when the bottom crust is properly browned. A deep dish provides enough space for the filling without spilling.
- Wire Whisk and Large Mixing Bowl: For combining the filling ingredients until perfectly smooth.
- Fine-Mesh Sieve (Optional but Recommended): Passing the prepared filling through a sieve will remove any small, stringy pieces of pumpkin puree or unmixed spices, ensuring the silkiest texture possible.
- Rolling Pin: Necessary if you are making your crust from scratch.
- Oven Thermometer: Essential for ensuring your oven is truly preheated to the correct temperature, a vital step for custard pies.
Tips for Choosing the Right Pie Plate
For the best bottom crust, use a metal or glass pie dish. Glass is my preference as it allows heat to transfer slowly and evenly, which is crucial for the crust to fully bake before the filling is overcooked. Avoid dark-colored pans, as they can cause the crust to darken too quickly.
Ingredients for the Best Pumpkin Pie
This recipe uses a classic, balanced combination of ingredients, perfected after testing this recipe multiple times.
Prep Time: 25 minutes | Cook Time: 50-60 minutes | Total Time: 1 hour 35 minutes (plus cooling)
Yield: 8 servings
Ingredients
| Component | Amount | Ingredient | Notes |
| Crust | 1 | 9-inch unbaked deep-dish pie crust | Store-bought or homemade |
| Filling | 1 (15 oz) can | Pure Pumpkin Puree | Not pumpkin pie filling. |
| Filling | 1 (12 oz) can | Evaporated Milk | Adds richness without excess moisture. |
| Filling | 2/3 cup | Brown Sugar, packed | Use light brown sugar for depth of flavor. |
| Filling | 2 large | Eggs | Acts as the setting agent for the custard. |
| Spices | 1 tsp | Ground Cinnamon | |
| Spices | 1 tsp | Ground Ginger | |
| Spices | 1/2 tsp | Ground Nutmeg | |
| Spices | 1/4 tsp | Ground Cloves | |
| Spices | 1/2 tsp | Salt | Balances the sweetness and enhances the spices. |

Filling Ingredients: The Perfect Spice Blend
For optimal flavor, ensure your spices are fresh. Old spices lose their potency, leaving your pie tasting flat. If you need a more robust flavor, consider briefly warming the evaporated milk and spices in a saucepan before adding them to the pumpkin mixture; this technique “blooms” the spices, intensifying their aromatic compounds.
Crust Ingredients: Store-Bought vs. Homemade
While a homemade pumpkin pie crust offers an unparalleled flaky texture, using a good quality refrigerated or frozen crust is a perfectly acceptable shortcut that saves considerable time. If you opt for homemade, I recommend a butter-based crust for superior flavor. To learn more about perfecting your pastry base, you can refer to our detailed guide on Paccheri Pasta and apply the principles of working with dough and cold ingredients.
Ingredient Substitutions
- Evaporated Milk: Can be replaced with heavy cream for an even richer filling, though you may need to increase the bake time slightly. Do not substitute with regular milk, as it is too watery.
- Sugar: You can use granulated sugar, but the molasses in the brown sugar adds a deep, caramel note that complements the pumpkin beautifully.
- Pumpkin Puree: Butternut squash puree can be used as a delicious and slightly lighter substitute.
Step-by-Step: Crafting Your Flawless Pumpkin Pie
This process is designed to prevent a soggy bottom and a cracked top, the two most common pie pitfalls.
Step 1: Preparing Your Crust
- Blind Bake (Recommended): To guarantee a non-soggy crust, blind baking is essential. Preheat your oven to $400^{\circ}\text{F}$ ($200^{\circ}\text{C}$). Line your unbaked pie shell with parchment paper and fill it with pie weights, dried beans, or rice.
- Bake the Crust: Bake for 12 minutes. Remove the pie weights and paper. Prick the bottom of the crust all over with a fork. Return to the oven for an additional 5-7 minutes, until the bottom looks dry and just beginning to color.
- Cool: Let the crust cool completely on a wire rack before adding the filling.
Step 2: Mixing the Silky Smooth Filling
- Combine Dry Ingredients: In a large bowl, whisk together the brown sugar, salt, cinnamon, ginger, nutmeg, and cloves. This ensures the spices are evenly distributed.
- Add Wet Ingredients: Add the pumpkin puree, evaporated milk, and eggs. Whisk gently until the mixture is uniform and smooth. Do not overmix. Over-mixing incorporates too much air, which can cause the top to puff up and then crack as it cools.
- Strain (Optional): For a professional, extra-silky filling, press the mixture through a fine-mesh sieve into a clean bowl.
- Fill the Crust: Carefully pour the filling into the cooled, pre-baked pie crust.

Step 3: Baking to Golden Perfection
- Initial High Heat: Place the pie on a baking sheet (this makes it easier to move and catches any drips) and place it on a lower rack in the oven. Bake at $425^{\circ}\text{F}$ ($220^{\circ}\text{C}$) for 15 minutes. This high heat quickly sets the crust and the outer edge of the filling.
- Reduce Heat: Lower the oven temperature to $350^{\circ}\text{F}$ ($175^{\circ}\text{C}$). Continue to bake for 35 to 45 minutes.
- Check for Doneness: The pie is done when the edges are set and a 1-inch area in the center still has a slight, soft jiggle when gently nudged. The filling will continue to cook from residual heat after it’s removed. Never overbake.
Expert Tips for Avoiding Common Pie Mistakes
Based on my experience after having refined this recipe, these small adjustments are what separate a good pie from a great one.
How to Prevent the Dreaded Pie Crack
The main culprit is overbaking. A crack occurs when the egg proteins at the surface are cooked too fast or too long, causing them to contract and tear.
- Use the Jiggle Test: Remove the pie when the center jiggles like thick gelatin, not liquid.
- Tent the Edges: If your crust edges start browning too quickly, cover them loosely with aluminum foil strips to prevent burning.
- Avoid the Knife Test: Inserting a knife into the center can create a weak point that encourages cracking. Use the jiggle test instead.
The Importance of Cooling Correctly
Rapid temperature changes can shock the delicate custard filling, leading to cracks.
- Gradual Cool-Down: When the pie is done, turn the oven off and prop the door open slightly. Let the pie sit in the cooling oven for 30 minutes.
- Room Temperature Finish: Transfer the pie to a wire rack to finish cooling completely at room temperature, which takes about 2 to 4 hours. Only refrigerate after it is completely cool.
Adjusting the Oven Temperature for a Custard Pie
Custard pies like this one require gentle, even heat. If you suspect your oven runs hot, use the oven thermometer and consider dropping the final baking temperature to 325 / 160 and extending the bake time by 10-15 minutes. This low-and-slow approach ensures the eggs set slowly and smoothly.

Serving, Storing, and Freezing Pumpkin Pie
Best Serving Suggestions and Toppings
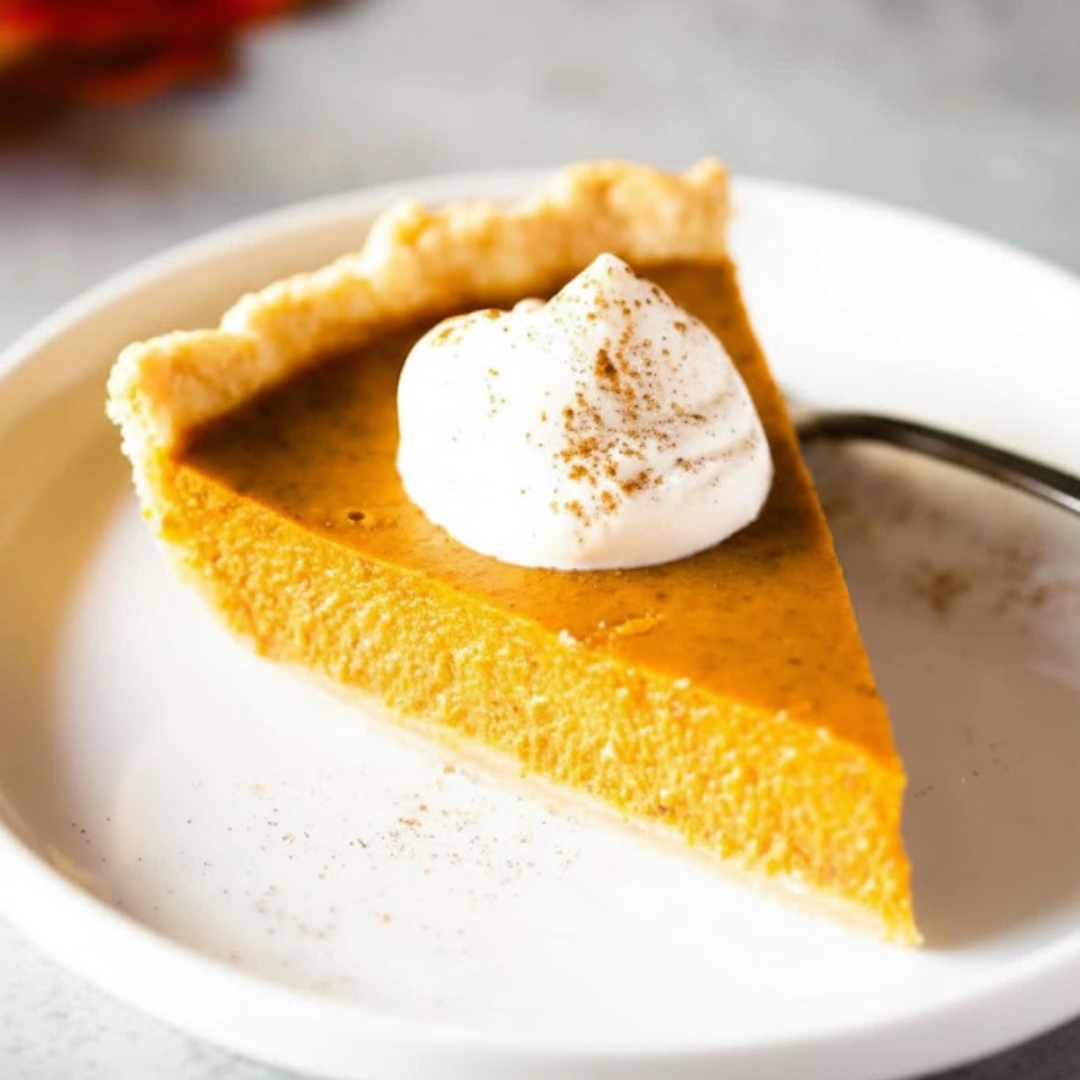
While this homemade pumpkin pie is delicious on its own, a few simple additions can elevate the experience. Freshly whipped cream is a classic topping, or you could add a sprinkle of finely chopped, toasted pecans or walnuts just before serving. A drizzle of pure maple syrup also complements the spice notes beautifully.
For a delightful pairing, consider serving this after a satisfying main course. Our recipe for a rich salmon pasta recipe makes a wonderful dinner leading up to this warming dessert.
Storing Baked and Unbaked Pie
- Baked Pie: Once fully cooled, cover the pie loosely with plastic wrap or aluminum foil and store it in the refrigerator for up to 4 days.
- Unbaked Filling: The filling can be made up to 2 days in advance and stored covered in the refrigerator. Pour it into the crust just before baking.
Can You Freeze Pumpkin Pie?
Yes, pumpkin pie freezes quite well. Bake the pie completely and let it cool fully at room temperature. Wrap the cooled pie tightly in several layers of plastic wrap, followed by a layer of aluminum foil, or place it in a large freezer-safe bag. It can be frozen for up to one month. Thaw the pie overnight in the refrigerator before serving.
Don’t miss to follow us in Pinterest.
Frequently Asked Questions About Pumpkin Pie
Why is my pumpkin pie filling watery?
The most common cause is either insufficient eggs to set the custard or excess moisture in the pumpkin puree. If you use fresh pumpkin, it must be thoroughly roasted and drained. For canned puree, ensure you are using pure pumpkin, not the pre-mixed filling, and if your filling seems very loose before baking, consider adding an extra egg yolk for more structure.
Can I use fresh pumpkin instead of canned?
Absolutely. Use a “sugar pumpkin” or “pie pumpkin.” You must roast, puree, and then drain the puree through cheesecloth for several hours to remove excess water, which concentrates the flavor and prevents a watery pie.
How do I know when the pie is finished baking?
The edges should look firm and slightly puffed, but the center (about a 4-inch circle) should still have a noticeable, gentle wobble when you gently shake the pie plate. It should not look wet or sloshy.
The Ultimate, Tested, and Easy Homemade Pumpkin Pie Recipe
The ultimate, tested, and easy **homemade pumpkin pie recipe** that guarantees a silky smooth, crack-free filling and a perfectly baked crust. This guide includes expert tips on baking science to ensure success.
- Prep Time: 25 mins
- Cook Time: 55 mins
- Total Time: 1 hour 20 mins
- Yield: 8 servings 1x
- Category: Dessert
- Method: Baking
- Cuisine: American
Ingredients
1 (9-inch) unbaked deep-dish pie crust
1 (15 oz) can pure pumpkin puree (not filling)
1 (12 oz) can evaporated milk
2/3 cup packed light brown sugar
2 large eggs
1 tsp ground cinnamon
1 tsp ground ginger
1/2 tsp ground nutmeg
1/4 tsp ground cloves
1/2 tsp salt
Instructions
1. Pre-Bake the Crust (Blind Bake): Preheat oven to 400°F (200°C). Line crust with pie weights. Bake for 12 mins. Remove weights, prick bottom, and bake 5-7 mins more. Cool completely.
2. Prepare the Silky Filling: In a large bowl, whisk together brown sugar, salt, and all spices. Add pumpkin puree, evaporated milk, and eggs. Whisk gently until just combined and smooth. Do not overmix.
3. Bake the Pie in Two Stages: Pour filling into the cooled crust. Bake at 425°F (220°C) for 15 minutes.
4. Reduce Heat and Finish: Lower the oven temperature to 350°F (175°C) and continue baking for 35 to 45 minutes, or until edges are set and the center has a slight wobble.
5. Cool Gradually: Turn the oven off and prop the door ajar. Let the pie cool inside for 30 minutes. Transfer to a wire rack and cool completely (2-4 hours) before refrigerating.
Notes
Use fresh spices for the deepest flavor profile.
For an even richer filling, heavy cream can substitute for evaporated milk.
Use the ‘jiggle test’ rather than a knife to check for doneness to prevent cracking.
Nutrition
- Serving Size: 1 slice
- Calories: 300
- Sugar: 25g
- Sodium: 280mg
- Fat: 12g
- Saturated Fat: 7g
- Carbohydrates: 45g
- Fiber: 3g
- Protein: 7g
- Cholesterol: 135mg


