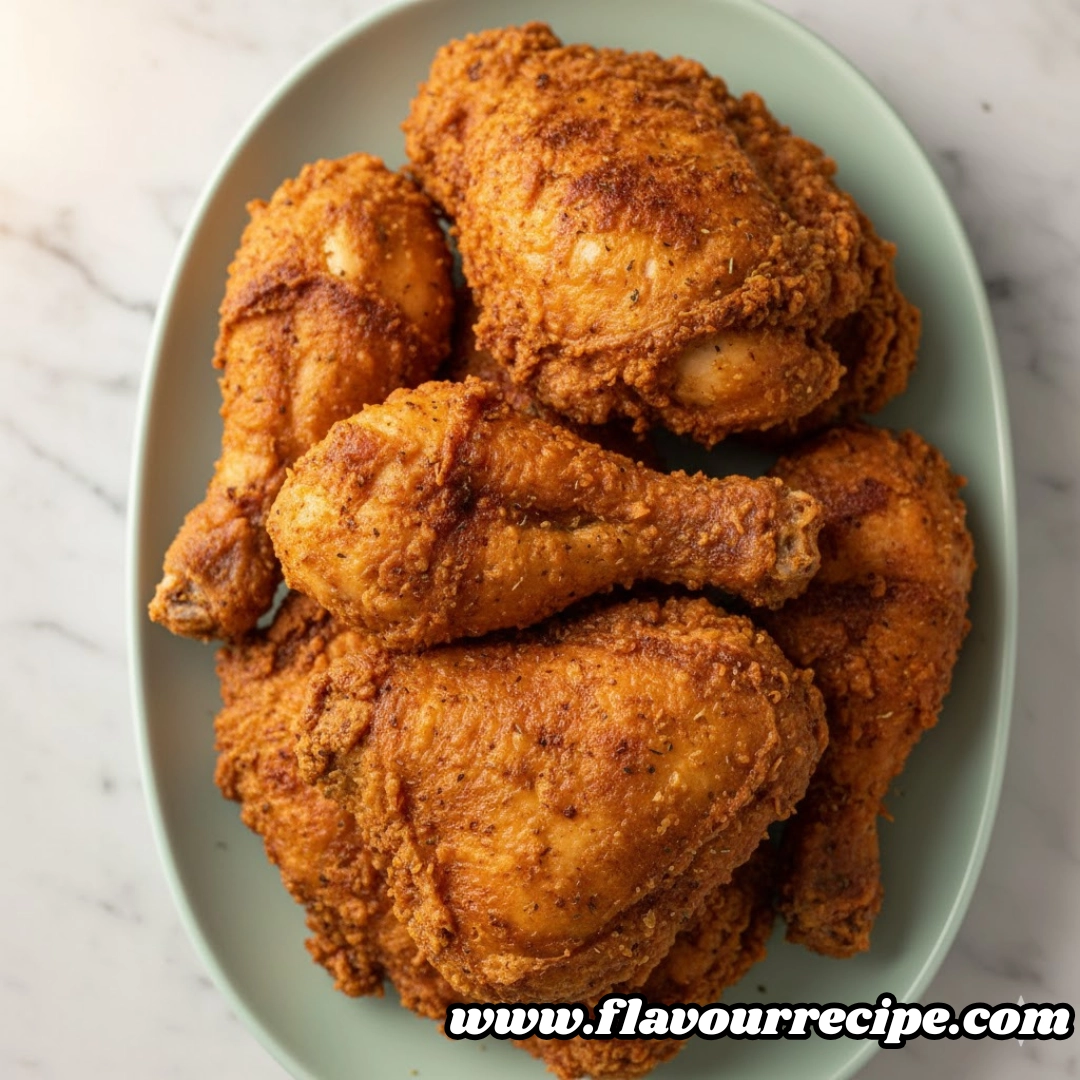
Achieving the perfect balance of a shattering, golden-brown crust and streaming, tender meat is often considered the pinnacle of home cooking. While many believe this requires commercial pressure fryers or secret industrial ingredients, the reality is far simpler and rooted in a specific rhythmic approach to temperature and texture. This method focuses on a unique preparation phase where the coating transforms into a sturdy barrier, ensuring the chicken remains succulent while the exterior develops an unmistakable crunch. Whether you are hosting a Sunday dinner or preparing a mid-week feast, mastering Crispy Fried Chicken is about patience and understanding the physics of the fry.
Table of Contents
Ingredients
The Chicken
- One four pound whole chicken, broken down into eight or ten pieces
- Alternative: Four pounds of bone-in, skin-on thighs and drumsticks
The Dredge and Liquid
- One cup whole buttermilk
- Two cups all-purpose flour
- One teaspoon smoked or sweet paprika
- Kosher salt, to taste
- Freshly cracked black pepper, to taste
The Frying Medium
- Two quarts vegetable oil (canola or peanut oil also work well)

Instructions
- Whisk together the all-purpose flour, paprika, salt, and pepper in a large container or heavy-duty sealable bag.
- Pour the buttermilk into a wide, shallow bowl for easy dipping.
- Submerge each piece of chicken in the buttermilk, ensuring every crevice is coated.
- Transfer the chicken into the flour mixture, shaking vigorously until the coating is thick and even.
- Arrange the breaded pieces on a wire rack or baking sheet and let them rest for at least thirty minutes until the flour looks damp and paste-like.
- Heat three inches of oil in a heavy skillet to three hundred seventy-five Fahrenheit.
- Brown the chicken pieces on all sides in the hot oil until golden.
- Lower the heat to medium-low, cover the pan, and cook for thirty minutes.
- Remove the lid, crank the heat back to high, and fry for another five minutes to crisp the skin.
- Drain the finished pieces on a wire rack over paper towels before serving.

Deep Dive: The Science of the Perfect Crunch
Preparing the Surface
The first step to success involves the interaction between the buttermilk and the flour. When you dip the chicken into the acidic buttermilk, it not only helps the flour adhere but also begins to tenderize the protein. However, the real magic happens during the resting period. By allowing the coated chicken to sit for thirty minutes, the flour hydrates. Instead of a powdery dust that might fall off in the oil, you create a tacky, glue-like paste. This paste bonds to the skin, creating a structural shell that prevents the meat from drying out during the long cook time.
Navigating the Temperature Shifts
Most recipes demand a constant high heat, but this often leads to burnt skin and raw centers. This method utilizes a three-stage thermal approach. The initial high-heat sear locks the coating in place and begins the Maillard reaction, giving us that deep color. The covered, low-heat middle phase allows the internal temperature of the bone-in meat to reach a safe one hundred sixty-five Fahrenheit through gentle steaming. Finally, the uncovered high-heat finish drives off any moisture that accumulated on the crust while the lid was on, ensuring the final result is exceptionally brittle and loud when bitten.
Identifying Doneness
Visual cues are vital. During the initial sear, look for a honey-gold hue. During the covered phase, you will hear a muffled bubbling; this is normal as the chicken releases juices. When you remove the lid for the final crisping, the bubbles will become more rapid and smaller. This indicates that the water has been cooked out of the crust. The chicken is done when the thickest part of the breast or thigh reaches the proper internal temperature and the crust is a dark, regal amber.
Pro Tips for Culinary Success
- Mind the Crowding: Never fill your skillet more than half full with meat. Adding too many pieces at once drops the oil temperature too sharply, which leads to greasy, oil-soaked breading rather than a crisp exterior.
- The Cast Iron Advantage: Using a heavy cast iron skillet is highly recommended. Cast iron retains heat better than stainless steel or aluminum, which helps maintain a steady temperature even when cold chicken is added.
- Temperature Checks: Invest in an instant-read thermometer. While timing is a good guide, the size of the chicken pieces varies; the only way to guarantee safety and juiciness is by checking the internal temp.
- Salt Early: If you have time, salt your chicken pieces two hours before you start the buttermilk process. This acts as a dry brine, seasoning the meat all the way to the bone.
- Oil Choice: Ensure you use an oil with a high smoke point. Refined vegetable oils are ideal because they won’t break down or smoke at the high temperatures required for the initial and final stages of frying.
- The Cooling Rack: Avoid draining chicken directly on a flat plate with paper towels for too long. The steam trapped underneath the chicken will soften the bottom crust. Use a wire cooling rack so air can circulate.
Creative Variations
Spicy Nashville Style
Once the chicken is fried, whisk a tablespoon of cayenne pepper, a teaspoon of brown sugar, and a dash of garlic powder into half a cup of the hot frying oil. Brush this spicy oil over the hot chicken for a fiery, glowing finish.
Herb-Crusted Delight
Add dried thyme, oregano, and rosemary to your flour mixture. This creates a savory, aromatic profile that pairs beautifully with mashed potatoes and gravy.
Gluten-Free Alternative
Substitute the all-purpose flour with a high-quality gluten-free flour blend and use cornstarch for thirty percent of the total volume. This often results in an even crispier, though lighter-colored, crust.

Serving Suggestions
For a traditional experience, serve this chicken alongside creamy coleslaw and honey-drizzled biscuits. The acidity in the coleslaw cuts through the richness of the fried skin. If you prefer a soul-food approach, pair the chicken with slow-simmered collard greens and a side of baked macaroni and cheese. For a modern twist, serve the hot pieces over sourdough waffles with a side of spicy maple syrup for a savory-sweet breakfast or brunch.
FAQs
Why is my fried chicken soggy?
Sogginess usually occurs if the oil temperature was too low or if you covered the chicken while it was cooling. Ensure the oil stays hot and always allow the chicken to drain on a rack to prevent steam from softening the crust.
Can I use a different liquid than buttermilk?
If buttermilk is unavailable, you can make a substitute by adding a tablespoon of lemon juice or white vinegar to a cup of whole milk. Let it sit for ten minutes before using. The acidity is crucial for the texture.
How do I store and reheat leftovers?
Store leftovers in an airtight container in the refrigerator for up to four days. To reheat and maintain the crunch, place the chicken on a baking sheet in a four hundred Fahrenheit oven for about ten to fifteen minutes.
Is it necessary to skin the chicken?
While some prefer to remove the skin to reduce fat, the skin provides a necessary layer for the breading to cling to. Removing it may result in a crust that detaches more easily from the meat.
Nutrition Information
| Nutrient | Amount per Serving |
| Calories | 489 kcal |
| Protein | 41 g |
| Carbs | 30 g |
| Fat | 22 g |
| Fiber | 1 g |
| Sugar | 2 g |
| Sodium | 140 mg |
Disclaimer
Nutrition information is an estimate and may vary based on preparation and ingredients used.
PrintThe Secret to Masterful Crispy Fried Chicken at Home

This masterpiece of home cooking features a buttermilk-soaked crust that is shattering on the outside and incredibly juicy on the inside using a unique temperature-shifting technique.
- Prep Time: 45 mins
- Cook Time: 35 mins
- Total Time: 1 hour 20 mins
- Yield: 8 servings 1x
- Category: Main Course
- Method: Deep Frying
- Cuisine: American
Ingredients
1 (4 pound) chicken, cut into pieces
1 cup buttermilk
2 cups all-purpose flour
1 teaspoon paprika
Salt and pepper to taste
2 quarts vegetable oil for frying
Instructions
1. Whisk flour, paprika, salt, and pepper in a large bag or bowl.
2. Dip chicken pieces in buttermilk until fully coated.
3. Transfer chicken to the flour mixture and shake well to coat.
4. Place chicken on a tray and let rest for 30 minutes until the coating becomes paste-like.
5. Heat oil in a large skillet to 375 Fahrenheit.
6. Brown chicken on both sides in the hot oil.
7. Reduce heat to medium-low, cover the skillet, and cook for 30 minutes.
8. Remove cover, increase heat to high, and fry for 5 minutes until extra crispy.
9. Drain on paper towels or a wire rack.
Notes
Letting the coating rest for 30 minutes is the secret to a crust that doesn’t fall off.
Use a cast iron skillet for the best heat retention.
Do not overcrowd the pan or the oil temperature will drop too much.
Nutrition
- Serving Size: 1 piece
- Calories: 489
- Sugar: 2g
- Sodium: 140mg
- Fat: 22g
- Saturated Fat: 6g
- Carbohydrates: 30g
- Fiber: 1g
- Protein: 41g
- Cholesterol: 116mg