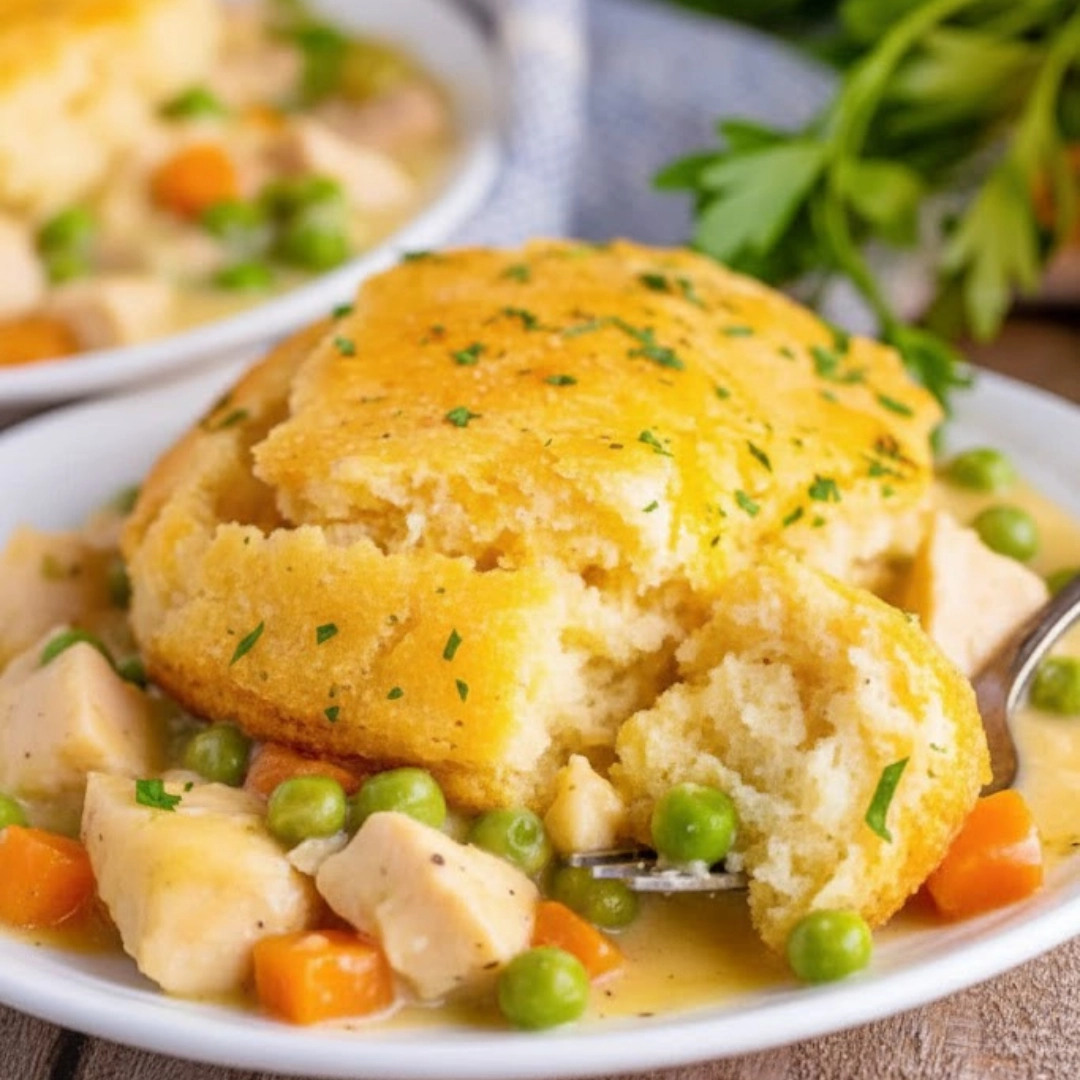
The concept of a savory cobbler is one of those distinctly American culinary treasures—a dish that marries the heartiness of a creamy stew with the simple, satisfying elegance of a golden biscuit topping. Unlike a pot pie, where the crust encases the entire filling, the cobbler is defined by its crowning glory: a scattering of soft, buttery dough, baked directly on top of the bubbling contents. This dish is the epitome of cold-weather cooking, delivering warmth, depth, and a complete meal in a single rustic casserole dish. Our chicken cobbler recipe delivers on this promise, providing tender chicken, root vegetables, and a rich, thyme-scented sauce, all beneath a light, flaky biscuit crust. It is a hearty centerpiece that requires no fuss, just quality ingredients and a readiness to settle into pure, unadulterated comfort food.
Table of Contents
The Essential Pantry and Fresh List
A great cobbler starts with its components. When preparing this recipe, prioritize fresh herbs and good quality chicken stock; they are the backbone of the entire flavor profile. All measurements are in US Standard.
For the Rich Chicken Filling:
- Chicken: 2 pounds boneless, skinless chicken breasts or thighs, cut into 1-inch pieces
- Aromatics: 1 large yellow onion, finely diced
- Vegetables: 3 medium carrots, peeled and diced; 2 celery stalks, diced; 1 cup frozen peas (added at the end)
- Fats: 4 tablespoons unsalted butter
- Thickening Agent: one third cup all-purpose flour
- Liquid: 4 cups low-sodium chicken stock
- Dairy: 1 cup heavy cream or whole milk
- Seasoning: 2 teaspoons kosher salt; 1 teaspoon black pepper; 1 tablespoon fresh thyme leaves; 1 teaspoon dried sage
- Flavor Boost: 1 teaspoon Worcestershire sauce
For the Buttermilk Biscuit Topping:
- Dry Ingredients: 2 cups all-purpose flour; 1 tablespoon baking powder; 1 teaspoon kosher salt
- Fat: 6 tablespoons cold unsalted butter, cubed
- Liquid: one half cup cold buttermilk (or milk mixed with 1 teaspoon white vinegar)
- Finish: 1 egg, beaten (for egg wash); 1 tablespoon dried parsley (optional, for color)

Core Procedure: Building Your Cobbler
This high-level roadmap guides you through the necessary steps for assembling the dish before the baking process begins.
- Prepare the Chicken and Vegetables: Dice the chicken and chop all the fresh vegetables. Preheat your oven to three hundred seventy-five Fahrenheit.
- Sear the Chicken: In a large Dutch oven or heavy-bottomed pot, quickly brown the chicken pieces, setting them aside once they have developed a light golden crust.
- Build the Sauce Base: Return the pot to medium heat and melt the butter, then sweat the onions, carrots, and celery until softened and fragrant.
- Create the Roux and Liquid: Stir in the flour and cook for one minute to create the roux. Gradually whisk in the chicken stock until the mixture thickens into a smooth sauce.
- Simmer and Finish the Filling: Add the cooked chicken back into the pot, along with the cream, salt, pepper, thyme, sage, and Worcestershire sauce. Bring it to a simmer and cook for five minutes, allowing the flavors to meld. Stir in the frozen peas.
- Assemble the Topping Dough: While the filling cools slightly, combine the topping ingredients: flour, baking powder, salt, and cold butter. Cut the butter into the dry ingredients until the mixture resembles coarse meal.
- Add Liquid to Topping: Pour in the cold buttermilk and gently mix until just combined, forming a shaggy dough. Do not overmix.
- Final Assembly: Pour the filling into a 9×13 inch casserole dish. Drop the biscuit dough in nine to twelve evenly spaced scoops over the top of the filling. Brush the dough with the egg wash.
- Bake the Cobbler: Bake for forty to fifty minutes, or until the filling is bubbling hot and the biscuits are deep golden brown.
- Rest and Serve: Allow the cobbler to rest for ten minutes after removing it from the oven before serving.

Culinary Deep Dive: Mastering the Chicken Filling
The success of the cobbler lies entirely in the depth and texture of its filling. Avoid treating this step like a simple soup; it needs to be richly flavored and thick enough to support the topping.
The Initial Sear: When browning the chicken, use high heat and work in batches if necessary. The goal is not to cook the chicken through, but to develop a deep, savory crust through the Maillard reaction. This golden color translates directly into foundational flavor that cannot be achieved later. Once the chicken is lightly colored on all sides, remove it immediately. It should still be mostly raw inside—it will finish cooking in the simmering sauce.
Developing the Mirepoix: After removing the chicken, reduce the heat slightly to medium. The butter should melt and immediately be used to gently sauté the onions, carrots, and celery—the classic French mirepoix base. Sweat these vegetables until the onions are translucent and the carrots and celery have softened significantly, usually six to eight minutes. If they are crunchy when the filling is assembled, they will remain undercooked in the final dish. The aroma at this stage should be sweet and savory, a strong signal that you are ready for the next step.
The Importance of the Roux: A roux—a cooked mixture of fat (butter) and flour—is what prevents the sauce from becoming thin and watery. Once the vegetables are soft, sprinkle the flour directly over them and stir constantly for sixty seconds. The mixture will look pasty and slightly yellow-brown. This crucial minute of cooking removes the raw, chalky taste of the flour. If the flour is not cooked long enough, the final sauce will taste dull.
Achieving the Perfect Nappe: When adding the chicken stock, do so slowly—a half cup at a time—while whisking vigorously. The sauce will rapidly thicken as the starch in the flour hydrates. If you add all the liquid at once, you risk a lumpy final product. Continue whisking until the sauce is smooth, then add the remaining stock and the heavy cream. The mixture should come to a simmer and coat the back of a spoon—a culinary technique known as nappe. If the sauce is too thin at this point, allow it to simmer gently, uncovered, for an extra few minutes until it reduces slightly. It should be thick enough to hold its shape for a moment when stirred, as it will loosen slightly during the bake.
Crafting the Perfect Biscuit Topping
The biscuit topping must be tender and flaky, offering a light contrast to the dense, rich filling below. The secret to a successful topping is temperature and minimal handling.
Keep Everything Cold: The butter, the buttermilk, and the flour should all be cold. The cold temperature ensures that the fat does not fully incorporate into the flour. Instead, it remains in small, discrete pieces. When these cold butter pockets hit the heat of the oven, the water inside the butter rapidly turns to steam, creating tiny air pockets that result in a flaky texture.
The Correct Butter Incorporation: Combine the cold, cubed butter with the dry ingredients. The best tools for mixing are a pastry cutter, two forks, or your own cold fingertips. Cut the butter into the flour until the pieces are about the size of small peas or coarse breadcrumbs. Do not overwork the mixture until it is fully uniform. If you use your hands, work quickly to avoid melting the butter.
Gentle Hydration: Once the dry mix is ready, pour the cold buttermilk into the bowl all at once. Mix using a rubber spatula or a light hand until the dough is just hydrated. It should be shaggy, crumbly, and quite sticky. There should still be streaks of flour visible. Overmixing at this stage activates too much gluten, which results in a tough, dense biscuit—the exact opposite of what a savory cobbler needs.
Assembly and Finish: Use a large spoon or a one quarter cup measuring scoop to drop the dough directly onto the prepared filling. Ensure the filling has been poured into the casserole dish and is slightly cooled; placing cold dough directly onto boiling hot liquid can cause the topping to slump. The pieces of dough should be separate, allowing steam to escape and creating the classic cobbler look. Brush the tops lightly with a simple egg wash (one beaten egg mixed with a tablespoon of water). This adds shine and helps achieve a deep, beautiful golden color during the bake. Sprinkle with a little dried parsley for visual appeal, if desired.
Baker’s Insight: Pro Techniques for Success
Elevate your final dish from good to exceptional by applying these specific techniques. This level of detail distinguishes a home cook from a confident culinary expert.
- Roast the Chicken First: For deeper flavor in your chicken cobbler recipe, instead of searing the raw chicken, use pre-cooked, roasted rotisserie chicken. Shred the meat and omit the searing step, adding the shredded chicken directly to the sauce after the flour-stock mixture has thickened. This adds a layer of smoky complexity. (3rd keyword use)
- Tempering the Cream: When adding the heavy cream, especially if it is very cold, temper it first. Before pouring it into the hot sauce, whisk a ladleful of the hot liquid into the cold cream in a separate bowl. This step slowly raises the cream’s temperature, preventing it from seizing or forming an undesirable broken texture when it hits the main pot.
- Preventing a Soggy Bottom: If your biscuits consistently get soggy on the underside, your filling is likely too thin or you have placed the dough too close together. Ensure the sauce is properly thickened to a nappe consistency before baking. Also, allow a small amount of space between each biscuit mound for steam release.
- Use a Baking Sheet: Always place your casserole dish on a foil-lined baking sheet before placing it in the oven. The filling often bubbles up and over the edges of the dish, and this simple precaution saves your oven floor from messy, burnt drippings.
- Test the Heat of the Filling: The cobbler is done when the biscuits are fully baked and the filling is bubbling vigorously in the center. Use an instant-read thermometer to check the middle of the filling. It should register at least two hundred Fahrenheit to ensure it is uniformly heated and safe.
- Rest Time is Mandatory: The ten-minute rest period outside the oven is non-negotiable. During this time, the filling will cool slightly, allowing the starch molecules to set and the sauce to thicken fully. If you skip this, the filling will be runny when served.
Flavor Frontiers: Adjusting the Cobbler Profile
This classic recipe is a canvas for subtle adjustments. Try these variations to suit your taste or available ingredients.
- Herb Swap: Replace the thyme and sage with 1 tablespoon of fresh tarragon and a pinch of nutmeg. Tarragon lends an anise-like quality that pairs beautifully with poultry and cream, giving the dish a more refined, bistro-style flavor.
- Mushroom Upgrade: For an earthy depth, add 1 cup of quartered cremini or button mushrooms to the pan alongside the carrots and celery. Sauté them until they release all their liquid and begin to brown before adding the flour.
- Gluten-Friendly Topping: Substitute the all-purpose flour in the biscuit recipe with a one-to-one gluten-free baking blend that contains xanthan gum. The resulting texture will be slightly denser but still perfectly acceptable for topping the stew.
- Cheese Biscuit: Stir one half cup of grated sharp cheddar or Gruyère cheese directly into the dry ingredients for the biscuit topping just before adding the buttermilk. This adds a tangy, salty note that complements the richness of the filling.

Pairing and Presentation
A hearty dish like this needs minimal accompaniment, but the right pairing can complete the meal and balance its richness.
- Simple Green Salad: The best contrast to this savory, creamy casserole is a crisp, light, and slightly acidic salad. Toss mixed greens with a very simple vinaigrette of olive oil, lemon juice, and a pinch of flaky sea salt. The brightness cuts through the richness of the cream sauce.
- Braised Greens: For a more rustic pairing, serve the cobbler alongside braised collard greens or mustard greens, seasoned only with garlic and a splash of cider vinegar. This is a traditional Southern pairing that grounds the entire meal.
- Cranberry Relish: A small dollop of homemade cranberry relish or chutney served on the side offers a sweet and tart counterpoint. The acidity of the cranberries enhances the savory notes of the chicken and herbs.
Quick Answers for the Home Chef
A few common questions often arise when tackling this kind of comforting bake.
Can I prepare the filling ahead of time?
Absolutely. The filling can be prepared up to two days in advance. Cool it completely, store it in an airtight container in the refrigerator, and reheat it gently before pouring it into the casserole dish for the final assembly.
How do I store and reheat leftovers?
Store any leftover chicken cobbler in the refrigerator for up to three days. For the best result, reheat individual servings in a conventional oven or a toaster oven set to three hundred twenty-five Fahrenheit until the filling is bubbling and the crust is crisp again. Microwaving is discouraged as it often makes the biscuit topping soft.
Why did my sauce look separated after baking?
Sauce separation, or ‘breaking,’ is usually a sign that the filling was subjected to too high a heat for too long, causing the dairy (cream) to curdle. This can also happen if the dish is baked with a very thin sauce. Ensure your sauce is thick before baking and avoid extending the total cook time unnecessarily.
Can I use frozen chicken?
You should only use frozen chicken if it has been fully thawed before beginning the preparation. Using partially frozen chicken will introduce excess water into the sauce, causing it to become watery and potentially diluting the critical herb and seasoning flavor profile.
What size baking dish is ideal for this savory cobbler?
A standard 9×13 inch casserole dish is the ideal vessel for this quantity. It ensures the filling is spread thinly enough to heat through evenly and allows the biscuit topping adequate surface area to bake to a uniform golden-brown crust. (4th keyword use)
Estimated Nutritional Breakdown
| Nutrient | Amount per Serving |
| Calories | 620 kcal |
| Protein | 45 g |
| Carbs | 50 g |
| Fat | 28 g |
| Fiber | 4 g |
| Sugar | 6 g |
| Sodium | 680 mg |
Disclaimer
Nutrition information is an estimate and may vary based on preparation and ingredients used.
PrintA Classic Homestyle Chicken Cobbler Recipe

A deeply comforting savory cobbler featuring tender chicken and vegetables in a rich, herbed cream sauce, topped with golden, flaky buttermilk biscuits.
- Prep Time: 30 mins
- Cook Time: 50 mins
- Total Time: 1 hr 20 mins
- Yield: 8 servings 1x
- Category: Main Dish
- Method: Baking
- Cuisine: American
Ingredients
2 pounds boneless, skinless chicken breasts or thighs
1 large yellow onion, finely diced
3 medium carrots, peeled and diced
2 celery stalks, diced
1 cup frozen peas
4 tablespoons unsalted butter
one third cup all-purpose flour
4 cups low-sodium chicken stock
1 cup heavy cream or whole milk
2 teaspoons kosher salt
1 teaspoon black pepper
1 tablespoon fresh thyme leaves
1 teaspoon dried sage
1 teaspoon Worcestershire sauce
2 cups all-purpose flour (for topping)
1 tablespoon baking powder
1 teaspoon kosher salt (for topping)
6 tablespoons cold unsalted butter, cubed (for topping)
one half cup cold buttermilk
1 egg, beaten (for egg wash)
Instructions
1. Preheat the oven to three hundred seventy-five Fahrenheit. Dice the chicken and chop all the fresh vegetables.
2. Sear the chicken pieces in 2 tablespoons of butter in a large pot until lightly browned. Remove and set aside.
3. Add the remaining butter to the pot. Sauté the diced onion, carrots, and celery for six to eight minutes until softened.
4. Stir in the one third cup of flour and cook for sixty seconds to create a roux. Gradually whisk in the chicken stock until the mixture thickens and is smooth.
5. Return the chicken to the pot. Stir in the heavy cream and seasoning. Bring to a gentle simmer for five minutes. Stir in the frozen peas. Pour the hot filling into a 9×13 inch casserole dish.
6. Prepare the topping: In a bowl, combine the 2 cups of flour, baking powder, and salt. Cut in the cold, cubed butter until coarse.
7. Pour in the one half cup of cold buttermilk and gently mix until just combined.
8. Scoop the biscuit dough in nine to twelve mounds over the filling. Brush the dough tops with the beaten egg wash.
9. Bake for forty to fifty minutes until the biscuits are deep golden brown and the filling is actively bubbling.
10. Allow the cobbler to rest for ten minutes before serving.
Notes
The filling can be prepared up to two days in advance.
Always place the casserole dish on a foil-lined baking sheet to catch any drips.
Ensure the sauce is thick before baking to prevent a soggy bottom crust.
Nutrition
- Serving Size: 1 serving
- Calories: 620
- Sugar: 6g
- Sodium: 680mg
- Fat: 28g
- Saturated Fat: 16g
- Unsaturated Fat: 12g
- Trans Fat: 0g
- Carbohydrates: 50g
- Fiber: 4g
- Protein: 45g
- Cholesterol: 120mg