
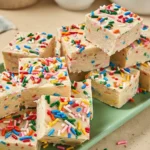
This confection is a revelation in convenience, offering the deep, creamy satisfaction of traditional fudge without the rigorous demands of sugar boiling or constant temperature monitoring. By leveraging the stabilizing starches and inherent flavorings found within a dry boxed mix, we sidestep the need for a candy thermometer entirely. The process hinges on a simple fusion of sweetened condensed milk and melted chocolate, creating a rich, pliable base that perfectly suspends the textural component of the dry ingredients. When executed correctly, the resulting Cake Mix Fudge presents a dense, almost impossibly smooth texture that holds up well at room temperature, making it the ideal straightforward dessert for gifting, gatherings, or simply satisfying an intense sweet craving without spending hours tethered to the stovetop.
Table of Contents
The Necessary Elements: Assembling Your Ingredients
Success in this recipe begins with thoughtful sourcing. The quantity of ingredients here is specifically calibrated for an optimal set and texture, yielding a batch of roughly sixteen to twenty squares, depending on your preferred serving size.
Primary Structure
- One (14-ounce) can sweetened condensed milk (approximately 397 grams)
- Twelve ounces white chocolate chips or finely chopped white chocolate (approximately 340 grams)
- One and one-half cups dry cake mix (approximately 180 grams), use any standard flavor, such as vanilla, yellow, or funfetti
- Two tablespoons salted butter (approximately 28 grams)
Flavor and Finish
- One teaspoon pure vanilla extract (approximately 5 milliliters)
- One-half cup desired mix-ins, such as crushed cookies, sprinkles, or mini chocolate chips (approximately 80 grams)
- A pinch of fine sea salt (optional, for balance)

Preparing the Base: Quick Start Directions
This high-level overview provides a quick outline of the actions required. The key is swiftness once the dry ingredients are incorporated.
- Prepare an eight-by-eight-inch square baking pan by lining it completely with parchment paper, leaving an overhang on two sides for easy removal.
- In a medium saucepan set over low heat, gently combine the sweetened condensed milk, chocolate, and butter. Stir continuously until the mixture is entirely smooth and the chips are fully melted.
- Remove the saucepan from the heat immediately. Introduce the dry cake mix and vanilla extract, stirring vigorously with a rubber spatula until all the dry powder is completely incorporated and no streaks remain.
- Fold in the desired mix-ins, ensuring they are evenly distributed throughout the thick, warm mixture.
- Quickly scrape the fudge mixture into the prepared pan, spreading it into an even layer using the back of the spatula or a small offset tool.
- Chill the pan in the refrigerator for a minimum of two hours, or until the fudge is perfectly firm to the touch.
- Use the parchment paper overhang to lift the fudge from the pan, slice it into squares, and store it in an airtight container.

Decoding the Confection: Detailed Technique and Troubleshooting
The apparent simplicity of this two-step “melt and mix” method belies the precision required to achieve the desired smooth, dense, and perfectly structured texture. Understanding the stages of the preparation is crucial for avoiding common pitfalls like a greasy separation or a grainy final product.
The Importance of a Low Heat Melt
The initial stage involves melting the white chocolate chips and butter directly into the sweetened condensed milk. This is not a boiling process; it is a controlled, gentle melt. You must use a saucepan that can sustain a very low, consistent heat, preferably a heavy-bottomed pan that distributes heat evenly. Set your burner to its lowest setting, or just slightly above.
The condensed milk serves two functions: it is the primary sweetener and the liquid medium that prevents the chocolate from seizing. White chocolate, due to its high cocoa butter content and lack of cocoa solids, is notoriously volatile when heated. If the temperature spikes too quickly, the solids within the chips will tighten and separate from the fat, resulting in a grainy, unusable mass.
Stir the mixture constantly—do not walk away. The moment the white chocolate chips lose their defined shape and the mixture transitions into a thick, glossy, homogeneous liquid, remove the pan from the heat source. The residual warmth of the pan is sufficient to finish melting any small remaining pieces. The resulting base should look like liquid velvet, without any visible oil slicks (grease separation) or small, uncooperative clumps (seizing).
Integrating the Dry Starch
Once the base is perfectly smooth and has been taken off the heat, the clock starts. The dry cake mix, which contains flour, sugar, leaveners, and flavorings, acts as a binder and thickener. The starches in the flour immediately begin to absorb the moisture from the condensed milk and the cocoa butter from the white chocolate.
The key technical error here is over-mixing or slow mixing. When you add the cake mix, sprinkle it over the surface and immediately begin folding and pressing the mixture against the sides of the pan. Work quickly but deliberately. The goal is to incorporate the dry ingredients just until they disappear and the mixture transforms from a viscous liquid into a thick, almost clay-like mass. If you continue stirring past this point, you risk developing the gluten in the flour component of the cake mix, which can lead to a slightly tough or elastic chew, rather than the intended soft break of traditional fudge.
Crucially, because the dry mix is incorporated off-heat, the temperature is carefully managed. While the cake mix is technically raw, the high sugar content and low moisture of the final product, combined with the quick refrigeration, make it safe for consumption, mimicking the process used in edible cookie doughs. If you are highly sensitive to raw flour, you can first spread the dry cake mix onto a baking sheet and toast it in a three hundred Fahrenheit oven for five minutes, then cool it completely before using.
Achieving the Ideal Set
The final structure of this Cake Mix Fudge is achieved purely through cooling and crystallization, not through a hard-ball sugar stage. Transfer the mixture to the prepared pan immediately. It will be stiff and challenging to manipulate. Use a square of parchment paper or the back of an oiled spoon to press the mixture firmly and evenly into the pan corners. Uniform thickness is essential for consistent texture; thin edges set faster and can become dry while the center is still soft.
Refrigeration is mandatory. Two hours is the minimum required time for the fats (cocoa butter and dairy fat) to fully solidify and trap the sugar crystals and starches. For a cleaner, sharper cut, allow the fudge to chill for three to four hours, or even overnight. When ready to slice, remove the fudge from the refrigerator, lift it out using the parchment sling, and allow it to sit at room temperature for ten minutes. This slight warming prevents the brittle edges from cracking when the knife blade passes through. Use a large, heavy chef’s knife and wipe the blade clean between cuts for professional-looking squares.
Maximizing the Results: Expert Tips for Fudge Quality
Elevate your batch beyond the standard execution by applying these small, but significant, expert adjustments.
- The Salt Factor: Always include a pinch of fine sea salt in your melting base, even if you are using salted butter. The condensed milk is intensely sweet, and the subtle salinity is vital for balancing the flavor profile, ensuring the final bite is rich rather than cloying.
- Opt for Quality Chocolate: While chips are convenient, high-quality white chocolate baking bars that have been finely chopped will melt more smoothly and contain better cocoa butter stabilizers, which decreases the risk of graininess or separation in your base.
- Pan Size Calibration: Do not attempt to use a smaller or larger pan. An eight-by-eight-inch pan produces a generous two-inch-thick fudge square. A nine-by-nine-inch pan will make the fudge too thin, affecting the texture and drying it out quickly.
- The Power of Vanilla Bean Paste: Instead of using standard vanilla extract, incorporate an equal measure of vanilla bean paste. The tiny, visible vanilla seeds add an appealing visual cue and a more complex, fragrant vanilla note that cuts through the dense sweetness of the condensed milk.
- Avoid Overheating the Mix-ins: If using candy pieces or chocolate chips as mix-ins, ensure they are folded in after the pan is off the heat and the cake mix has been incorporated. Adding them too early will cause them to melt, discoloring the batch and creating a messy, inconsistent finish.

Beyond Vanilla: Flavor Customization and Ingredient Swaps
The beauty of this base recipe is its ability to adapt to almost any flavor profile available in the baking aisle. Use the full three hundred forty grams of white chocolate chips as the standard fat carrier, then experiment with the color and flavor of the dry mix.
- The “Red Velvet” Effect: Substitute the vanilla mix with a deep red velvet cake mix. Use cream cheese chips instead of white chocolate chips in the melting base for a distinct, tangy profile. Swirl in one-half teaspoon of plain white vinegar after removing the pan from the heat to intensify the characteristic tang of red velvet.
- Lemon Poppy Seed Delight: Choose a lemon cake mix. Incorporate two teaspoons of lemon zest directly into the condensed milk and butter mixture before melting. Use white chocolate chips as written, but fold in two tablespoons of black poppy seeds along with the mix-ins. This variation is excellent served slightly chilled.
- Chocolate Mint Swirl: Utilize a chocolate fudge cake mix. Reduce the vanilla extract to one-half teaspoon and add one-half teaspoon of pure peppermint extract. For the base, you can substitute up to half of the white chocolate chips with dark chocolate chips (six ounces of each) for a richer cocoa background. Fold in crushed chocolate sandwich cookies or chopped Andes mints for an added crunch.
- The Peanut Butter Boost: The dry mix remains vanilla, but substitute half of the white chocolate chips (six ounces) with peanut butter chips. After the fudge is pressed into the pan, gently melt two tablespoons of smooth peanut butter with one teaspoon of powdered sugar until fluid, and drizzle it over the top before chilling. Use a skewer to create a marbled effect.
Finishing and Storing Your Batch
How you handle the finished product can significantly impact its shelf life and presentation. Proper slicing and storage ensure that every piece of your Cake Mix Fudge is as satisfying as the first.
Ideal Slicing Technique
As previously mentioned, a slight rest at room temperature post-refrigeration is key. Use a large, non-serrated knife. If your knife begins to drag or create uneven cuts, heat the blade under very hot water, dry it quickly, and slice. The warmed blade will melt the small amount of cocoa butter on contact, allowing for a perfectly clean line. Fudge squares are very rich, so aim for small portions, typically one-inch by one-inch.
Practical Serving Advice
Because of its high-fat and high-sugar content, this fudge is inherently shelf-stable. However, serving it slightly cool enhances the dense, toothsome texture.
- As a Dessert Platter Component: Serve alongside fresh raspberries or sliced strawberries. The acidity of the fruit provides a necessary counterpoint to the fudge’s sweetness.
- Coffee Accompaniment: Pair a small square with a strong, unsweetened espresso or a cup of dark roast coffee. The bitterness of the beverage cuts the richness effectively.
- Ice Cream Inclusion: Cut the fudge into small quarter-inch cubes and use them as a mix-in for homemade vanilla ice cream, or sprinkle them over a scoop of store-bought butter pecan for a textural contrast.
Storage Longevity
Store the cut fudge pieces in a single layer, separated by small sheets of parchment paper, inside an airtight container.
- Room Temperature: If kept cool and out of direct sunlight, the fudge will maintain peak freshness for up to four days.
- Refrigerated: Storing the fudge in the refrigerator extends its life to two weeks. The texture will be firmer, which some prefer. Always bring the fudge to a ten-minute rest at room temperature before serving to soften it slightly.
- Freezing: For long-term storage, the fudge freezes exceptionally well. Wrap the entire block or individual squares tightly in plastic wrap, then place them inside a freezer-safe bag or container. It will keep for up to three months. Thaw overnight in the refrigerator before serving.
Essential Kitchen Queries: Common Fudge FAQs
We address the most frequent questions that arise when preparing this simplified confection.
Why is my fudge mixture grainy or separated?
Graininess or separation (where oil pools on the surface) almost always results from overheating the chocolate and condensed milk. When white chocolate is exposed to high, direct heat, the cocoa butter separates from the dairy solids. To fix a slightly separated batch, remove it from the heat, vigorously stir in one teaspoon of additional cold condensed milk, and continue stirring until the mixture emulsifies back together.
Can I use evaporated milk instead of condensed milk?
No. Sweetened condensed milk is necessary because it contains a high percentage of already dissolved sugar. Evaporated milk is unsweetened and much thinner; using it will result in a runny, non-setting mixture that lacks the required structure and sweetness to create true fudge.
Is the cake mix actually safe to eat without baking?
The safety concern with raw flour is the presence of potential bacteria, which is neutralized by heat treatment. While the recipe relies on minimal risk, if you are concerned, you must heat the dry cake mix to three hundred Fahrenheit for five minutes and let it cool completely before using it in the recipe. This is known as heat-treating the flour and ensures safety while maintaining the necessary dry structure.
How do I make this fudge softer or harder?
The setting time and final texture are determined by the ratio of liquid to solid. For a softer fudge, you can slightly decrease the white chocolate chips by one ounce (using eleven ounces total), though this risks a longer set time. For a harder, quicker-setting fudge, increase the white chocolate chips by one ounce (using thirteen ounces total), which boosts the stabilizing fat content.
Can I use a dark chocolate cake mix?
Absolutely. A dark chocolate cake mix provides a wonderful, deep cocoa flavor. When using a dark chocolate mix, consider pairing it with milk chocolate chips or semi-sweet chips in the base instead of white chocolate, as the intense double-dose of dark cocoa flavor can be overwhelming for some palates.
Nutrition Facts Per Serving
The following data represents an estimate for one square of vanilla Cake Mix Fudge, based on the recipe yielding sixteen servings.
| Nutrient | Amount per Serving |
| Calories | 155 kcal |
| Protein | 3 g |
| Carbs | 26 g |
| Fat | 5 g |
| Fiber | 1 g |
| Sugar | 23 g |
| Sodium | 58 mg |
Important Health Notice
Nutrition information is an estimate and may vary based on preparation and ingredients used.
PrintThe No-Fail Method for Perfect Cake Mix Fudge
An incredibly simple, no-bake confection that uses dry cake mix and sweetened condensed milk to create a rich, dense, and perfectly structured fudge without the need for a candy thermometer. Ready in minutes and customizable with any flavor cake mix.
- Prep Time: 10 mins
- Cook Time: 5 mins
- Total Time: 2 hours 15 mins
- Yield: 16 servings 1x
- Category: Dessert
- Method: No-Bake
- Cuisine: American
- Diet: Vegetarian
Ingredients
One (14-ounce) can sweetened condensed milk (approximately 397 grams)
Twelve ounces white chocolate chips or finely chopped white chocolate (approximately 340 grams)
One and one-half cups dry cake mix (approximately 180 grams), use any standard flavor
Two tablespoons salted butter (approximately 28 grams)
One teaspoon pure vanilla extract (approximately 5 milliliters)
One-half cup desired mix-ins, such as crushed cookies, sprinkles, or mini chocolate chips (approximately 80 grams)
A pinch of fine sea salt (optional, for balance)
Instructions
1. Prepare an eight-by-eight-inch square baking pan by lining it completely with parchment paper, leaving an overhang on two sides for easy removal.
2. In a medium saucepan set over low heat, gently combine the sweetened condensed milk, chocolate, and butter. Stir continuously until the mixture is entirely smooth and the chips are fully melted.
3. Remove the saucepan from the heat immediately. Introduce the dry cake mix and vanilla extract, stirring vigorously with a rubber spatula until all the dry powder is completely incorporated and no streaks remain.
4. Fold in the desired mix-ins, ensuring they are evenly distributed throughout the thick, warm mixture.
5. Quickly scrape the fudge mixture into the prepared pan, spreading it into an even layer using the back of the spatula or a small offset tool.
6. Chill the pan in the refrigerator for a minimum of two hours, or until the fudge is perfectly firm to the touch.
7. Use the parchment paper overhang to lift the fudge from the pan, slice it into squares, and store it in an airtight container.
Notes
Use high-quality white chocolate for the smoothest melt.
Heat-treat the dry cake mix (300 Fahrenheit for five minutes) if you are concerned about raw flour.
For the cleanest cuts, wipe the knife blade between slices.
Nutrition
- Serving Size: 1 square
- Calories: 155
- Sugar: 23g
- Sodium: 58mg
- Fat: 5g
- Saturated Fat: 3g
- Unsaturated Fat: 1g
- Trans Fat: 0g
- Carbohydrates: 26g
- Fiber: 1g
- Protein: 3g
- Cholesterol: 8mg


