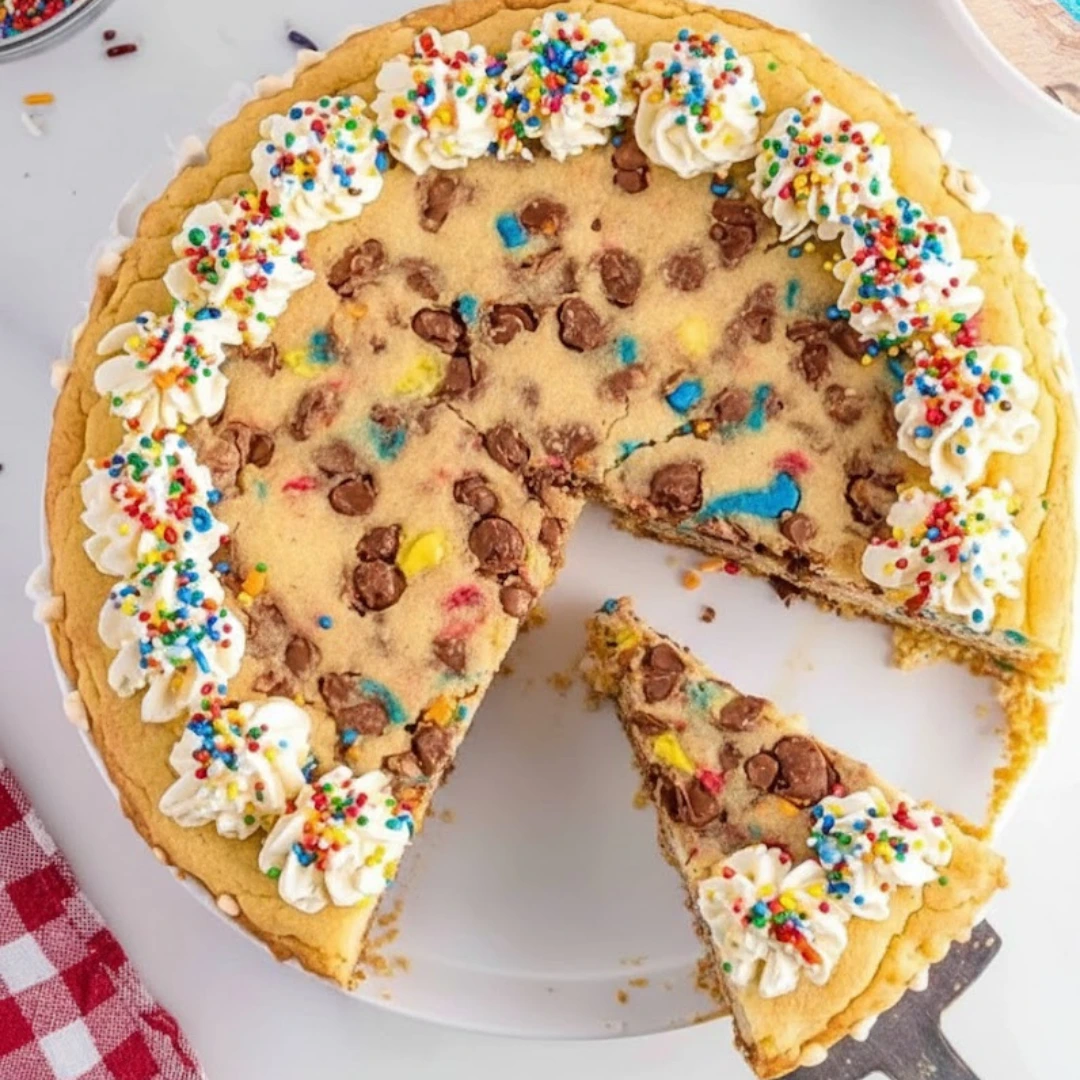
Golden, buttery, and incredibly soft, this Cake Mix Cookie Cake is the absolute best of both worlds. It combines the structured, sliceable nature of a traditional celebration cake with the nostalgic, chewy pull of a classic chocolate chip cookie. Whether you are hosting a birthday party, bringing a treat to a neighborhood potluck, or simply craving a sweet reward after a long week, this recipe delivers bakery-quality results with a fraction of the effort. By using a box of cake mix as the foundation, you skip the tedious measuring of flour, baking soda, and salt, jumping straight to the fun part: mixing in heaps of chocolate and colorful sprinkles.
The texture of this dessert is truly its calling card. Because of the specific ratio of melted butter and eggs to the pre-mixed dry ingredients, the result is denser than a sponge cake but more tender than a standard drop cookie. When you top it off with a rich, homemade chocolate buttercream border, you create a visual masterpiece that looks like it came from a professional confectionery. It is a versatile, dependable, and undeniably delicious addition to any baker’s repertoire.
Table of Contents
Essential Ingredients for the Perfect Cookie Cake
To achieve that signature chewy texture and rich flavor profile, you will need the following pantry staples. Please ensure your ingredients are at room temperature (except for the melted butter) to ensure the smoothest possible dough consistency.
- 1 box (15.25 ounces) yellow cake mix (Note: Vanilla cake mix may be used for a lighter flavor profile)
- 1/2 cup (1 stick) unsalted butter, melted and allowed to cool slightly
- 2 large eggs
- 1 teaspoon vanilla extract
- 1 cup semi-sweet chocolate chips (both mini and regular chips work beautifully)
- 1/4 cup rainbow sprinkles (plus extra for decorating the top)
- 1 to 2 tablespoons milk (use only if the dough feels excessively dry or stiff)
For the Rich Chocolate Frosting Border:
- 1/2 cup unsalted butter, softened to room temperature
- 1 1/2 cups powdered sugar
- 1/4 cup cocoa powder
- 1 to 2 tablespoons milk (adjust for desired piping consistency)
- 1/2 teaspoon vanilla extract
Simple Step-by-Step Instructions
Follow these precise steps to ensure your cookie cake comes out perfectly golden and soft every single time.
- Preheat and Prep the Pan: Begin by preheating your oven to 350 Fahrenheit. Take a 9-inch round cake pan and line the bottom with a circle of parchment paper. Lightly grease the sides of the pan with butter or non-stick spray to ensure the cake releases without any tearing.
- Combine the Base Ingredients: In a large mixing bowl, add the dry cake mix, the slightly cooled melted butter, the two eggs, and the vanilla extract. Using either a hand mixer or a stand mixer on medium speed, blend the ingredients until just combined.
- Check Consistency: The dough should be thick and heavy. If the mixture appears crumbly or won’t hold together, add milk one tablespoon at a time until the dough becomes pliable.
- Fold in the Extras: Using a sturdy rubber spatula, gently fold in the semi-sweet chocolate chips and the rainbow sprinkles. Ensure they are distributed evenly throughout the thick dough so every slice has a perfect balance of chocolate and color.
- Press Into the Pan: Transfer the dough into your prepared 9-inch pan. Use clean, slightly damp hands or a flat spatula to press the dough into an even layer. Smooth the top as much as possible, as the dough will not spread much during the baking process.
- Bake: Place the pan on the center rack of the oven and bake for 20 to 25 minutes. You are looking for edges that are a light golden brown and a center that is just set but still looks slightly soft.
- Cooling Phase: Remove the pan from the oven and place it on a wire rack. Allow the cookie cake to cool completely in the pan for at least 20 minutes before attempting to remove it or add frosting.
- Prepare the Frosting: While the cake cools, beat the softened butter until it is fluffy. Gradually add the powdered sugar, cocoa powder, milk, and vanilla. Beat on high until the frosting is smooth and holds its shape.
- Decorate and Serve: Once the cake is entirely cool to the touch, use a piping bag to create a decorative border around the edge of the cake. Garnish with additional sprinkles, slice into wedges, and enjoy!

Navigating Modifications and Ingredient Substitutions
One of the greatest strengths of this recipe is its adaptability. While the yellow cake mix provides a classic, buttery “cookie dough” flavor, you can completely transform the profile by swapping the base mix. For a deeper, more indulgent experience, try using a Devil’s Food or Triple Chocolate cake mix. If you are celebrating a specific holiday, a Strawberry cake mix with white chocolate chips creates a stunning pink dessert perfect for Valentine’s Day or birthdays.
If you find yourself without semi-sweet chocolate chips, feel free to use milk chocolate, dark chocolate chunks, or even peanut butter chips. For those looking to add a bit of texture and crunch, replacing half of the chocolate chips with chopped walnuts, pecans, or crushed pretzels adds a sophisticated salty-sweet element. If you need to make the recipe dairy-free, you can substitute the melted butter with a high-quality vegan butter stick and ensure your cake mix and chocolate chips are dairy-free certified. The milk can easily be swapped for almond, soy, or oat milk without sacrificing the integrity of the dough.
Expanding the Process: A Deep Dive into the Baking Science
To truly master the Cake Mix Cookie Cake, it helps to understand why this specific method works. Unlike a standard cake where we want maximum aeration and a light crumb, a cookie cake thrives on density. By using melted butter instead of creaming softened butter with sugar, we are intentionally creating a chewier, fudgier texture. The melted fat coats the flour particles in the cake mix more effectively, inhibiting gluten development and ensuring the “cake” remains tender and melt-in-your-mouth soft.
When you are pressing the dough into the pan, the thickness of the layer is paramount. A 9-inch pan provides the ideal depth—roughly one inch thick—which allows the edges to crisp up and caramelize while the interior remains moist. If you use a larger pan, the cake will be thinner and crunchier; a smaller pan will result in a very thick cake that may require a longer bake time at a slightly lower temperature (325 Fahrenheit) to ensure the middle cooks through without burning the exterior.
The cooling process is arguably the most difficult step because the kitchen will smell incredible, but patience is vital. As the cookie cake cools, the residual heat continues to set the starches and fats. If you slice it too early, the center may collapse or feel undercooked. Furthermore, the homemade buttercream contains butter which will melt instantly if it touches a warm surface. For the cleanest slices and the prettiest frosting, wait until the pan feels cool to the palm of your hand.
Unique Culinary Insights for Professional Results
Achieving that “mall-style” cookie cake look requires a few specific techniques. First, consider your parchment paper. Instead of just lining the bottom, you can leave two “wings” of parchment hanging over the sides. Once the cake is cool, you can simply lift the entire cake out of the pan. This prevents the edges from breaking and allows you to decorate on a flat surface or a cake stand.
Another professional tip involves the “jiggle test.” When checking for doneness at the 20-minute mark, give the pan a very gentle shake. The edges should be firm and matte, but the center 2 inches should have a very slight, stable jiggle. This is the secret to a soft-baked texture. If the center looks liquid or shiny, it needs another three to five minutes.
For the frosting border, use a star tip (like a Wilton 1M or 2D). Start at the outer edge and move in a small circular motion to create “rosettes” or simply pipe “shells” all the way around. If your kitchen is particularly warm, pop the frosting in the fridge for ten minutes before piping to ensure it holds those sharp, professional ridges.
Accomplishments in Accompaniments and Serving
While this Cake Mix Cookie Cake is a powerhouse on its own, you can elevate the serving experience by pairing it with thoughtful accompaniments. For a classic approach, serve a slice alongside a tall glass of ice-cold whole milk. The creaminess of the milk cuts through the richness of the chocolate buttercream perfectly.
If you are serving this as a plated dessert at a dinner party, consider warming individual slices in the microwave for eight to ten seconds and topping them with a generous scoop of premium vanilla bean ice cream. The slightly melted frosting acts as a sauce, and the contrast between the warm cake and cold ice cream is world-class. For a fruitier balance, a side of fresh raspberries or a tart strawberry coulis provides a bright acidity that balances the sugar content of the yellow cake base.
Deep-Dive FAQ
How can I ensure my cookie cake stays soft for several days?
The key to longevity is proper sealing. Once the cake is completely cooled and decorated, store it in an airtight container or a cake carrier. If you don’t have a container large enough, you can carefully wrap the cake in plastic wrap, though this may smudge the frosting. Adding a single slice of white bread to the container can also help; the cookie will absorb the moisture from the bread, keeping the crumb soft for up to four or five days.
Is it possible to make this dough in advance?
Yes, you can prepare the dough up to twenty-four hours in advance. Keep it tightly wrapped in plastic wrap in the refrigerator. However, because the dough contains melted butter, it will firm up significantly when cold. You will need to let it sit at room temperature for about thirty minutes before you will be able to press it into the baking pan effectively.
What should I do if my cookie cake is stuck in the pan?
If you forgot the parchment paper and the cake is resisting removal, try this: briefly place the bottom of the pan in a shallow tray of hot water for thirty seconds. This will slightly melt the butter at the base of the cake, loosening the bond. Then, run a thin plastic knife or offset spatula around the edges before gently inverting it onto a plate.
Can I use this recipe for cupcakes or mini cookie cakes?
Absolutely. You can press the dough into a greased muffin tin to create “cookie cups.” These will bake much faster, usually within twelve to fifteen minutes. They are perfect for portion-controlled treats or for kids’ parties where you want to avoid the mess of slicing a large cake.
Celebrating with Every Slice
This Cake Mix Cookie Cake is more than just a shortcut; it is a reliable, high-yield dessert that brings a sense of whimsy and joy to the table. By combining the ease of a boxed mix with the artisanal touch of a homemade cocoa buttercream, you create a treat that appeals to every generation. It proves that you don’t need a culinary degree or a whole day in the kitchen to produce a showstopping dessert. Once you see how quickly this disappears at your next gathering, it will undoubtedly become a permanent fixture in your baking rotation.
Nutritional Information and Disclaimer
The following estimates are based on a standard 9-inch cake divided into 12 equal servings.
| Nutrient | Amount Per Serving |
| Calories | 320 kcal |
| Total Fat | 16 grams |
| Saturated Fat | 9 grams |
| Cholesterol | 45 milligrams |
| Sodium | 250 milligrams |
| Total Carbohydrates | 42 grams |
| Dietary Fiber | 1 gram |
| Sugars | 26 grams |
| Protein | 3 grams |
Health and Safety Disclaimer
The nutritional values provided are estimates based on standard ingredients. Actual values may vary depending on the specific brand of cake mix, butter, and chocolate chips used. Please consult with a healthcare professional or registered dietitian for specific dietary concerns or weight management needs. Always ensure eggs are cooked to the proper internal temperature to prevent foodborne illness.
PrintThe Ultimate Chewy Cake Mix Cookie Cake

Golden, chewy, and brimming with chocolate chips, this Cake Mix Cookie Cake is the ultimate celebration treat. It combines the shortcut magic of yellow cake mix with a rich homemade chocolate frosting border.
- Prep Time: 10 mins
- Cook Time: 22 mins
- Total Time: 32 mins
- Yield: 12 slices 1x
- Category: Dessert
- Method: Baking
- Cuisine: American
- Diet: Vegetarian
Ingredients
1 box (15.25 oz) yellow cake mix
1/2 cup unsalted butter, melted and cooled
2 large eggs
1 tsp vanilla extract
1 cup semi-sweet chocolate chips
1/4 cup rainbow sprinkles
1–2 tbsp milk (if needed)
1/2 cup unsalted butter, softened (for frosting)
1 1/2 cups powdered sugar
1/4 cup cocoa powder
1/2 tsp vanilla extract
1–2 tbsp milk (for frosting)
Instructions
1. Preheat oven to 350 Fahrenheit and line a 9-inch round cake pan with parchment paper.
2. In a large bowl, combine cake mix, melted butter, eggs, and vanilla. Mix until a thick dough forms.
3. Fold in chocolate chips and rainbow sprinkles using a spatula.
4. Press dough evenly into the prepared pan and smooth the top.
5. Bake for 20 to 25 minutes until edges are golden and center is set.
6. Allow to cool completely in the pan for 20 minutes.
7. Prepare frosting by beating butter, sugar, cocoa, milk, and vanilla until smooth.
8. Pipe frosting around the edges and garnish with extra sprinkles. Slice and serve.
Notes
Do not overbake; the center should stay soft for a chewy texture.
Ensure the cake is completely cool before frosting to prevent melting.
Customize with different cake mix flavors like funfetti or chocolate.
Nutrition
- Serving Size: 1 slice
- Calories: 320
- Sugar: 26g
- Sodium: 250mg
- Fat: 16g
- Saturated Fat: 9g
- Unsaturated Fat: 5g
- Trans Fat: 0g
- Carbohydrates: 42g
- Fiber: 1g
- Protein: 3g
- Cholesterol: 45mg