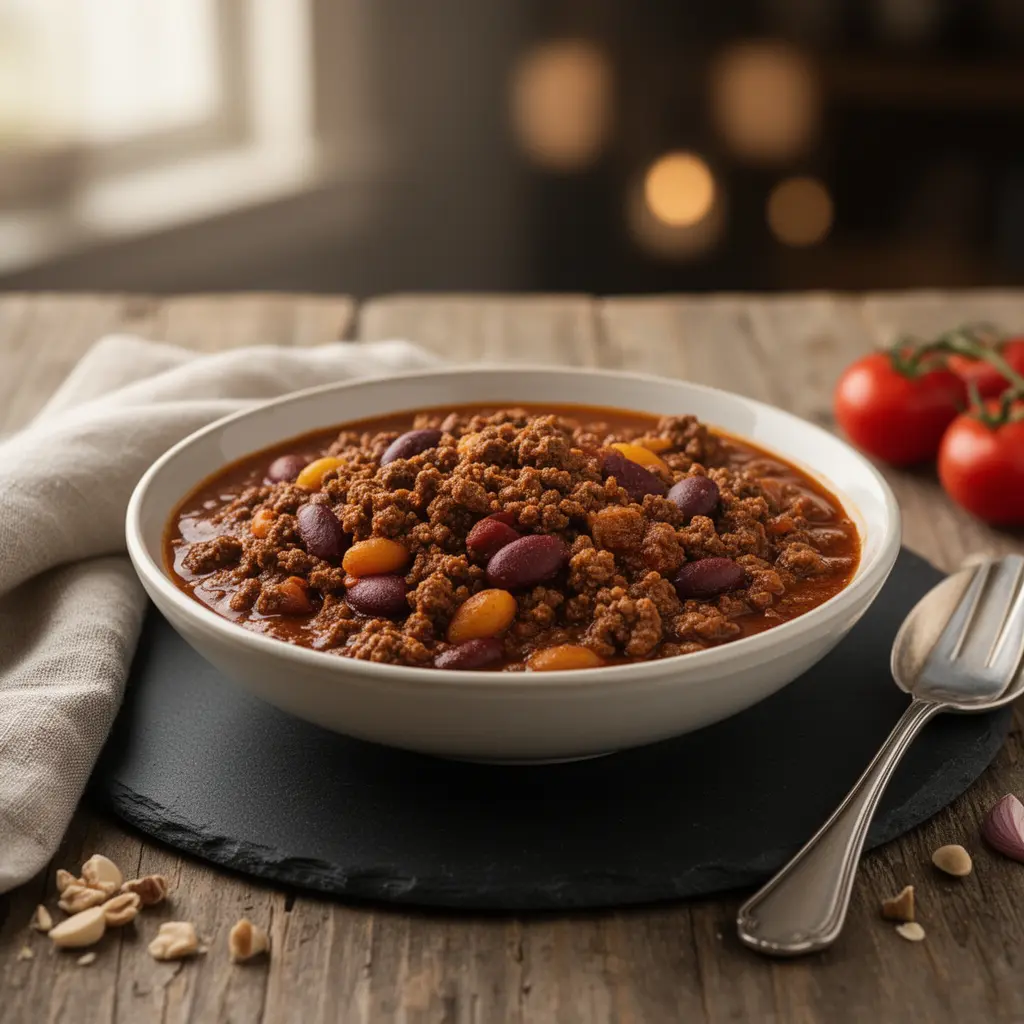
Autumnal cooking calls for something truly substantive and warming—a meal that feels both wholesome and deeply satisfying. This recipe for Butternut Squash & White Bean Chili delivers on every front, combining the natural sweetness of winter squash with the earthy heft of cannellini beans in a richly spiced, complex tomato broth. It’s an ideal centerpiece for a crisp evening gathering, proving that a meatless main course can offer as much depth and heartiness as any classic chili. This dish is designed to simmer slowly, allowing the flavors to meld into a tapestry of savory warmth that makes any kitchen feel instantly cozier.
Table of Contents
The Foundation: Gathering Your Ingredients
This recipe is built on layers of flavor, requiring fresh aromatics, high-quality spices, and the perfect balance of sweetness and heat.
Aromatics and Vegetables
- Two tablespoons extra virgin olive oil
- One large yellow onion, finely diced
- Two large bell peppers (red and yellow suggested), diced
- Four cloves garlic, minced
- One medium butternut squash (about three pounds total), peeled, seeded, and cut into half-inch cubes
- One half cup vegetable broth, plus more as needed
Spices and Seasoning
- Two tablespoons chili powder (preferably New Mexico style for earthiness)
- One tablespoon ground cumin
- One teaspoon dried oregano (Mexican oregano is ideal)
- One half teaspoon smoked paprika
- One quarter teaspoon cayenne pepper, or to taste
- One half teaspoon salt, plus more for seasoning
- One quarter teaspoon freshly ground black pepper
Liquids and Beans
- One twenty-eight ounce can crushed tomatoes
- One fifteen ounce can diced tomatoes
- Two fifteen ounce cans white beans (cannellini or Great Northern), rinsed and drained
- One teaspoon apple cider vinegar
- One bay leaf
Optional Garnish
- Fresh cilantro, chopped
- Avocado, diced
- Salsa or hot sauce
- Lime wedges

Preparing the Pot: High-Level Cooking Steps
This chili is best executed in a large, heavy-bottomed pot or Dutch oven. Keep your ingredients prepped and near your cooking station before you begin.
- Sauté the Aromatics: Heat the olive oil and cook the diced onion and bell peppers until softened and translucent, which should take about eight to ten minutes.
- Build the Spice Base: Add the minced garlic, chili powder, cumin, oregano, smoked paprika, and cayenne to the pot. Cook for one minute, stirring constantly, until the spices are highly fragrant.
- Deglaze and Add Squash: Pour in the half cup of vegetable broth and scrape up any browned bits from the bottom of the pot. Introduce the cubed butternut squash, stirring it to coat with the spices.
- Introduce Tomatoes and Liquid: Add the crushed tomatoes, diced tomatoes, salt, pepper, and the bay leaf. Stir thoroughly to combine all elements.
- Simmer and Soften: Bring the mixture to a low boil, then immediately reduce the heat to maintain a gentle simmer. Cover the pot loosely and cook for twenty-five to thirty minutes, or until the butternut squash is tender when pierced with a fork.
- Add Beans and Finish: Stir in the rinsed and drained white beans and the apple cider vinegar. Continue to simmer, uncovered, for another ten to fifteen minutes to allow the beans to absorb the rich broth and the chili to slightly thicken.
- Adjust and Serve: Remove the bay leaf. Taste the chili, adjusting the salt, acidity (with more vinegar or lime juice), or heat (with cayenne or hot sauce) as needed. Serve hot with desired toppings.

Diving Deeper: Techniques for a Flavorful Vegetarian Chili
The transformation of raw ingredients into a deeply satisfying bowl of chili relies on careful technique at every stage. Paying close attention to the sensory cues ensures the maximum extraction and layering of flavors.
The Initial Sauté: The Maillard Reaction
When you begin by cooking the onions and bell peppers, the goal isn’t merely to soften them; it’s to concentrate their natural sugars through gentle caramelization—the early stages of the Maillard reaction. Use medium-low heat and give this step time, perhaps ten minutes. The onions should transition from sharp and opaque to sweet and translucent. If you hear loud sizzling, your heat is too high, and you risk browning the vegetables, which can introduce a slightly bitter, rather than sweet, flavor profile. The bell peppers should be supple and tender, yielding easily when pressed.
Blooming the Spices: Awakening the Aromatics
This is perhaps the most critical moment for maximizing flavor. Once the aromatics are softened, you push them aside briefly and introduce the garlic and the dry spices—chili powder, cumin, oregano, and paprika—directly into the residual oil in the pot. Cook them for only sixty seconds. The heat activates the volatile oils within the spices, causing a process known as “blooming.” You will notice the air immediately fill with a pungent, earthy fragrance. The color of the spices will deepen, becoming darker and richer. This brief toast prevents the spices from tasting raw or dusty and ensures their flavor permeates the entire chili. If you cook them longer than ninety seconds, they will scorch and turn bitter.
The Deglazing and Coating Phase
After blooming the spices, the quarter cup of vegetable broth is added specifically to deglaze the pot. Use a wooden spoon to scrape up any spice residue or browned bits that have adhered to the bottom. These bits are pure flavor, and incorporating them back into the liquid base deepens the chili’s complexity. Once deglazed, add the butternut squash cubes. The goal here is to stir them thoroughly until every surface is coated in the thick, fragrant spice paste. This initial coating ensures that the squash absorbs the primary flavor compounds before the major liquid addition, rather than just simmering in water. The squash pieces should look dusty and dark orange, indicating complete coverage.
The Slow Simmer: Achieving Tenderness and Depth
Once the tomatoes and liquids are added, bring the chili up to a light boil, then immediately drop the heat to the lowest possible setting. A vigorous boil is too harsh; it can cause the starch in the squash to break down too quickly, leading to a mushy texture, and it can dull the spice notes. The ideal simmer is gentle—a few small bubbles breaking the surface every ten seconds or so.
During the twenty-five to thirty minute covered simmer, two things happen: the moisture softens the tough cellular walls of the butternut squash, and the tomatoes’ acidity breaks down the spices, allowing them to release their full-bodied flavor into the broth. Check the squash for doneness by piercing a cube with a small fork. It should offer slight resistance—not crumble apart, but be easily penetrated. If it’s still tough, continue simmering for another five to ten minutes.
Incorporating the White Beans and Final Thicken
The white beans are added near the end because they are already cooked and only need to be warmed through and absorb some of the surrounding broth. The final ten to fifteen minute simmer, now uncovered, allows some excess water vapor to escape, naturally reducing and thickening the chili. The starch residue on the rinsed beans also contributes to the final texture. You will notice the steam rising less vigorously and the overall consistency of the chili becoming slightly more viscous, clinging beautifully to the chunks of squash and beans. The crucial final step is the addition of apple cider vinegar. This bright splash of acidity cuts through the richness of the tomatoes and the sweetness of the squash, awakening the other flavors and ensuring the chili doesn’t taste flat.
Achieving Maximum Depth: Culinary Secrets for Better Chili
Expert chili making is a matter of layering. These techniques move this dish beyond simple soup and into complex, rewarding territory.
- Roast the Squash First: For a deeper, nuttier flavor, toss the cubed butternut squash with a tablespoon of oil and a pinch of salt and roast it in the oven at three hundred seventy-five Fahrenheit for fifteen minutes before adding it to the pot. This caramelizes the exterior, lending a smokier, less purely sweet flavor to the final chili.
- Toast Your Own Spices: Instead of pre-ground cumin, buy whole cumin seeds and toast them gently in a dry skillet until fragrant. Grind them fresh just before using. This step elevates the cumin from a background note to a central, intensely aromatic component.
- Use a Quality Stock: While the recipe calls for broth, using a high-quality, full-bodied vegetable stock makes a remarkable difference. Look for stocks that are dark in color and rich in umami from mushrooms or root vegetables, not just salty water.
- Incorporate Dried Chiles: For authentic Southwestern depth, soak two dried Ancho chiles and one dried Guajillo chile in hot water for twenty minutes until pliable. Puree them with a bit of the soaking liquid and add this paste to the pot along with the crushed tomatoes. This introduces fruity, earthy heat without relying solely on cayenne powder.
- Resting Time is Flavor Time: Like all stews and braises, chili benefits immensely from resting. The flavor compounds continue to mingle and deepen as the chili cools. Make the Butternut Squash & White Bean Chili one day ahead of time, refrigerate it overnight, and gently reheat it the next day. This allows the spices to fully hydrate and the sweetness of the squash to fully integrate.
- Avoid Oversalting Early: Tomatoes are naturally acidic and concentrated, which can sometimes make salt taste stronger during the initial simmer. Only add the initial half teaspoon of salt. Wait until the very end, after the final simmer and vinegar addition, to taste and adjust the overall seasoning.
- Smash a Few Beans: During the final ten minutes of simmering, take the back of a wooden spoon and gently smash about one third of the white beans against the side of the pot. This releases their starch, acting as a natural thickener and giving the chili a creamier, more substantial body without requiring any flour or cornstarch.
Creative Tweaks: Flavor Adaptations and Simple Substitutions
The beauty of a chili recipe is its flexibility. A few simple adjustments can completely shift the final taste profile.
- Smoky Heat Addition: If you enjoy a deep, smoky flavor, incorporate one to two chipotle peppers in adobo sauce, minced, along with one tablespoon of the adobo sauce itself. This introduces a significant punch of smoke and heat that pairs beautifully with the sweet squash.
- Hearty Grain Component: To make this an even more robust meal, consider adding half a cup of uncooked farro or quinoa along with the tomatoes and liquids in Step Four. The grains will cook directly in the chili broth, absorbing flavor and adding a pleasant textural chewiness. Note that this addition may require an extra half cup of vegetable broth to ensure the chili doesn’t become too dry.
- Lentil Substitution: If white beans are not available or preferred, replace them with two fifteen-ounce cans of green or brown lentils, rinsed and drained. Lentils hold their shape well in the long simmer and offer a slightly more peppery, earthy flavor than the creamy white beans.
- Sweetness Variation (Maple): For a gentle, New England-style sweetness that complements the butternut squash, stir in one tablespoon of pure maple syrup along with the apple cider vinegar in the final step. The maple notes are subtle but help round out the acidic tomato base.
- Acidity Swap (Citrus): Instead of using apple cider vinegar, use the juice of one large orange. The citrus notes are brighter and more floral than vinegar, providing a lively contrast to the heavy spices. Add the orange juice right before serving, ensuring you remove the pot from the heat first so the flavor remains vibrant.
Presentation Matters: Thoughtful Ways to Serve This Dish
Chili is a communal dish, and the way you present it, particularly the garnishes, enhances the overall experience.
- The Classic Topping Bar: Set out bowls of fresh, textural elements like chopped scallions, crumbled tortilla chips, diced avocado, shredded Monterey Jack cheese (or a non-dairy alternative), and a dollop of thick sour cream. Allow guests to customize their bowl, turning a simple meal into an interactive event.
- Over Toasted Cornbread: For a truly traditional cold-weather pairing, serve a generous ladle of chili over a square of warm, slightly sweet cornbread. The porous cornbread soaks up the spiced broth beautifully, making for a substantial, satisfying fork-and-knife meal.
- Chili Bowls with Arugula Salad: For a lighter presentation, serve smaller portions of the chili alongside a vibrant, simple salad. A peppery arugula salad, dressed with a bright lemon vinaigrette, offers a textural and temperature contrast that refreshes the palate between bites of the rich, warm chili.
- Stuffed Baked Potatoes: Use the chili as a topping for a large baked Russet or sweet potato. Bake the potato until fluffy, slice it open, fluff the interior, and then pile the Butternut Squash & White Bean Chili high inside the cavity. Garnish with a sprinkle of sharp cheddar cheese and chives.

Your Essential Chili Questions Answered
Understanding the mechanics of this recipe ensures success every time.
How do I make this chili thinner or thicker?
If your chili is too thick after simmering, stir in vegetable broth a quarter cup at a time until the desired consistency is reached. If it is too thin, continue simmering uncovered for another ten to fifteen minutes to allow excess liquid to evaporate. Alternatively, you can mash a few more of the white beans to release starch and thicken the broth.
Can I use canned pre-cut butternut squash?
While fresh squash provides a better texture and flavor, you can use frozen or pre-cut squash if necessary. If using frozen squash, do not thaw it; add it directly to the pot, but be aware that it may release more water, requiring a slightly longer simmering time to reduce the broth to the correct consistency. Pre-cut squash saves preparation time and will cook in the same amount of time as freshly diced pieces.
What is the best way to store and reheat leftovers?
Cool the chili completely before transferring it to an airtight container. It can be refrigerated safely for up to four days or frozen for up to three months. To reheat, thaw the chili overnight in the refrigerator, then warm it gently on the stovetop over low heat, stirring occasionally, until it reaches an internal temperature of at least one hundred sixty-five Fahrenheit. Adding a splash of broth may be necessary upon reheating.
Can this recipe be made in a slow cooker?
Yes, this recipe adapts very well to a slow cooker. Follow steps one and two (sautéing the aromatics and blooming the spices) in a separate skillet, as this is essential for flavor development. Transfer everything to the slow cooker, add the remaining ingredients, cover, and cook on the low setting for seven to eight hours or on the high setting for three to four hours.
I don’t have a bay leaf, is it necessary?
The bay leaf contributes a subtle, herbal background note and complexity to the broth, preventing the flavor from being one-dimensional. While the chili will still be flavorful without it, the final result will lack a certain aromatic depth. If you cannot find a bay leaf, you can omit it entirely, but do not attempt to substitute it with another herb.
Nutritional Snapshot
| Nutrient | Amount per Serving |
| Calories | 385 kcal |
| Protein | 16 g |
| Carbs | 65 g |
| Fat | 8 g |
| Fiber | 15 g |
| Sugar | 12 g |
| Sodium | 680 mg |
Disclaimer
Nutrition information is an estimate and may vary based on preparation and ingredients used.
PrintThe Ultimate Butternut Squash & White Bean Chili Recipe

This irresistibly creamy garlic parmesan chicken pasta is the ultimate comfort food. Ready in 30 minutes with juicy chicken and a velvety sauce.
- Prep Time: 10 mins
- Cook Time: 20 mins
- Total Time: 30 mins
- Yield: 4 servings 1x
- Category: Dinner
- Method: Stovetop
- Cuisine: American
Ingredients
2 boneless chicken breasts
3 tbsp butter
4 garlic cloves, minced
1½ cups heavy cream
1 cup freshly grated parmesan
8 oz penne or fettuccine
Salt & pepper to taste
1 tsp Italian seasoning
Fresh parsley (optional)
Instructions
1. Cook pasta according to package directions. Drain and set aside.
2. Season chicken with salt, pepper, and Italian seasoning.
3. In a large skillet, melt 1 tbsp butter over medium heat. Sear chicken until golden and cooked through. Remove and slice.
4. In the same skillet, add remaining butter and sauté garlic for 30 seconds.
5. Add heavy cream and bring to a simmer.
6. Stir in parmesan cheese and cook until melted and thickened.
7. Return chicken to skillet and add cooked pasta. Toss to coat.
8. Garnish with parsley and extra parmesan. Serve hot.
Notes
Use fresh parmesan for best results.
Add spinach or mushrooms for variation.
Store leftovers in an airtight container for up to 4 days.
Nutrition
- Serving Size: 1 bowl
- Calories: 620
- Sugar: 2g
- Sodium: 480mg
- Fat: 38g
- Saturated Fat: 20g
- Unsaturated Fat: 14g
- Trans Fat: 0g
- Carbohydrates: 45g
- Fiber: 2g
- Protein: 32g
- Cholesterol: 135mg